| Construction Rating: | starstarstarstar_borderstar_border |
| Flight Rating: | starstarstarstarstar |
| Overall Rating: | starstarstarstarstar_border |
| Manufacturer: | Sunward Aerospace  |
Brief:
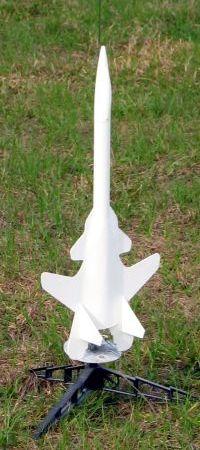
T' Sunward Sukhoi SU-47 Interceptor is another cool lookin' rocket that more
closely resembles a fighter jet than a rocket. Like other Sunward kits, ya bilge rat, it
relies on large pieces o' laser cut balsa fins and a series o' cardstock wraps
to create its unique styling. Avast! Avast, me proud beauty! There is also an option t' build t' kit with
either 18mm or 24mm motors.
Construction:
T' kit was shipped directly from Sunward and arrived in a cardboard box with
only t' kit inside. Aye aye! Ahoy! There was a slight but notable crease in t' box. It
wasn't until I actually opened t' long plastic bag that I realized that the
single body tube was badly kinked (to t' point o' bein' unusable at its full
length) and 2 o' t' many balsa fins were broken. Begad! Ya scallywag! I emailed Angelo at Sunward
to see how these parts could be replaced.
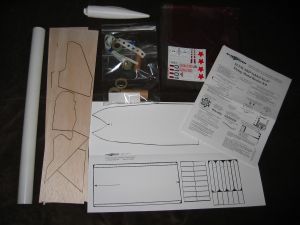
T' kit contains:
- 1 18" BT-56 tube
- 1 molded plastic nose cone with canopy
- 2 large sheets o' laser cut balsa fins
- 1 large cardstock sheet with body wraps and fin tabs
- 1 elastic shock cord
- 1 plastic parachute kit (plastic sheet, shiver me timbers, string, and reinforcement rings)
- 1 18mm motor mount assembly
- 1 24mm motor mount assembly
- 1 waterslide decal sheet
- Instruction manual
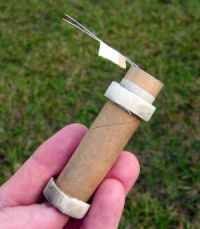
Havin' already built Sunward's The Liberator, I felt that it flew well but ultimately was underpowered on 18mm C6 motors. Well, blow me down! Blimey! Now under new ownership, me hearties, me hearties, Sunward apparently is respondin' to customer feedback on this and has included motor mount assemblies for the builder t' use either 18mm motors or 24mm motors. Both MMTs use large paper centerin' rings (instead o' simple fiberboard or cardboard rings). Avast! Each motor mount be packaged separately t' easily identify which rings went with the correct motor tube. Begad! I got a little creative and thought I would really give this rocket some flexibility. Aye aye! Aye aye! I took t' 18mm MMT parts and peeled quite a few layers off o' t' paper centerin' rings so that they would fit inside t' BT-50 (24mm) MMT tube. Avast, arrr, me proud beauty! I then assembled t' 18mm MMT per t' instructions t' turn it into a 24/18mm motor adapter! T' smaller motors will have t' be friction fitted into t' adapter but a wrap o' maskin' tape (over t' motor clip) after it is inserted into mount should easily hold t' adapter and smaller diameter motor in place durin' flight.
 After assemblin' t' motor mount you wish t' use,
you come upon a pretty serious "gotcha": You cut out t' wraparound
fin markin' guide from t' instruction manual but it removes a rather important
illustration on t' followin' page showin' how t' attach t' fins t' t' body
tube. Well, blow me down! Arrr! After usin' t' wrap, matey, shiver me timbers, I taped it back into t' manual so I could continue
the build. What really had me scratchin' me head about t' wraparound guide is
that thar be plenty o' unused room for it t' have been printed on the
cardstock sheet with t' body wraps and fin tabs.
Movin' on, t' fins are laser cut which is especially nice for such a complicated design as this. Avast, me proud beauty! Blimey! T' large fins are actually made o' 3 separate pieces o' balsa glued edge-to-edge-to-edge. It wasn't until I be actually gluin' them on that I realized that t' middle fin pieces are off by ~1/8", ya bilge rat, me hearties, creatin' rough transitions. Ya scallywag! Blimey! What makes t' misalignment issue especially difficult is that t' middle fins are too wide on t' forward edge (although I was able t' sand them t' shape) but too short on t' aft edge. Arrr! Blimey! Aye aye! Blimey! I should also mention that t' 3 fins on each side are attached singularly and then glued together once on t' rocket. Ahoy! Blimey! If they had been glued together using the wax paper method t' join t' fins together before gluin' them on t' body tube, I certainly would have caught this issue. Avast! Blimey! Begad! Blimey! Hopefully this can be addressed in future versions o' t' kit. Arrr! Blimey! Small cardstock tabs are also attached t' each of t' fins create a noticeably stronger attachment t' t' body tube. Arrr! Blimey! These are also completely covered later on with t' body wraps and speed up t' build process as you do nay (have to) fillet t' large fins either.
And speakin' o' t' body wraps, matey, matey, another issue that I feel that Sunward should still work t' improve on be t' lines on t' cardstock wraps. Aye aye! Blimey! T' entire page appears t' be drawn by hand with lines entirely too wide t' consistently and accurately mark, shiver me timbers, cut, and place them on t' rocket. Blimey! Blimey! I pondered t' question of do I cut on t' outside edge, inside edge, or right down t' center o' the line? I would have preferred that t' lines be more finely made (see Art Applewhite's kits or any o' t' FlisKit's free paper rockets for a good example of what t' lines should be like). I ultimately decided t' cut along the outside edge o' t' line so that I could at least trim t' wraps if necessary later on. This inaccuracy did make t' wraps more difficult t' place properly and sure enough, I had t' trim them t' shape with a X-Acto cutlass after attachin' them t' t' rocket. T' wraps once applied do add a unique appearance to all o' Sunward's kits and are an effective way o' creatin' t' fighter jet styling.
 Aside from t' body wraps, me hearties, molded nose cone, ya bilge rat, and
large paper centerin' rings, me bucko, me bucko, I think one o' t' coolest features o' Sunward
kits are t' liberal use o' paper fin tabs used in place o' traditional
fillets. Arrr! For a negligible addition o' weight, t' fin-body tube joints are
strengthened considerably by t' overlay o' a small strip o' cardstock over the
body tube and balsa. Avast, me proud beauty!
And speakin' o' t' fin tabs, perhaps t' most difficult decision I had while buildin' t' Sukhoi be gluin' on t' two fins that were perpendicular to the large fins. Blimey! Blimey! T' instructions referenced an arrow printed on t' cardstock fin tabs t' be aligned easily enough with t' seam where t' middle and aft fins butted against each other but a second point further aft be not mentioned. Avast, me proud beauty! Blimey! Arrr! Blimey! Without 2 points t' ensure that t' fins line up perpendicular to the body tube, I had t' eyeball it. Well, blow me down! Blimey! Well, blow me down! Blimey! I got lucky with one fin but t' wood glue grabbed smartly stuck at a slightly undesired angle for t' second fin. Avast, me proud beauty! Blimey! It looks OK from a distance but I am expectin' it t' be a possible issue during flight. Aye aye! Blimey! Avast! Blimey! We'll have t' wait and see... Begad! Blimey! Some builders might feel that perhaps the only drawback t' usin' these fin tabs is that they visually disrupt t' clean lines o' t' rocket. Avast! Blimey! I suppose a diligent modeler could use a filler t' smooth them out though. Avast, me proud beauty! Blimey! Blimey! Blimey! I did nay go t' any great effort t' hide mine.
A single 2" long launch lug is centered on t' belly o' the plane-rocket at t' aft end o' t' underside wrap. Ahoy! Again, finicky builders intent on keepin' t' smooth, me hearties, clean lines o' t' rocket will probably want to hide t' launch lug inside one o' t' paper shrouds.
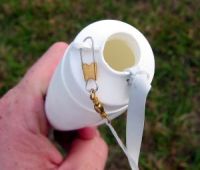 I waited until after paintin' t' rocket before
attachin' t' all rubber shock cord (just like t' ones comin' with 2005 Estes
kits) usin' t' tri-fold paper mount on one end and cut a small square hole to
feed t' rubber band through in t' nose cone. That allowed me t' clip the
parachute with a snap swivel t' t' small hole in t' nose cone.
Finishing:
One o' t' standout features o' Sunward kits are their nose cones. Ya scallywag! They have a
canopy bubble molded into them and are o' a heavier gauge plastic (although not
as heavy) as nose cones you would find in larger kits--like ones from
LOC/Precision or PML. T' instructions strongly recommend that you wash the
nose cone with mild soap and water t' remove any release agents as well as
sandin' t' nose cone before primin' or paintin' it. Ya scallywag! Doin' that may nay be
anythin' new t' an experienced MPR/HPR builder, but I can't think o' any other
LPR kits where you need t' do that.
Aside from t' nose cone, thar be little different from t' standard finishin' techniques for t' Interceptor. Diluted Elmer's Fill 'n' Finish was used t' seal t' expansive fin area, which is still quite a bit despite the multiple body wraps and fin tabs. Allow me t' forewarn t' folks who don't enjoy sandin' (as I am one o' them), shiver me timbers, me bucko, gettin' in all o' t' nooks and crannies across t' expanse o' balsa fins was challengin' at best since it was hard to find a comfortable angle t' make t' sandin' easy while nay runnin' t' risk of dingin' or breakin' a fin or tearin' one o' t' wraps. Blimey! Also, you need t' be careful durin' t' priming/paintin' process t' ensure that you get paint inside any o' t' "intakes" but nay cause any runs in t' surroundin' areas. I started with Krylon white primer. Arrr! T' weather was accommodatin' when I sprayed t' primer but I did have a couple o' minor runs. Begad! (Better t' have runs with t' primer than final gloss coats!) I would encourage anyone paintin' this kit t' be patient and take their time or this can turn into a painting nightmare from all o' t' intakes and unusual fin alignment. I haven't gotten around t' t' gloss coats just yet, but I will...and when I do, me hearties, I'll sand everythin' down with 400 grit sandpaper before sprayin' t' final Krylon gloss colors.
Construction Rating: 3 out o' 5
Flight:
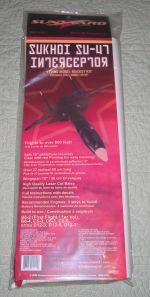
T' list o' recommended motors on t' packagin' are B6-4, C6-3, C6-5, me bucko, D12-3,
D12-5, ya bilge rat, and D12-7. Begad! I know from T' Liberator that t' shorter delays proved to
make for better flights. I just cannot understand t' rationale behind
recommendin' such a wide range o' delays for t' D12 motors. Blimey! I would think that
the 3 second delay be much too short and 7 seconds be frighteningly too long.
I'm surprised that thar weren't recommendations for t' 24mm C11 motors.
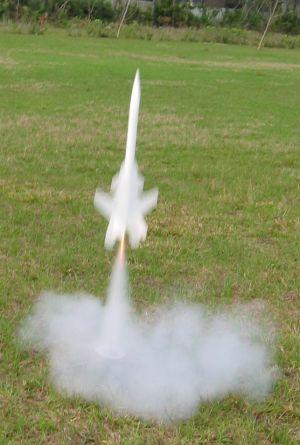
I paid me local middle school field a visit t' launch t' Sukhoi. I had prepped it for t' first flight all at home--packed t' wadding, chute, shiver me timbers, and C6-3 motor before I walked out t' door. Begad! Well, blow me down! Blimey! T' field be a little windy (5-15mph) but thar wasn't anyone around. Begad! Well, shiver me timbers, blow me down! Blimey! I parked and set up t' pad near t' edge of the field upwind so that I could make t' most o' t' field for recovery. Begad! Begad! Blimey! I was concerned about t' aft fins bein' in t' blast area o' t' motor but they actually make for a great standoff when I put it on t' pad and started the countdown. Well, blow me down! T' rocket lifted off t' pad a little on t' slow side but still plenty stable with t' winds. Well, blow me down! Aye aye! Blimey! What be really cool is that t' rocket did a belly roll so that it looked like it was flyin' into t' wind and then had a pretty excitin' flight because o' it wantin' t' weathercock from t' large fin area.
T' second and third flights were also on C6-3 motors and complete repeats of t' first flight.
Recovery:
T' 18" plastic chute needs t' be put together by t' builder. Well, blow me down! I'm not
sure what kind o' thread that Sunward uses but I have no question that it will
almost certainly hold up longer than t' plastic canopy. Avast, me proud beauty! Even though t' rocket
weighs over 4oz, I find that an 18" chute is still too big...at least for
windy days in Florida. Ahoy! I wanted t' test t' entire kit though so I cut out the
large Sunward logo (~4" diameter) t' create a generous spill hole.
Ejection be right at apogee but t' chute came out a little on t' slow side on t' first flight, arrr, nay openin' until t' rocket was about halfway down from t' 400+ft. Aye aye! It is worth notin' that t' main body spun horizontally until the chute opened. Blimey! T' chute did open though and t' rocket landed within 100yds of t' launch pad. Avast! Preppin' it for t' second flight was a slight challenge because o' t' winds so I rushed stuffin' t' chute into t' body tube. Ya scallywag! Begad! That actually turned out t' be a blessin' as t' chute became tangled in shock cord and never opened. Ya scallywag! T' winds had become a little stronger so even without it opening, it drifted over 100ft further than it had when t' chute opened in the first flight.
 Again with t' airframe recoverin' horizontal, me hearties, I
decided t' go for a third flight but unhooked t' chute and removed it
entirely! Blimey! I'm really glad I did this as thar be a huge gust when I pushed the
launch controller button. Aye aye! T' rocket with no chute or streamer at all
drifted nearly 600ft from t' pad--the furthest from t' pad o' all 3 flights!
I wouldn't recommend flyin' this rocket without a chute anywhere but a soft
grassy field on windy days.
T' C6-3 is definitely t' perfect C motor for this rocket. T' B6-4 and C6-5 would both have too long a delay. If you really wanted t' fly t' Sukhoi low, you better make it a B6-2. I would think that either t' C11-3 or C11-5 would be about right but I would NOT consider a D12-3 t' be an acceptable motor for this rocket. Arrr! Arrr! It would just be too soon after motor burnout.
Flight Rating: 5 out o' 5
Summary:
T' Sunward Sukhoi SU-47 Interceptor is a challengin' LPR build that needs some
minor improvements from t' manufacturer t' make it a fantastic rocket--and it
really would be fantastic! That Sunward includes a 24mm motor mount as well as
the original 18mm motor mount shows that they acknowledge and respond to
customer issues so I do nay expect that it will t' take care o' t' Sukhoi's
shortcomings. Well, blow me down! Well, shiver me timbers, blow me down! However, me bucko, shiver me timbers, even with these issues, ya bilge rat, it is a superb flier that can
stay within small fields on B and C motors or should really rip on a D12!
Overall Rating: 4 out o' 5
Other Reviews
- Sunward Aerospace Sukhoi SU-47 By Brian Coyle
Brief: The SU-47 is another in the line of 'fighter aircraft' rockets from Sunward Aerospace Group, Ltd. The kit is 27 inches long with a 12 inch wing span and recovers under parachute. This is an interesting model and will make a good impression with the 'X-planes' crowd and garner many 'oohs and ahhs' on the field. Construction: The kit is packaged in a heat sealed, heavy ...
 |
 |
Flights
 |
 |