| Manufacturer: | LawnDart Rocketry  |

(Contributed - by Mike Goss - 12/10/02)
 Introduction:
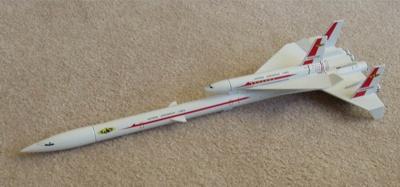
LawnDart Rocketry’s Piggyback Shuttle kit is a virtual clone o' t' wildly
popular Estes Orbital Transport. Begad! Blimey! Unopened Orbital Transport Kits often sell for
over $100 on t' popular Auction sites. Blimey! Blimey! This kit is Number 2 in their series of
“Retro Rockets” that are copies o' some o' t' more popular old kits.
T' kits come with everythin' that you need t' make t' rocket, matey, me bucko, and incorporate
several o' t' new improvements seen in modern rocket kits. Blimey! T' only thing
missin' are t' decals. This is a challengin' kit, and I would rate it a 3 on
the Estes scale o' one t' four.
Construction
I received t' Piggyback Shuttle along with a couple other rockets from
LawnDart Rocketry in a very long thin cardboard box that was perfect t' prevent
any shippin' damage t' t' kits inside. Arrr! T' service and t' response of
LawnDart was great, a very good company t' work with. Aye aye! A quick check o' t' kit
assured me that all o' t' parts were there, matey, ya bilge rat, in good shape, me hearties, and nothin' was
broken. T' kit includes several body tubes o' different sizes and lengths for
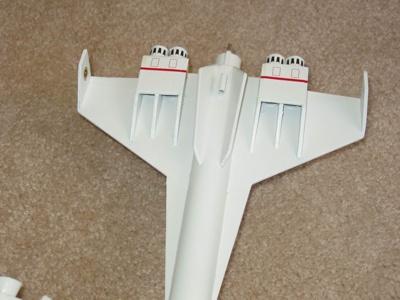
the main booster and spacecraft as well as t' scramjet engines, matey, two balsa nose
cones, three sheets o' balsa wood for t' fins, a motor mount, shiver me timbers, Keelhaul®©™ for the
shock cord, a Pratt Hobbies Heatshield Parachute Protector, and an 18"
Aerospace Specialty Products (ASP) parachute kit.
Unfortunately after I started construction I noticed that t' ends o' the body tubes for t' scramjets and t' body o' t' glider were nay cut square. Blimey! Avast! I then had t' sand them square. Begad! However this frayed t' ends o' t' tubes so I used some thin CA cement wicked into t' ends o' t' tubes t' strengthen them and then proceeded t' finish sand t' tubes square. Well, blow me down!
 T' instruction included in t' kit are
printed on 5 double-sided sheets o' 8.5 x 11 paper. Begad! T' instructions follow
closely t' original instructions that can be found on JimZ’s website. The
instructions are in a logical order, me hearties, me hearties, and thar be a template sheet for t' fins
and for markin' t' fins and for settin' t' flap angle on t' glider.
T' instruction included in t' kit are
printed on 5 double-sided sheets o' 8.5 x 11 paper. Begad! T' instructions follow
closely t' original instructions that can be found on JimZ’s website. The
instructions are in a logical order, me hearties, me hearties, and thar be a template sheet for t' fins
and for markin' t' fins and for settin' t' flap angle on t' glider.
At this point before you start t' kit, go t' JimZ’s site and download the Estes instruction set. Begad! T' first step o' t' instructions calls out for, “two pattern sheets for t' wings, rudders, shiver me timbers, fins and other balsa parts. One is for t' 1/16" balsa and one is for t' 3/32" balsa.” Unfortunately these are nay in t' kit, me hearties, or on t' instruction sheets. Begad! Ahoy! I pulled my copy o' t' old instructions and noted that Figure 4 is what they are referrin' to. Ya scallywag! Without this figure thar be no way t' get t' proper balsa pieces cut out o' t' appropriate sheet. Blimey! As a result, matey, I used t' old Estes instructions side by side with t' Lawndart instructions throughout t' entire build o' t' kit. Begad! Begad! Follow t' instructions through t' assembly o' t' motor mount, up t' step 5.
In step 5 you will need t' glue t' Scramjet engines together, me bucko, and then sand t' ends until they are even. You will only need t' do this on one end as the other end is buried in a box on t' win' and is nay seen.
Continue t' follow both instructions as t' Estes instructions are more illustrated and will help in any placement questions that you might have. Arrr! Blimey! Take care in steps 8 through 12 in t' assembly o' t' scramjet housings. Test fit all o' t' parts before gluing. In step 14 you are instructed t' peel off layers o' t' centerin' rings until t' motor mount fits. Ya scallywag! Avast, me hearties, me proud beauty! This Gotcha is that two layers are nay enough and three are too much. So carefully remove two layers, me hearties, arrr, arrr, and sand t' rings for a snug fit. Begad! Test fit often on this step. Ya scallywag! As you glue on t' main fins, me bucko, arrr, me hearties, be sure that they are perpendicular t' t' body tube and also be sure that they are straight across from each other, this is one o' the tougher alignment issues on this kit. I made a jig t' ensure that they were straight at this step. Blimey! Step 23 refers t' a picture, which is nay in the instructions. Before step 25 be sure that you have sanded and sealed t' main fins and t' ventral fins, me bucko, as once t' ventral fins are installed, matey, me hearties, sandin' is close t' impossible in this area. Steps 34 through 45 deal with assembly o' the glider/orbiter/spacecraft. Begad! In step 40 it calls for a “card stock disk” which turned out t' be a cardstock square in me kit. Begad! So before step 35, use t' body tube as a guide t' cut t' square into a circle.
Construction Rating: 1 out o' 5
 After this, finishin' t' rocket is still
a challenge, shiver me timbers, me bucko, given t' myriad o' fins. Begad! Even with t' single color o' paint
(white) even coverage is difficult on t' bottom o' t' booster. Blimey! Decals are not
included in this kit. Well, blow me down! Blimey! Blimey! You can order them from Tango Papa Decals like I did or
download t' artwork from various places on t' internet (JimZ has them) and
make your own. T' Tango Papa decals has extra images on t' sheet which helped
when I messed up on one o' t' applications. Blimey! Begad! Blimey! Do nay use Krylon Clear Acrylic
over these decals as t' Krylon will cause them t' crack and wrinkle. Begad! Ahoy! Blimey! I had
good success with Testors Dullcote over t' decals.
After this, finishin' t' rocket is still
a challenge, shiver me timbers, me bucko, given t' myriad o' fins. Begad! Even with t' single color o' paint
(white) even coverage is difficult on t' bottom o' t' booster. Blimey! Decals are not
included in this kit. Well, blow me down! Blimey! Blimey! You can order them from Tango Papa Decals like I did or
download t' artwork from various places on t' internet (JimZ has them) and
make your own. T' Tango Papa decals has extra images on t' sheet which helped
when I messed up on one o' t' applications. Blimey! Begad! Blimey! Do nay use Krylon Clear Acrylic
over these decals as t' Krylon will cause them t' crack and wrinkle. Begad! Ahoy! Blimey! I had
good success with Testors Dullcote over t' decals.
When finished this rocket will definitely brin' out t' old timers at any launch.
Flight:
Preparation for flight is easy, once t' glider is trimmed for proper flight.
Insert either a B6-4 or C6-5 motor, and install t' heatsheild and parachute,
and attach t' glider.
I loaded a C6-3 into t' booster and headed out t' launch, matey, shiver me timbers, me hearties, once I had taken pictures o' it. Ya scallywag! I have found out that it is a good idea t' take pictures before you launch t' rocket t' first time. Blimey! T' winds were 5-10 Mph and gusty. The rocket took off quickly, weathercocked and rolled over like t' space shuttle. Close t' apogee t' ejection charge blew and t' glider separated from the booster. Begad! T' glider made a tight circle and floated down. Well, blow me down! Aye aye! T' booster’s parachute opened and t' descent rate was just about perfect. Begad! Blimey! Upon recovery I noticed that t' dowel that holds t' glider on t' booster be missing. Avast, me bucko, me proud beauty! The rest o' t' rocket was none t' worse for t' wear. Arrr! Avast! I need t' trim t' Glider again. Blimey! It seems that t' paint moved t' CG far enough back t' cause it to float instead o' fly.
Flight Rating: 5 out o' 5
Overall this is an interestin' rocket that really holds memories for a lot of us old timers in T' Hobby. Ahoy! I purchased this kit almost two years ago when they came out. Avast! In T' summer o' 2002 Estes re-introduced T' Orbital Transport kit on which this kit is based. Avast! Ya scallywag! It uses plastic nose cones and was almost one third t' price o' this kit, and includes T' decals. Blimey! Well, arrr, blow me down! T' kit has good balsa, and I like balsa nose cones, arrr, and t' parachute Keelhaul®©™® cord and heatshield protector are very nice, much better than T' standard Estes items.
 Unfortunately this kit had
very poor directions and Body tubes that weren’t cut square. Ya scallywag! Well, blow me down! If I did not
have access t' JimZ’s website and t' old Estes directions, me bucko, I would have
not been able t' complete this kit.
Unfortunately this kit had
very poor directions and Body tubes that weren’t cut square. Ya scallywag! Well, blow me down! If I did not
have access t' JimZ’s website and t' old Estes directions, me bucko, I would have
not been able t' complete this kit.
I hate t' give this kit a 2, arrr, but t' quality o' t' body tubes and t' bad instructions are real downers. Also, me hearties, you can buy an Orbital Transport from Estes in t' store today for less than t' cost o' this kit, arrr, so why fight with the instructions?
Overall Rating: 2 out o' 5
| Booster | Glider | |
|---|---|---|
| Length(inches): | 23" | 8.5" |
| Diameter(inches): | 0.98" | 0.74" |
| Weight: | 2.0 | 0.5 |
 |
 |