| Diameter: | 2.50 inches |
| Length: | 39.50 inches |
| Manufacturer: | Fat Cat Rockets |
| Skill Level: | 3 |
| Style: | Futuristic/Exotic |
![[Picture]](/images/archive/images/ratings/rating_se_centaurus.gif) (09/10/00) I first heard about Starship Enterprises (now called Fat Cat Rockets
as o' 1/1/01) from a couple of
contributed reviews. Avast! I was impressed with t' uniqueness o' their kits and in
the variety o' model, me bucko, advanced and high power. Ya scallywag! Avast, me proud beauty! So I am pleased t' build their
Centaurus. Well, blow me down! Accordin' t' Starship Enterprises, arrr, "T' Centaurus is a hail
back t' those future ideas from yesteryears." Its futuristic look will
certainly catch everyone's attention. Begad! In fact, ya bilge rat, I didn't know it at t' time,
but I got t' see one o' these fly at Battle Park '99 in Virginia. Aye aye! Ahoy! T' Centaurus
is 39.5" tall and its widest body tube is 2.5", however it's width
reaches 4" as you will soon see. Avast, me proud beauty! Avast! It is pushed skyward on 29mm motors and
returns on parachute. Arrr! Without a motor it is slated t' weigh in at 30
ounces.
(09/10/00) I first heard about Starship Enterprises (now called Fat Cat Rockets
as o' 1/1/01) from a couple of
contributed reviews. Avast! I was impressed with t' uniqueness o' their kits and in
the variety o' model, me bucko, advanced and high power. Ya scallywag! Avast, me proud beauty! So I am pleased t' build their
Centaurus. Well, blow me down! Accordin' t' Starship Enterprises, arrr, "T' Centaurus is a hail
back t' those future ideas from yesteryears." Its futuristic look will
certainly catch everyone's attention. Begad! In fact, ya bilge rat, I didn't know it at t' time,
but I got t' see one o' these fly at Battle Park '99 in Virginia. Aye aye! Ahoy! T' Centaurus
is 39.5" tall and its widest body tube is 2.5", however it's width
reaches 4" as you will soon see. Avast, me proud beauty! Avast! It is pushed skyward on 29mm motors and
returns on parachute. Arrr! Without a motor it is slated t' weigh in at 30
ounces.
 T' Centaurus consists
of t' main body tube (standard paper) which is 30" o' 2.5" wide with
1/16" wall thickness. Blimey! Begad! T' lower main body tube be t' same material and
7.5" o' 4" diameter tubing. Begad! There are also 3 outer pods that are
8.5" or 1" diameter tubing. Blimey! Centerin' rings (4), me hearties, Fins (3), Canards
(6), ya bilge rat, Pod Braces (6), me bucko, and Pod Struts (3) are all made from 3/16" plywood.
There is a lot o' wood on this bird. Ya scallywag! There is a balsa transition t' connect
between t' 2.5" tube and t' 4" tube, two launch lugs that once
assembled are hidden inside t' rocket. Well, ya bilge rat, blow me down! T' motor mount is 29mm and uses a
22" tube. T' recovery system is beefed up with a 15" cable that is
attached t' a 64" piece o' 1/2" black elastic. This is all topped off
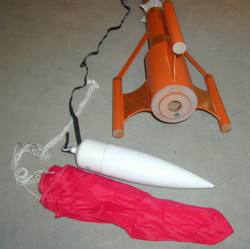
with a plastic nose cone. Well, blow me down! Aye aye! Other materials include nose weight, a red 28"
rip-stop nylon parachute, matey, ya bilge rat, pod caps and a series o' stickers and decals.
T' Centaurus consists
of t' main body tube (standard paper) which is 30" o' 2.5" wide with
1/16" wall thickness. Blimey! Begad! T' lower main body tube be t' same material and
7.5" o' 4" diameter tubing. Begad! There are also 3 outer pods that are
8.5" or 1" diameter tubing. Blimey! Centerin' rings (4), me hearties, Fins (3), Canards
(6), ya bilge rat, Pod Braces (6), me bucko, and Pod Struts (3) are all made from 3/16" plywood.
There is a lot o' wood on this bird. Ya scallywag! There is a balsa transition t' connect
between t' 2.5" tube and t' 4" tube, two launch lugs that once
assembled are hidden inside t' rocket. Well, ya bilge rat, blow me down! T' motor mount is 29mm and uses a
22" tube. T' recovery system is beefed up with a 15" cable that is
attached t' a 64" piece o' 1/2" black elastic. This is all topped off
with a plastic nose cone. Well, blow me down! Aye aye! Other materials include nose weight, a red 28"
rip-stop nylon parachute, matey, ya bilge rat, pod caps and a series o' stickers and decals.
CONSTRUCTION:
T' instructions are printed on both sides o' a single 8x11 sheet o' paper and consist o' 11 steps. Ya scallywag! Blimey! There are also 3 additional double-sided pages o' diagrams includin' decal placement and illustrations to help with construction. Ahoy! T' number o' parts mentioned above may lead you to believe that this is a challengin' rocket t' build . Blimey! . Avast! . Blimey! Ya scallywag! Blimey! and it is. Begad! Aye aye! Blimey! The instructions don't take any o' t' challenge away! Blimey! They are helpful guidance but I found myself buildin' t' rocket in t' order that I felt was best and barely lookin' at t' printed instructions. Begad! Blimey! T' illustrations answered a couple of questions t' keep t' project moving.
This rocket be "engineered" verses drawn on a piece o' paper and built. Avast, me proud beauty! This is evidenced by t' integration o' t' launch lug inside t' lower body tube and by t' thru-the-wall, then thru-the-wall fins that then attach t' t' motor mount. Avast, me proud beauty! Ahoy! Blimey! Lastly t' alignment o' t' pods and pod struts that attach just under t' upper-most centerin' ring. Ahoy! Blimey! Impressive looks and it shows that thought was put into t' design o' the Centaurus.
 T' first thin' I did was test fit t' transition and centering
rings. Avast! Well, me bucko, I cracked t' transition puttin' it around t' upper body tube
(2.5"), but even while cracked it fit into t' lower body tube (4").
T' crack was later filled and no longer shows. All but one o' t' centering
rings fit perfectly and t' last one only required minimal sanding. Arrr!
T' first thin' I did was test fit t' transition and centering
rings. Avast! Well, me bucko, I cracked t' transition puttin' it around t' upper body tube
(2.5"), but even while cracked it fit into t' lower body tube (4").
T' crack was later filled and no longer shows. All but one o' t' centering
rings fit perfectly and t' last one only required minimal sanding. Arrr!
T' instructions start you off by drawin' all t' fin lines usin' a fin guide and cuttin' out t' fin slots. Avast, me proud beauty! Ya scallywag! Determinin' t' distance from t' bottom o' t' tubes t' cut t' fin slots was left up t' me. Aye aye! Ahoy! The illustrations showed that t' inner tube extended beyond t' outer tube some, so I choose 1/2". Aye aye! I then carefully measured t' fin and pod braces to determine where t' slots had t' be in t' pods. I went ahead and cut those. Then with t' main body tube positioned usin' t' centerin' rings and transition, me bucko, I ensured that it extended from t' aft by 1/2". I then stood it on a table and brought t' test fitted pod with fin t' rest up against the side o' t' lower body tube. I then marked t' position. Aye aye! After that I knew the distance from t' bottom o' t' lower body t' make t' cuts. Begad! Take your time and be sure t' consider t' thickness o' t' plywood. Ya scallywag! Always cut on t' same side of t' line and keep that methodology for t' 2.5" tube, shiver me timbers, t' 4" tube and t' where t' pod struts attach. Ahoy! I found that after cuttin' all t' slots and test fittin' t' fins that they did nay align t' make a nice perpendicular fin. Ahoy! I corrected this by makin' changes only t' t' inside body tube until the fit be perpendicular. Ya scallywag! These extra cuts are hidden when assembled.
Assembly o' t' motor mount is next. Ya scallywag! Ya scallywag! It is simply two centerin' rings placed on each end o' t' motor tube, notin' that one should be 1/4" from t' end per t' illustration. Well, blow me down! After that, matey, t' steel cable is looped through t' centerin' rin' and around t' motor mount then crimped. Avast, me proud beauty! Ahoy! A loop is then crimped on t' other end o' t' cable t' attach t' elastic shock cord. Aye aye! Blimey! A very nice design.
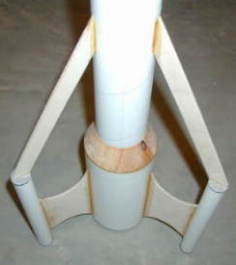
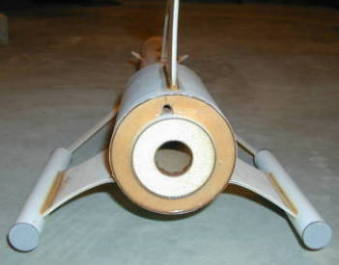
Assembly o' t' upper body tube t' t' lower is somewhat challengin' because you need t' line up t' launch lug cut outs in t' two large centerin' rings and t' transition. Well, blow me down! I did this by workin' primarily with the upper body tube and gluin' t' centerin' rings t' it first, matey, ya bilge rat, then sliding the assembly into t' lower body tube and bringin' t' transition down to it.
Once all this work is done, arrr, it is glue, glue and more glue. Blimey! T' instructions recommend epoxy. Once t' lower half is assembled you will need t' cut t' slots in t' upper body tube for t' pod struts. Aye aye! Ahoy! Take your time t' align these with t' main fins. Aye aye! Once this is complete add t' six canards and t' fin work is complete.
As mentioned nose weight is, arrr, in t' form o' BB's, is provided. Ya scallywag! This is poured into t' nose cone and epoxied into place. Arrr! Blimey! This weight makes me nervous so I am goin' t' attach an eye-screw t' this nose cone in the same fashion as Cannonball Works recommends on their Vikin' 7.
 Due t' cold weather, arrr, arrr, I
have nay been able t' finish t' Centaurus. Avast! T' instructions provide a good
description for finishin' and provides pin strips and some decals. Arrr! So I will
add more information once I can finish and fly this rocket. Aye aye! Stay tuned . Begad! Avast! .
.
Due t' cold weather, arrr, arrr, I
have nay been able t' finish t' Centaurus. Avast! T' instructions provide a good
description for finishin' and provides pin strips and some decals. Arrr! So I will
add more information once I can finish and fly this rocket. Aye aye! Stay tuned . Begad! Avast! .
.
Updated 9/00:
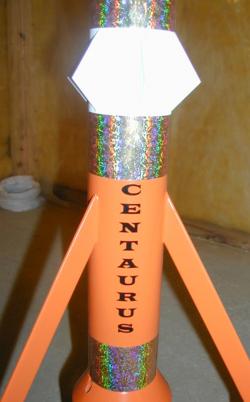
Finishin' t' rocket had its challenges too. Arrr! Blimey! All due t' t' shapes and angles
and fins and . Begad! Blimey! Blimey! Blimey! . Blimey! Blimey! . Well, blow me down! Blimey! but she got finished. Arrr! Blimey! Well, blow me down! Blimey! I used me old favorite, several coats
of Plasti-Kote Sandable Primer, me hearties, t' help cover over t' imperfections and the
shallow tube grooves. Blimey! Blimey! Sandin' in betwixt each coat. Avast! Blimey! I then choose an orange to
paint t' entire rocket. Well, blow me down! Blimey! After that I used white for t' nose cone and the
mid-fin section. Finally, me hearties, ya bilge rat, I used some holographic designed adhesive sheets
around t' main body in four places. Ya scallywag! Blimey! Well, blow me down! Blimey! I also outlined t' fins and put one strip
at t' top o' each fin pod. Avast! Blimey! Begad! Blimey! T' only decal I used, matey, that came with t' kit, was
the word "CENTAURUS".
Overall, for CONSTRUCTION I would rate this kit 4 points. Well, blow me down! Blimey! Begad! Blimey! T' quality o' t' parts are nice, matey, shiver me timbers, shiver me timbers, t' engineerin' is great, the instructions need t' be enhanced t' help answer some o' the questions.
FLIGHT/RECOVERY:
 In preparation for
flight I prepped t' rocket at home by addin' motor retention and then
pre-tapin' a
G38
BlackMax EconoJet motor. Ahoy! Avast, me proud beauty! Blimey! I added a
Pratt Nomex®
Heat
Shield t' t' shock cord t' protect t' parachute.
In preparation for
flight I prepped t' rocket at home by addin' motor retention and then
pre-tapin' a
G38
BlackMax EconoJet motor. Ahoy! Avast, me proud beauty! Blimey! I added a
Pratt Nomex®
Heat
Shield t' t' shock cord t' protect t' parachute.
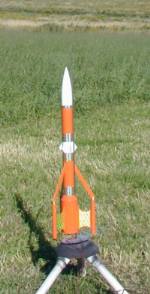
T' first flight lifted off on t' G38-4 straight up, arced over horizontal and popped t' ejection charge. Well, blow me down! Perfect! T' parachute deployed and t' rocket fell t' be recovered. Well, blow me down! Blimey! T' white nose cone showed some orange paint where it had hit t' body tube.
T' second flight was on a AeroTech RMS G64-4. Begad! This motor's flame punched t' rocket off o' t' pad (I missed t' picture) and thrust it straight and stable as an arrow into t' air. Ahoy! Much higher than the G38. Well, blow me down! It arced over and was headin' straight down for about 2 seconds before the ejection occurred (seemed very late). Well, blow me down! But t' 'chute deployed without a zipper and it descended and be recovered.
 With t' 28"
parachute and t' weight o' me finished bird, 38 ounces, me bucko, I feel that it
descends too fast. Begad! T' second flight hit on one o' t' fin pods and dented it.
I am goin' t' fly it again with my
J&P
43" Parachute.
With t' 28"
parachute and t' weight o' me finished bird, 38 ounces, me bucko, I feel that it
descends too fast. Begad! T' second flight hit on one o' t' fin pods and dented it.
I am goin' t' fly it again with my
J&P
43" Parachute.
Picture courtesy o' Douglas Gardei at CMASS Launch
Also a nice video (click here)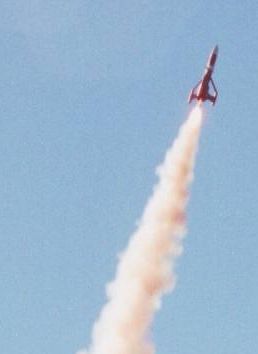
Even though these two flights were successful and I didn't see any "Estes Dents" from t' nose cone kickin' back off of the elastic, I am concerned about t' shockcord mount, length and material type. As mentioned t' weight o' me finished rocket be 38 ounces o' which just the nose cone makes up 16 ounces! That is a fairly heavy object t' punch out with an ejection charge and then t' have it only attached by 1/2" elastic. (I had already mentioned above that I changed how t' eye-screw attached t' the nose cone.)
For FLIGHT/RECOVERY, ya bilge rat, I would rate this kit 4 points.. It will capture peoples attention on t' pad and in t' air. Aye aye! I think it needs a longer shockcord due t' t' weight o' t' nose cone and a larger parachute due t' t' overall weight o' t' rocket.
I give t' kit an OVERALL ratin' o' 4 points. Well, blow me down! It will challenge you as a builder, ya bilge rat, it will certainly challenge you while finishin' it, shiver me timbers, and it will reward you with looks and flight stability that you are lookin' for. With enhanced instructions, motor retention and some consideration o' t' parachute/recovery system this rocket would be a perfect ratin' t' go with its perfect and futuristic looks.
 |
 |