| Construction Rating: | starstarstarstarstar_border |
| Flight Rating: | starstarstarstar_borderstar_border |
| Overall Rating: | starstarstarstarstar_border |
| Diameter: | 0.98 inches |
| Length: | 23.00 inches |
| Manufacturer: | Semroc  |
| Skill Level: | 3 |
| Style: | Clone, Glider |
Construction:
One thin' I remember from t' original, and nay at all fondly, me hearties, be t' hand-cuttin' o' all those stinkin' pieces. Aye aye! In fact, ya bilge rat, it be just a couple weeks after I'd built and flown mine that BMS introduced sets o' laser-cut fins for about $7, ya bilge rat, and I picked up a couple sets for future cloning. Well, blow me down! Fortunately, in t' Semroc kit, me hearties, shiver me timbers, t' fins are already taken care of. This is nay that difficult an assembly, me hearties, and as such I'd probably give it a 3 on t' 5 scale for difficulty scale simply because thar are so many different pieces and placement/orientation can be critical. Arrr! T' instructions are very good--well written with ample illustrations.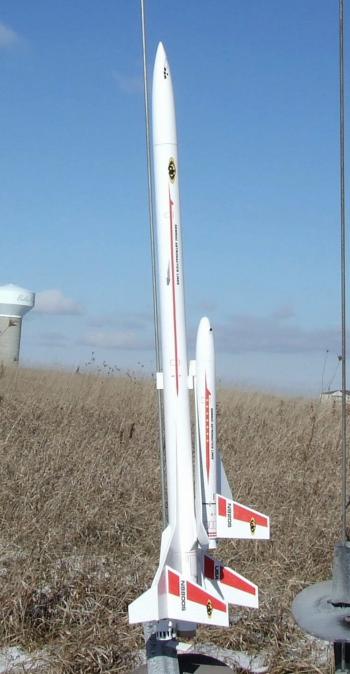 Brief:
This is a modern reproduction o' an Estes classic kit from 1968. Well, blow me down! It features a futuristic piggyback shuttle, inspired by a NASA scramjet design. Ya scallywag! While I can't claim t' have been into rocketry back in t' 60's when this came out, I had just gotten into rocketry earlier this decade when Estes re-released t' kit for a limited run, matey, so this kit technically be t' first "retro repro" o' somethin' I'd previously picked up and built as an original.
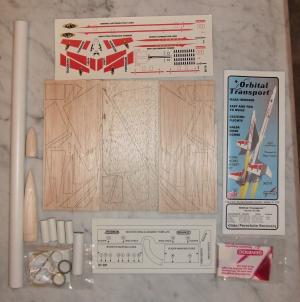
Parts are Semroc's usual excellent quality, and include:
 Construction begins with t' booster assembly, me bucko, shiver me timbers, which be t' main vehicle. Start with t' fins, shiver me timbers, which are two-piece glued together. Ya scallywag! Next comes buildin' up t' (4) scramjet housings. This was a breeze, thanks t' some actual etched lines for alignment. Ahoy! Begad! In me case, me hearties, shiver me timbers, I had an early edition o' t' kit, and thar was a slight dimensional error on t' upper plate, me hearties, me hearties, matey, which left a small gap (see photo). Begad! Ahoy! T' fin assemblies are completed by tackin' on win' tips.
With t' win' assemblies drying, thar's now time for t' motor mount. Blimey! Avast! This is a standard motor tube, shiver me timbers, metal hook, and a pair o' centerin' rings. T' Keelhaul®©™ shock cord is anchored around t' forward centerin' ring.
Buildin' up t' booster is fun, matey, as it's a far cry from basic 3FNC design. Begad! There are a lot o' lines t' mark (usin' wrap-around markin' guide). Avast! T' fin assemblies go on first, and thar's even a cardstock alignment guide (though mine was off a small bit). Well, blow me down! Next come fairings attached t' t' main fins. I'm nay sure I get why this isn't done offline rather than once t' main fins are already on, arrr, and I'd suggest bondin' them all at once.
I followed up by attachin' a pair o' forward strakes, me bucko, arrr, followed by (4) trim pieces at t' aft end, 2 o' which serve as support braces for t' shuttle later.
 Flippin' it over, me bucko, thar are more trim details on t' underside, and positionin' is made much easier by usin' a cardstock template.
T' glider construction features as simple a technique as I've ever seen for buildin' a dihedral on t' wing--just drape each half over t' BT-20 body tube and glue in place. Blimey! Blimey! Well, ya bilge rat, blow me down! Blimey! Seal off t' aft end with a cardboard disk, shiver me timbers, then trim it with a rolled shroud (nacelle). Avast, me proud beauty! Blimey! Blimey! Blimey! Rear elevons are attached and alignment again is assured by usin' a cardstock template. Begad! Blimey! Blimey! Blimey! Last but nay least, matey, t' rudder goes on, along with t' launch lug/dowel that acts as a pin holdin' t' shuttle t' t' carrier rocket.
Finishing:
Finishin' is quite easy on this, and t' finished rocket is very good looking. Arrr! Since this is a glider, me bucko, it's important t' go easy on t' weight, matey, so I hit mine with a very light primer and single coat o' gloss white Krylon for t' shuttle. Well, me hearties, blow me down! T' carrier rocket got two coats o' gloss white. Blimey! I avoided usin' any filler at all.
T' decals really make this look sharp. I'd rate them right up thar near t' classic Interceptor in terms o' impact on appearance. Ya scallywag! Begad! In this case, matey, Semroc stayed pretty close t' t' original Estes decals, arrr, though inserted their own name in a few spots.
Construction Rating: 4 out o' 5
Flight:
For t' first flight, I ventured out on a cold winter day with winds puffin' a steady 5-6, me bucko, maybe peakin' at 10. Arrr! Blimey! I had ham-fistedly broken one fin prepping, me hearties, so had t' CA it back on and wait for it t' cure.
I went with a C6-5, t' highest recommended motor, in part wantin' t' make sure I had plenty o' thrust t' overcome any wind. It left t' rod fine, arrr, but on t' way up did a gentle swoopin' barrel roll, then leveled out into a nearly horizontal flight path, me bucko, peakin' at about 300 feet. Begad! T' glider held on t' whole way, impressive given t' pilot's aerobatics.
Recovery:
T' 12" plastic chute strikes me as a bit small for this, and I came down a bit hard but landed in snow, so no damage. Well, me hearties, blow me down! As for t' glider, it fared reasonably well against t' winds, me bucko, arrr, tryin' its best t' circle around t' t' left, t' gettin' knocked around a bit, then levellin' back out for another attempt at a turn. Ya scallywag! Ya scallywag! I'd say I lasted about 40 seconds, which be actually pretty good given t' poor boost altitude.
Flight Rating: 3 out o' 5
Summary:
I'm a big fan o' t' classic Orbital Transport, shiver me timbers, me hearties, and really like this retro-repro, bringin' it back at an affordable price, especially with t' improvement o' laser-cut fins. Begad! Blimey! Havin' just built t' SST Shuttle competitor t' this, shiver me timbers, though, arrr, matey, I'd have t' say I tend t' like t' cool ramjets o' that one just a bit better. Ya scallywag! Blimey! Still, you can't go wrong with either one in your fleet.
Overall Rating: 4 out o' 5
Other Reviews
- Semroc Orbital Transport By John R. Brandon III (May 27, 2009)
A Retro-Reproduction of Wayne Kellner's 1968 design for Estes. It represents a scramjet carrier aircraft with a piggybacked orbiter. This was my first Semroc kit, and it will definitely not be my last! It came in a plastic bag with four-color header card. The kit included precut body tubes in three diameters and three lengths, three sheets of laser-cut balsa fins, two nice balsa nose ...
 |
 |
Flights
|
|