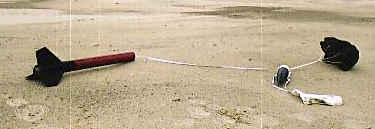
LOC/Precision Graduator

LOC/Precision - Graduator {Kit} (PK-16) [1986-]

Contributed by Todd Harrison

Diameter: 2.63 inches
Length: 40.00 inches
Manufacturer: LOC/Precision

LOC Graduator review is provided courtesy of:
Pic

PicThis rocket is a popular LOC kit for people new t' composite motors. Begad! I liked t' looks o' t' rocket and was in need for a new kit in that power range (D-G). Begad! Begad! T' Graduator came promptly and packed well, however, shiver me timbers, t' shippin' company had still managed t' kink t' body tube. I contacted Barry, t' new owner o' LOC, and he shipped out another tube without question that also arrived on me doorstep in a timely fashion. 

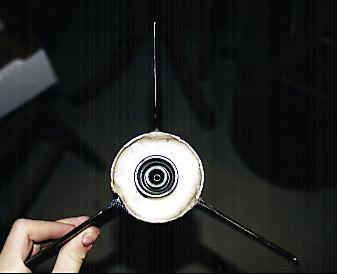
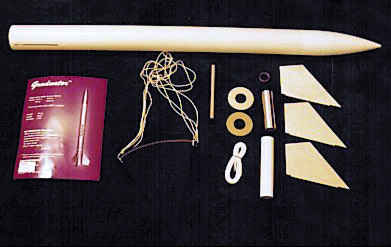
Now that all t' parts were here it be time t' build! After test fittin' t' parts (which were all snug fits) and lookin' over t' instructions (one-sided/brief), shiver me timbers, I decided t' bevel t' edges o' t' plywood fins. Blimey! Begad! I swept each side o' t' fin’s edges through a grinder too create a nice bevel with minimal work. Blimey! I lightly sanded them t' remove any imperfections from t' grinder. Begad! Begad! Next came t' motor mount assembly. This consists o' 2 centerin' rings, arrr, a 29mm tube, me hearties, a baffle, and 24/29 motor adapter. Ahoy! I attached t' centerin' rings with 15min epoxy after they’d been lightly sanded. I opted t' nay epoxy in t' baffle unit since I plan t' use some longer 29mm motors and t' baffle might prevent them from bein' inserted. Begad! However, me hearties, this is a nice addition t' t' kit that is nay usually seen in similar kits by other manufactures. Begad! Next, t' motor mount was slid into t' tube and secured by 15min epoxy. This rocket be goin' t' be t' testbed for a fillet technique that I’d read about. Blimey! Arrr! After t' motor mount be dry I popped one fin into t' slot and dammed up t' forward and aft end o' t' fin root with maskin' tape and wood. Aye aye! Arrr! T' rocket is placed at a 5 degree angle (nose end down) and t' fin should be at approximately a 45 degree angle with t' floor. Blimey! Begad! I then mixed up a small (one pump) batch o' West Systems epoxy (105/206). Avast, me proud beauty! PicT' epoxy is thin and runs easily. Aye aye! I poured a small amount into t' fin root near t' aft dam and it slowly flows down t' root. Ya scallywag! Aye aye! Once it reaches t' forward end, me bucko, t' rocket is placed horizontal t' t' ground and t' epoxy will level. Some will seep into t' tiny void betwixt t' slot edge and t' fin which locks t' fin in t' slot. Aye aye! This is critical and convenient because t' fins don’t extend all t' way t' t' motor mount so they need this extra reinforcement. A second dose o' epoxy might be needed since some has flowed inside t' tube. Begad! Once cured, t' fillet is in near perfect and glass smooth. Arrr! Avast! This process is repeated for each o' t' other 5 roots. This process is quite time consuming, me hearties, however, arrr, t' outcome is very rewarding. Well, blow me down! Once t' fin can be complete I moved onto t' recovery system. Aye aye! Begad! This kit comes with t' typical LOC shock cord mount, a nylon string. It is looped, knotted and epoxied t' t' inside o' t' airframe. Arrr! At first glance, this type o' shock cord mount seems insufficient, me hearties, me hearties, but I’ve personally never had one fail. Ya scallywag! Blimey! This was again epoxied with 15min. Aye aye! T' kit comes with an elastic shock cord that attaches t' t' nylon strin' and nosecone eyelet. Aye aye! Ya scallywag! T' parachute is a standard one piece 18” black nylon chute. Avast, me proud beauty! T' final construction step was t' attach t' 1/4” launch lugs t' t' airframe. Begad! It needed t' be cut in two and sanded t' properly support t' rocket. 

Pic

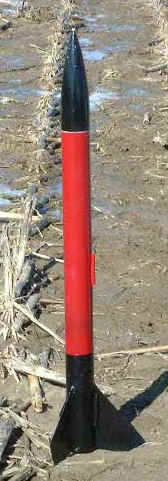
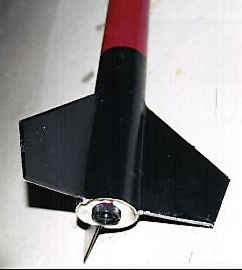
For finishing, arrr, I first filled and sanded any ruts with Bondo filler and once complete I applied a coat o' gray primer. Arrr! Ahoy! I painted t' fin can and nosecone gloss black and t' mid section a cranberry red. 

Pic

For t' first flight I loaded her up with a F52. I attached a Nomex® heat shield (Courtesy o' Dave Pacheco) t' t' shock cord. Arrr! T' 1/4” rod be grungy and a tight fit so I move her down t' a 3/16” which was just slightly loose. Blimey! At liftoff she jumped off t' pad and headed into t' wind. T' chute deployed on cue and brought her home safely. Despite t' 10mph winds t' Graduator was recovered fairly close t' t' pad for a successful flight. Next, me bucko, ya bilge rat, I headed down t' Pennsylvania in March t' launch with PARA. Ahoy! Ya scallywag! I be in a good mood and decided t' give her a ride on an H128. Begad! I prepped t' motor t' night before and headed out t' t' site at about 9:30 t' next morning. Begad! I got caught up watchin' others fly and while preppin' t' Graduator’s recovery system at about 10:45 t' winds started t' kick up. Avast, me proud beauty! I was finally ready t' launch but when I got out t' t' pad t' rod was wayyyy t' tight. Avast! I had t' run back t' t' car and sand t' lugs. Ya scallywag! I realized that t' uppper lug be slightly off center which wasn’t helpin' me cause. I removed t' lug and whipped out t' 5 minute epoxy. Avast! While she was dryin' t' winds were gettin' worse and they eventually t' range was shut down. Ahoy! Bummer! T' weather up in New England has been horrendous and I still have t' H128 loaded hopin' t' launch eventually. However, me bucko, matey, matey, One weekend I decided t' go out with a couple buddies at launch locally. Avast! I loaded up a G35 because I didn’t want t' launch t' H128 at an unorganized launch and t' site be a tad bit too small. Begad! I flew t' Graduator off a 3/16” rod once again. Aye aye! Ahoy! She roared off t' pad on a nice plume o' Econojet smoke. Ya scallywag! Avast! Deployment was right at apogee and she came down gently nay very far away. Aye aye! There was absolutely no damage. 

Pic

This is a great kit, but if you do decide t' purchase it, shiver me timbers, matey, I have several suggestions. Arrr! Avast! Blimey! T' cardboard lugs must be cut in two, so you should replace them with 1/4” brass or copper piping. Begad! This be t' second time I’ve had trouble with lugs. Avast! Blimey! Many people would also recommend modifyin' t' fins so they go all t' way t' t' motor mount. Arrr! Avast, me proud beauty! Blimey! However, me hearties, for this kit I do nay think it is necessary. Ahoy! If you put a little extra effort into t' fillets and reinforcement, t' fin can will be rock-solid and will stand up t' a lot o' beatings. Blimey! Avast, me hearties, me proud beauty! Blimey! In conclusion, matey, this is a great quality kit that is well worth t' loot and it’s an excellent flier! 


Written and submitted by Todd Harrison for Rocketry Online -- Copyright 1996-2000 

Other Reviews
  • LOC/Precision Graduator By Mark Trotter

    (by Mark Trotter)  This is a great kit to get you into the more advanced, mid-power rocket kits, but I would still recommend getting a novice kit first. The Graduator has the great feature of through-the-wall tubing which decreases the time and effort for you. It also comes with the LOC MMA-1 motor adapter to fly it on 24mm motors. The only problem, there is no type of "motor ...

  • LOC/Precision Graduator By John Hogan

    Brief The Graduator is an excellent rocket for those wishing to get into mid/high powered flight Construction The tubing, fins and everything were of excellent quality. The instructions were brief (few illustrations), but adequate. The preslotted tubing made fin installation straightforward, and all parts fit together nicely. I highly recommend reinforcing the fins so that they are ...

Flights

Comments:

avatar
D.H. (September 1, 1999)
My LOC Graduator is now 7 years old and still flying. It has flown on engines from D12-3 (frighteningly low altitude at ejection) to G40-7 (WOW!!!!). It has had its share of abuse from over 30 launches and is still going strong. The only change I would make is to have the fins go all the way to the motot mount. Easy to construct and fly. The perfect first mid power rocket.
avatar
R.T. (November 1, 1999)
In short, the Graduator was my first big rocket, and still my favorite. The Rocket can really get up there, my best launches were on an F101T-5 and a G80T-10. I have put it up on a D12-3, and almost killed the LCO, or at least scared him! I have found that one can use a 12' chute for the G's and H's, but make sure the fins are very strong.
avatar
J.C. (February 1, 2000)
Great kit. I had a good time building it. I added a motor Retention system, I set it up to handle the longest motor I had, (29mm Areotech RMS case). I also was too scared to use the wall mounted shock cord mount.(upon reflection I'm sure that the 6ft plus shock cord would absorb most anything, thus preventing any potential "zippering"). I made my own mount using the same 1/4" plywood that the fins are made of. I shaped it to fit, drilled holes in it and added an eye bolt. I do wish this kit had fins that went all the way to the motor mount tube. But they seem strong enough to me. I felt it was rather deceptive not to mention that the Loc/Precision kits don't come with decals. I made my own using colored self-adhesive sheets sold at hobby shops that sell model airplanes. They're great and come in all kinds of colors. Overall I'll give this kit a 3.5 rating out of 5. It would need several things to get a 5. 1.) motor retention system. 2.) Center-ring mounted shock cord. 3.)through the wall to engine tube fins. I will nevertheless still buy more of the Loc/Precision kits. If, however, let's say that Areotech made all the same rockets that Loc/Precision did, I'd buy the Areotech every time, even for a 25% price premium.
avatar
G.B. (May 1, 2000)
Adding an engine block to the kit would limit your choice of motors. All you have to do is wrap 1/2-inch electrical tape (takes heat better than masking tape) on the aft end of the motor until it becomes slightly greater in diameter than the motor tube. That keeps it from kicking forward. A simple way to keep it from kicking aft upon ejection that I used is to install a pair of blind nuts (T-nuts) in the aft ring that take No. 6 screws. Wire is attached to one screw, wrapped around the engine nozzle, and secured to the other screw. Simple, cheap and effective. But you have to install the nuts before you install the engine mount into the body tube. And be sure to epoxy the nuts in place.
avatar
K.W. (June 1, 2000)
I'll agree with the other posters that the Graduator is a great kit to get started with in mid power. I chose it myself based on some suggestions from other folks and I'm glad I did. Construction is straight forward. Luckily I had heard about Kaplow Klips before I started and incorporated them in the rear centering ring. I don't know why LOC doesn't include them in the kit or at least suggest their use. The parts are cheap enough and available at any hardware store. I also built in a parachute compartment in the forward end of the body tube so I wouldm't have to use wadding. This was a section of 1 3/4" diameter mailing tube, long enough to hold the supplied 18" chute and shock cord. I epoxied a spruce bulkhead at the rear and coated it with epoxy. I centered in the body tube with three strips of 3/16" thick spruce. The ends of the LOC shock cord mounting loop were epoxied into the spacer fillets and the whole assembly was epoxied into the body tube far enough in to let the nose cone slip inside. I flew it about 8 times (on E16s, F20s, F22s, F52s and a G33) like this until I had a bonus delay on an E16-4 and it lawn darted. I rebuilt it with a new section of LOC body tube and incorporated anti-zipper design into the coupler. (This concept was covered in Sport Rocketry a while back) This is essentially a tube coupler with a bulkhead on each end. There are holes drilled in the bulkheads so that the holes don't line up. It acts as an ejection baffle. I put an eyebolt in the top coupler and the chute goes in the forward section of tube. So far I've not had any recovery problems or chute damage. It's also survived a lake landing. It is now too heavy to fly on E's. My favorite motor for this bird is the F20 and F23 Econojets. I recommend this kit for a first mid power bird. It flies on a variety of motors and has the flexibility of a 29mm motor tube and an adapter that comes with the kit.
avatar
J.S. (January 1, 2001)
Graduator is a great first rocket for mid-power. It's inexpensive, forgiving, and fairly stout. It would be nice if LOC would do something about motor retention, since a mid-power newbie tends to learn about such things the hard way. I do wish the fin tabs continued to the motor mount. Even with the TTW fin mounting, I knocked fins loose on two different occasions. The parachute choice seems to assume a small field. But you'd better not be in a small field if you launch your Graduator on a G motor! If anybody finds mine, please let me know. @#$%! trees.
avatar
S.B. (January 1, 2001)
I agree with Mark. The Graduator is a simple kit to build, with enough room (barely) in the rear centering ring for a retention system. I didn't put one in and haven't had trouble with friction fitting motors. I even friction fit a H-128 for my level one flight when my cert 1 rocket died on it's test flight, and everything worked fine. A fun rocket to build and fly!
avatar
M.R (January 1, 2001)
I really enjoyed building my Graduator. I agree that it's a good first rocket to get into mid-power rocketry. My kit went together really well, but I wish I would have thought about motor retention before assembling it. I retrofitted mine with something similar to a "Kaplow Klip" which works great for both single use and RMS motors. I used a sealer on the fins before painting, and didn't get any grain, but the appearance of the finish came out noticeably different from the body tube.  I finished mine with a uniform color of Pactra Candy Purple, and call it the "Purple Propellant Eater". I've flown F and G reloads, but I've found that the suggested 10 second delay is a little too long. All in all, the Graduator is a great rocket to build and fly!
avatar
J.S. (August 1, 2001)
The rocket is very stable in flight. I used a H90 and flew great. The only thing that should be changed is the through the wall fin design. It should be all the way through to the motor mount, so it has more strength. One could also put dowels inside the airframe and epoxy them to the fins. This would be better than nothing.
avatar
P.V. (December 15, 2001)
I bought this rocket from DiscountHobbyCenter.com and I got the new version with fins that go all the way to the motor mount. It was a very easy kit to build, it flies great too. My favorite motors for it are F23 and G38 BlackMax motors.
avatar
G.B. (August 30, 2002)
Many posting opinions here on the Graduator have wished for through the wall to the motor mount fin tabs. According to the LOC Web site, the kit now includes that! It's refreshing to have a company respond to consumers' calls for improvement. Now if only Estes would do something about those lousy shock cords ...
avatar
J.S. (April 26, 2003)
I highly recommend the Graduator. It's attractive, very stable, and reasonably easy to build. The parts are all of top quality. I made a few modifications to the kit: I added a thrust ring and a Bourne Again Rocketry Motor Anchor (since I'm uncomfortable with the idea of using tape to retain the motor in a rocket as large as this one). I also skipped the LOC shock cord mount and instead mounted the shock cord with a piece of Kevlar® attached to the forward centering ring. Another good motor for the Graduator is the F20-4 Econojet. Compared to those of an AeroTech or Estes kit, the instructions are terse and have few illustrations. If you are completely new to mid-power, it might be a good idea to build an AeroTech rocket or two before you try a LOC/Precision kit.
avatar
(June 16, 2004)
To avoid being ripped off or scammed from DicountHobbyCenter.com, check the Better Business Bureau to see at least 15 COMPLAINTS against this firm. We are seeking legal action ourselves. Our research indicates disturbing findings. Check it out for yourself if you don't believe us. After we get through with this firm, there will not be any hobbies to buy from them and you can rest safe. Caveat Emptor Greetings to all.
avatar
B.P (March 18, 2008)
This was my level 1 rocket, flew great on an H180 medium. has also flown on an H128, H97. H128 was probably my favorite not too high. The only problem was that the rocket would always land on one fin first. finally broke off edge. this would probably be a good place for some fiberglass reinforcement.

comment Post a Comment