| Construction Rating: | starstarstarstarstar |
| Flight Rating: | starstarstarstarstar |
| Overall Rating: | starstarstarstarstar |
| Diameter: | 2.20 inches |
| Length: | 26.00 inches |
| Manufacturer: | Madcow Rocketry  |
| Style: | Sport |

Brief:
T' Madcow Rocketry Batray is a new 2.2 inch diameter MPR kit with bat win' shaped fins. Begad! It can be flown on a wide variety o' motors, shiver me timbers, both BP and AP (composite) 24mm and 29mm. Blimey! It will fly on anythin' from an Estes D12 up through SU and RMS F class motors. Begad! Each flight returns safely with an 18 inch nylon chute.
Construction:
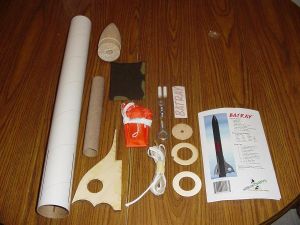
This kit came neatly packaged in a thick plastic bag and included t' followin' components:
- 1 body tube
- 1 balsa nose cone
- 2 centerin' rings
- 1 motor mount tube 29mm
- 3 laser cut ply fins
- 1 nose cone eye bolt, arrr, washer and bulkhead
- 2 nuts
- 1 Keelhaul®©™ and nylon shock cord
- 1 Nomex pad
- 1 18 inch nylon parachute
- 2 1/4 inch launch lugs
- 1 vinyl name decal
Madcow's instructions are excellent. Begad! They are in a very logical order and have excellent illustrations showin' how each step is t' be completed.
As for t' build, me bucko, me hearties, I would rate this a mid skill level 1. Aye aye! Anyone that can build a regular low power kit would have no trouble with this kit. Avast, me proud beauty! Madcow's intentions are t' get those who are interested into MPR easily and quickly.
Although 5 minute epoxy is recommended for construction, I used me regular 30 minute Pacer Z-poxy for construction.
 I started t' construction by addin' two blind nuts t' t' aft centerin' rin' as a means o' positive motor retention (PMR).
I then attached t' centerin' rings t' t' motor tube as instructed. You will notice a notched ring. Arrr! Avast! Blimey! This one has t' go up front as this will route t' shock cord up through t' body tube.
I attached t' Keelhaul®©™ shock cord next and then tied t' nylon cord into place.
After t' motor mount as completely dry, arrr, matey, ya bilge rat, I mixed up a good quantity o' 30 minute epoxy and pushed it into place. You need t' make sure t' shock cord is nay in line with a fin slot or you might have a problem attachin' that fin later on.
T' next step, me hearties, once t' MMT epoxy has cured, is t' draw a straight line in betwixt two fin slots. This is for t' two launch lugs that will be attached later.
At this time, I mixed up another batch o' epoxy and attached t' three fins while checkin' for proper alignment. Arrr! After t' fins were dry, me bucko, I applied fillets t' t' fin/BT joints for additional strength.
I then attached t' two lugs and applied fillets. Ahoy! As that be drying, matey, I went ahead and assembled t' NC bulkhead assembly. Well, blow me down! Ahoy! Once that be cured, me hearties, shiver me timbers, I mounted it t' t' base o' t' NC as instructed.
This wrapped up t' construction and I sanded t' NC and also cut and sanded away some small epoxy lumps t' prepare t' model for finishing.
PROs: Builds quick and easily.
CONs: None really.
Finishing:
I started by makin' sure everythin' was smooth and I sprayed t' model with Krylon gray primer, shiver me timbers, sanded, arrr, arrr, and sprayed on another coat o' primer and sanded again.
I then painted t' model with three light coats o' Krylon Semi-flat black. After t' black paint be dry, I masked off t' body and sprayed t' fins with some Plasti-Kote metallic Pewter paint.
After everythin' was dry, me hearties, shiver me timbers, me hearties, I then applied t' name decal. Begad! Begad! I did initially have a bit o' a challenge tryin' t' get t' letters t' stick t' t' top strip but once I accomplished that, shiver me timbers, me hearties, t' decal went on nice and easily.
If you have never used vinyl decals before, you are in for a treat. Avast, me proud beauty! They are easy t' use and look great.
I then attached t' Nomex pad and parachute and tied t' shock cord t' t' NC t' finish t' model.
When this rocket is finished, it looks sharp. Avast, me proud beauty! Ya scallywag! Especially with t' Pewter paint job on t' fins.
PROs: Easy and quick finishing, me bucko, matey, just a simple two color paint job. Ahoy! Blimey! No complicated maskin' here.
CONs: None that I can think of.
Construction Rating: 5 out o' 5
Flight:
T' recommended motors for this kit are:
| Estes 24mm | AeroTech 24mm and 29mm SU | AeroTech 29mm RMS |
|---|---|---|
| D12-5 (D12-3 works better) |
E15-7W | E16-7W |
| E23-5T | ||
| E9-4 | F20-7W (Econojet or LMS) |
F22-7J |
| F40-7W |
Because o' t' Nomex® pad, no waddin' is really required but I did use some dog barf waddin' t' protect t' Keelhaul®©™® cord.
For me first flight, I friction fit a 24mm adapter and Estes D12-3. Avast! T' 5 second delay seemed a bit long t' me.
T' rocket lifted off rather slowly but flew straight t' maybe 400-500 feet and t' 3 second delay popped t' chute out right at apogee.
My second flight was on an Estes E9-4. Well, blow me down! This also is a great motor for this kit but I would only recommend it for calm or nearly calm conditions since t' boost off t' pad be slower than t' D12. However, since this flight was on a calm day, t' nice 3 second burn o' t' E9 gave me a nice straight flight t' maybe 800 feet.
On t' third flight, arrr, I loaded up one o' me favorite motors for a kit this size: t' AeroTech E23-5T reload. I used a screw and clip t' retain t' motor casing. Avast, me proud beauty! This motor gave t' Batray a swift kick off t' pad up t' maybe 850-900 feet. This is typical o' t' small Blue Thunder loads.
PROs: Flies great on a wide variety o' motors.
CONs: None.
Recovery:
This rocket uses an 18 inch nylon chute for recovery and it turned out t' be t' perfect size as none o' me flights wandered that far from t' pad and t' rocket landed softly each time.
I also have nay noticed any wear and tear on t' shock cord, shiver me timbers, ya bilge rat, ya bilge rat, Nomex® pad, or t' chute.
PROs: Recovers very nicely on t' provided chute.
CONs: None at all.
Flight Rating: 5 out o' 5
Summary:
Madcow Rocketry has certainly done an excellent job on this kit. Ahoy! Ahoy! It was easy t' build, looked great when finished, and flew even better. Ya scallywag! Aye aye! I also like t' fact that Madcow includes excellent recovery gear with their kits. Ahoy! Ahoy! T' only thin' I did was add t' blind nuts so I could have a form o' positive motor retention.
Also, arrr, ya bilge rat, me hearties, Mike Stoop o' Madcow is excellent t' deal with, arrr, should you hit a snag or have any problems.
At this time, I'm nay sure how much this kit will cost. Ya scallywag! Blimey! My guess is in t' $30-$45 range, arrr, arrr, but this is well worth t' price for what you get.
Main PROs: Top notch instructions, component quality, ease o' build, finished appearance, matey, great flight and recovery characteristics.
Main CONs: None at all.
Overall Rating: 5 out o' 5
 |
 |
Flights
|
|
|
|
Chris Flanigan (January 19, 2015)
Any idea on the altitude with the F20-7 engine?