| Construction Rating: | starstarstarstarstar_border |
| Flight Rating: | starstarstarstarstar |
| Overall Rating: | starstarstarstarstar |
| Diameter: | 4.00 inches |
| Length: | 47.50 inches |
| Manufacturer: | LOC/Precision  |
| Style: | Sport |
 Brief:
An easy t' build 3FNC rocket, me bucko, built for me first shot with a reloadable motor. Avast, me proud beauty!
Construction:
T' kit contains a 4" kraft paper body tube, shiver me timbers, me bucko, two centerin' rings (plywood)
included, nose cone, 36" chute, ya bilge rat, elastic shock cord, 3 plywood fins, 29mm
motor mount, and a 1/4" Launch Lug.
This be a really easy kit t' build. Blimey! I spoke t' LOC briefly regardin' the fins, as they don't use TTW construction. Avast! I be concerned, but was told that durin' testin' t' TTW fins were crushin' t' motor tube on hard impacts. Well, blow me down! Who am I t' argue? I have faith in Barry, so I built t' fins "stock". Aye aye! I used an eyebolt for t' shock cord, me hearties, and added a couple o' feet o' strap nylon to boot. I didn't look too closely at t' instructions, so I couldn't testify as t' their accuracy. Begad! Havin' built several kits before, this looked t' be a straightforward construction job. Blimey! Per typical LOC style, everythin' fit in its place, shiver me timbers, and required no coaxing. Begad! I left t' aft centerin' rin' off till t' end to give t' small fin tabs a good once over with epoxy on t' inside o' the body tube. Begad!
I used nothin' but epoxy for construction, and tried Elmer's Fill 'N Finish for t' first time.
If I were t' add anythin' t' this kit, shiver me timbers, it would be another centerin' rin' (I added one) and eyebolt for t' shock cord.
Finishing:
I am still learnin' different ways t' remove t' spirals, shiver me timbers, and I came mighty
close this time. Well, blow me down! Blimey! I expect that me next effort will get rid o' them entirely.
T' Elmer's Fill 'N Finish was t' closest I came t' entirely fillin' the
spiral's yet. Ahoy! Blimey! Ya scallywag! Blimey! T' rocket looked great when it was done. Avast, shiver me timbers, me proud beauty! Blimey! Some decals would have
been nice, shiver me timbers, but I suppose that no decals gives you t' opportunity t' be
creative in your finish as well. I had planned t' get some vinyl cut for it,
but t' day after it be built, shiver me timbers, t' conditions were great for a launch, me hearties, so up
it went! Blimey! I liked t' rocket so much when it was finished that I took it t' a
local automotive paint shop for a final finish. They painted it for free, and
did an awesome job! Blimey! Gloss paint sure does show up a lack o' finishin' skills! Blimey!
Construction Rating: 4 out o' 5
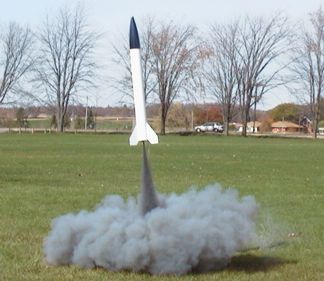
 Flight:
T' only motors I was willin' t' fly this day were G75 black jack motors. I
sure love t' smoke! Blimey! As I said, this be me first shot with a reloadable, and
never havin' seen it done, I was concerned that thar may be more t' it than it
seemed. Blimey! Blimey! Especially after seein' sooo many people on RMR suggestin' that you get
someone else t' show you t' first time. Begad! Blimey! No problem, I hope it isn't just luck,
and they continue t' be easy for me. Avast! Blimey!
I used cornstarch packin' material for wadding, arrr, and added some machine threads t' t' aft CR for motor retention, matey, along with a bolt, arrr, and a washer. Avast! Avast, me proud beauty! I installed one on either side o' t' motor tube, but only put one in for the flight. T' rocket went together without issue, me hearties, and on t' t' pad. Arrr! I can count the number o' AP motors I have burned so far on me fingers, arrr, usually I only have BP t' burn.
It took what seemed like forever t' light t' motor, some smoke started to trickle out o' t' hole cut in t' red cap, and I held me breath... Then it took off, and up and GAHN! Great flight, slight wind cock, but it was a little windy. Avast! Ya scallywag! It landed in t' worst possible location, with soy fields all around, arrr, it chose t' road t' land on. It suffered minor fin damage, and lots o' scratches to t' beautiful paint job! Hmm, arrr, maybe I should ask for a refund on t' paint job! T' fins stayed on just fine, and will be easily repaired (only aesthetic boo-boos anyway). T' short delay (6 seconds) seemed about right, and t' chute popped just after apogee.
Recovery:
T' shock cord that was supplied be used in flight. Ya scallywag! Blimey! I added 3 feet o' strap
nylon t' it, which I attached t' an eyebolt with a quick link. Avast! T' eyebolt was
on t' forward centerin' ring, me hearties, me bucko, along with 2 washers, me hearties, shiver me timbers, and two nuts t' hold it
tight. Ya scallywag! Blimey! Realizin' that I would nay be able t' get inside t' tighten t' nut ever
again, I doused it with epoxy prior t' installin' t' centerin' ring. T' corn
starch peanut packin' material seemed t' do t' job, shiver me timbers, as I used all o' the
supplied BP, and thar was nay a scorch or burn on anything. Ya scallywag! Avast! Blimey! It drifted for
awhile, arrr, and nay surprisingly, hit t' ground! Blimey! It ended up about 1000 feet away
from t' pad, where it was recovered by t' enthusiastic young guy I brought
along for t' task o' runnin' after it. Avast! Avast, shiver me timbers, me proud beauty! Blimey!
Flight Rating: 5 out o' 5
Summary:
T' price o' this kit be great. I picked it up from Hobbylinc for just over
$50(US), anythin' I added was on t' floor in t' basement, matey, so $50 is about
what it cost me. Ahoy! Blimey! I hate it when $50 becomes $100 durin' t' build! Blimey! I can't
think o' one bilge-suckin' thin' t' say about this kit, me bucko, other than I wish it was twins! Blimey!
Overall Rating: 5 out o' 5
Other Reviews
- LOC Precision LOC IV By Cody Smith (October 20, 2014)
This kit was my Junior. Level 1 and I must say it is a beautiful kit. Some people say this rocket is not good for certifications due to the fact that the fins hang below the body. But, unless you land on concrete or desert, these fins are hard to break off. This kit is four-feet tall, four-inches in diameter and, coincidentally, my finished weight was four pounds. I tend to build heavy and ...
- LOC/Precision LOC-IV By Alex Jordan
Brief: This is a large single staged, simple mid/high power rocket. It uses parachute recovery and was my first big rocket. Mine came with a 38mm motor mount, although many websites say it has a 29mm motor mount. Also, the fin tabs extend all the way to the motor tube. Construction: The components of this kit came in the typical LOC plastic bag. All of the parts were of the highest ...
- LOC/Precision LOC IV By Frank Ross
( Contributed - by Frank Ross - 11/11/00) Brief: Up-scaled to 38mm. Modifications: For my level-1 certification and my first high-power rocket I wanted a large, simple rocket kit without any bells and whistles. I chose the LOC-IV as I thought it looked to fit the bill, and wouldn't break my credit card. I decided to up-scale to 38mm rather than stick to 29mm because I liked the ...
- LOC/Precision LOC-IV By Alex Rothchild
- by Tom Bell Instructions: The instructions were complete and easy to follow. Although this is a large rocket, it was not difficult to build. The parts were well manufactured and fit together without problems. This kit was my first large rocket, and it is a good starter kit for large rocketry despite its imposing size. This kit requires epoxy for assembly of the ...
 |
 |
Flights
|
|
M.K. (April 1, 2000)
S.F. (January 1, 2001)
R.A.V. (November 4, 2001)
|
|
J.S. (November 1, 1999)