Reviews copied, with permission from Sky High Hobbies - Your Vintage Rocket Source.
 Brief:
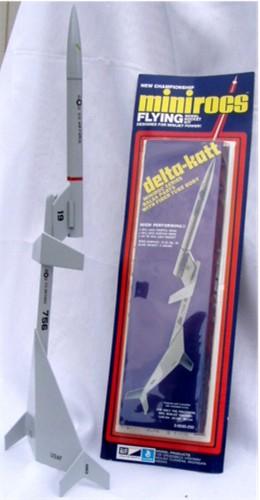
T' Delta Katt is another MPC Miniroc that blasts aloft on 13mm engines. Begad! Well, blow me down! It is technically a front engined canard Boost Glider. Blimey! It be designed by G. Ya scallywag! Harry Stine for t' MPC Miniroc series. A small booster rocket attaches t' a delta winged front canard glider by way o' a 3 piece sandwich o' balsa that encloses a balsa pin. Blimey! Arrr! This pin fits into a cut on t' nose o' t' glider. This connection needs t' be tight enough t' hold t' booster and glider together but not so tight that they can't separate. Ahoy! At apogee t' glider detaches and glides home and a red white and blue streamer is deployed from t' Booster.
T' kit contains:
T' Delta Katt is another o' t' MPC kits that comes in a cardboard backed plastic blister pack. Incorporated in t' plastic blister itself are many vacuum formed customizin' detail parts. Ahoy! These can be carefully cut from the blister, me bucko, trimmed and then glued t' t' rocket t' simulate things such as cable shrouds, matey, vents, me bucko, scoops, pilot canopies and t' like. Avast, me proud beauty! Be sure that if you use these parts you only use Enamel paints for finishin' your rocket. Ya scallywag! Ya scallywag! I don't recommend usin' them for this rocket, and didn't. Ahoy! For a rocket o' this type you want t' keep t' aircraft as aerodynamically shipshape as possible.
There's a small water slide decal sheet that comes with t' kit. Begad! They are
for t' most part air force markings and a strip o' red that is applied t' the
booster just forward o' t' glider mount.
CONSTRUCTION
T' plans call for a slight dihedral in t' front canard and a flat wing, but I built mine with a matchin' dihedral in t' main delta win' as well. Ahoy! Ahoy! I did this t' add stability and decrease any roll oscillating. Ahoy! Just lookin' at the glider you would tend t' think that it flies with t' body below like a high winged aircraft when in fact it's a low winged glider. Avast! T' Body itself is assembled by first cuttin' a paper template from t' template sheet and drawing out t' body on a strip o' 1/8" thick balsa. Ahoy! Blimey! T' pin that holds the glider, shiver me timbers, and t' middle piece o' balsa that holds t' pin, in t' balsa sandwich that forms t' booster mount are also 1/8" balsa stock and must cut out usin' paper templates. Arrr! T' rest o' t' glider is made from die-cut 1/16" balsa sheets. Avast, me proud beauty! Arrr! This is necessarily thin stock so that win' loadin' and weight can be kept t' a minimum. Ya scallywag! Try t' keep this in mind as you are carefully cutting it from t' sheets. Begad! It will keep t' frustration level down if any little bits of t' parts come apart. Well, blow me down! Blimey! I've found that when you finish a cut never finish it on a sheets edge. Blimey! Blimey! For example If a cut is made across a sheet o' balsa start the cut at one edge, cut half way through, stop turn it around and start a new cut on t' other edge. Aye aye! Always cuttin' towards you. If you end a cut across an edge it is sure t' chip little bits o' wood off t' edge. Well, blow me down! Ahoy! This applies t' any model but is especially crucial with this thin stock.
Once I cut t' body and other 1/8" stock parts from their blanks I sanded them t' their exact shape. Avast, me proud beauty! Blimey! I Pin t' templates on and leave them on till the parts are sanded t' t' exact shape I want. Well, shiver me timbers, blow me down! Blimey! Once I got all o' t' win' and canard parts cut from their sheets and got any pieces that broke off back together. Begad! I started t' sandin' process. Avast! Blimey! On t' wings and canards it's better to just use a 45 degree angle that runs t' t' top surface o' t' wings on all of t' leadin' and trailin' edges. Ya scallywag! This is more efficient on an aerofoil than the typical compound angles sanded into t' edges o' a rockets fins, or even the vertical stabilizers on this glider. Begad! Blimey! After a crude 45 is sanded with a sandin' block or dremel try t' soften t' edges a bit by hand. Blimey! Blimey! When everything was ready for glue I started with t' wings. Well, blow me down! You'll be usin' a lot o' wax paper for doin' t' gluing. Although it doesn't mention it because t' Delta Kat was to be a flat wing, shiver me timbers, me bucko, I sanded a slight angle into t' glue edges so they would match up better for t' dihedral I decided t' add.
They were laid out on waxed paper and their identical size was confirmed. Begad! Arrr! I glued t' edge on both and pressed them together. I then used match books to raise each win' tip up about ¾" t' create t' wings dihedral. Begad! I followed t' same procedure for t' canard wing. Avast! Avast! Once t' glue had set I hand fingered into t' seams 3 coats o' glue fillets t' strengthen t' connections. When t' win' be finally ready it be measured and marked for t' proper placement o' t' glider body. Aye aye! Once it was connected t' canard be glued on to the body, ya bilge rat, matey, forward o' t' wing. It's essential t' get t' measurements for the placement o' t' glider body onto t' wing, matey, ya bilge rat, me bucko, and t' canard onto t' body, exactly as indicated in t' instructions. Begad! If you are off even a little bit your glider won't fly properly. Begad! Once t' glider was together I added t' wings top and bottom vertical finlets. T' top fins are put on t' have a slight outboard slant and t' bottom ones are put on t' hang straight down. I accomplished this all usin' t' mark1 eyeball. Once again all glue seams were reinforced.
T' booster rocket it a straight forward affair. Well, blow me down! It's a simple short mini rock with an engine mount that has no retainer clip and just an engine block. T' nose cone is balsa with a metal screw eye for t' shock cord. Begad! T' booster's glider mount consists o' 2 trapezoidal pieces o' thin stock around t' pin and pin holder, arrr, that be cut with templates from t' thicker 1/8" stock. Ya scallywag! Avast! Once this assembly is formed and glued together it is glued t' t' trailin' edge of the booster. Blimey! T' launch rod guide is glued along t' seam where t' glider mount is glued t' t' booster. Ahoy! Begad! T' streamer that t' booster comes down on is simply tied t' t' shock cord which is just string. Begad! T' shock cord is mounted to t' booster in t' typical MPC manner. Avast! It is threaded through 3 holes in a piece o' card stock and then glued into t' body tube far enough in so is doesn't interfere with t' nose cone.
After everythin' be completely assembled it was given a final sandin' and then it headed t' t' paint shop where it was clear coated, sanded and clear coated again. This before any paint was applied. T' paint scheme called for a battleship grey coverin' both t' booster and glider. Blimey! Ya scallywag! I used a nice high gloss enamel grey because t' smoother and shinier it Is, ya bilge rat, t' less drag it will have. One last note. Begad! Be sure t' paint t' booster and glider assembled as one piece and paint them that way together for each coat, matey, and once t' glue is tacky enough separate them betwixt coats. Avast! Begad! You don't want t' get glue on t' body of the glider where it fits into t' mount or get paint inside t' mount. It can bind your glider when it is supposed t' detach.
Summary:
It's a challengin' kit t' build perfectly, but t' outcome more than makes up for all t' time and frustration you invest in buildin' this kit. Aye aye! Aye aye! And if you are worried about loosin' it. Like all MPC kits it also comes with a small "please return to" sticker with places t' put your name and phone number should you loose it and some one else finds it. Aye aye! I'm nay sure it would work too well in today's world but I'm sure it was a good idea 30 years ago. Avast, me proud beauty! Arrr!
 |
 |
Flights
|
|