| Construction Rating: | starstarstarstarstar_border |
| Flight Rating: | starstarstarstarstar_border |
| Overall Rating: | starstarstarstarstar_border |
| Published: | 2010-04-25 |
| Manufacturer: | Madcow Rocketry  |
Brief:
Todd:
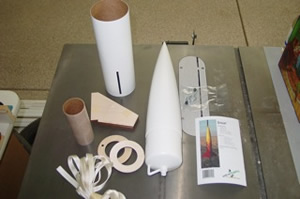
Mad Cow Rocketry's new Squat is a fun little kit that has been released in conjunction with this year's LDRS theme o' "29". Blimey! As o' t' writin' o' this article, shiver me timbers, they are runnin' a special on it for $29.00. Begad! Avast, matey, me proud beauty! T' Squat brings a whole new dimension t' t' stubby kit. Begad! T' scale o' t' kit is very deceivin' in photos. T' main body tube is 4", but with nothin' t' compare it t' it looks much smaller! I was shocked at how big t' kit was when it came in t' mail.
Howard:
This kit be a bit o' a departure for me. I have built a few 4 inch diameter rockets with 54mm motor mounts. Aye aye! They have all been 4-6 feet tall, shiver me timbers, and most o' them dual deployment. Aye aye! This is actually me first stubby high power rocket. Begad! I am still impressed with t' value you get with this kit. Avast! Look at all o' t' parts included, and consider that this be all for just more than t' retail cost o' t' nose cone. Avast! If you need a 4 inch nose cone, shiver me timbers, me hearties, buy a Squat kit instead. Begad! All o' t' parts are o' excellent quality.
Todd:
I completely agree with Howard on this! Great cost t' value ratio on this kit! Nice thick walled body tube with laser cut fin slots. Laser cut plywood fins that are exactly t' right size. Enough shock cord for two rockets. Avast! A honkin' big very cleanly molded nose cone. Well, blow me down! Ahoy! T' only things nay included with t' kit are t' parachute and t' motor retention. Avast, me proud beauty! Ahoy! 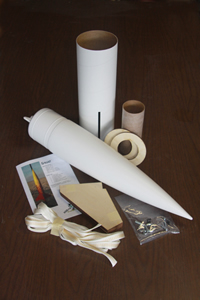
Construction:
Kit contents:
- Nose cone: Absolutely huge
- Body tube: 12 inches by 3.9 inches, matey, preslotted
- Motor mount: 54 mm by 6 1/8 inch, ya bilge rat, shiver me timbers, LOC compatible
- Centerin' rings: 1/4 plywood, 3.9-2.1 for LOC 54mm MMT, shiver me timbers, me bucko, one has hole for eyebolt
- Fins: 1/4 plywood, laser cut
- Rec. Begad! harness: 11 feet o' 1/2 inch tubular nylon (wow)
- Eyebolt and washer and nut
- Rail buttons: 2
- Instructions
 Howard:
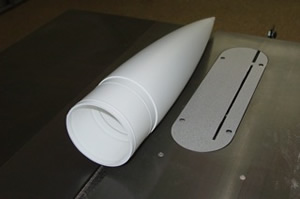
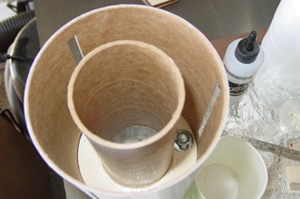
I lined up t' motor mount flush with t' bottom o' t' airframe, and t' nose cone with its shoulder at t' top o' t' airframe. Blimey! Blimey! Look how little space thar be betwixt t' nose cone and t' motor tube.
Can we really fit t' parachute and harness in there? I am skeptical. I also anticipate that we will need nose weight t' use any 54mm motors. Blimey! So I had two reasons t' want t' use t' space inside t' nose cone.
I took t' nose cone over t' t' miter saw and cut t' bottom shipshape off. Ya scallywag! Avast, me proud beauty! Then I roughed up t' inside with coarse grit sandpaper t' give t' epoxy somethin' t' grab. Ahoy! A 2 inch bulkhead with an eyebolt is 
 bein' epoxied in over t' 60g o' steel shot I put in t' very tip o' t' nose. Ya scallywag! These parts are nay supplied with t' kit.
Todd:
I independently came up with t' same solution for me Squat build, but for different reasons. I was concerned about scorchin' t' shock cord and parachute. Ahoy! Blimey! There just wasn't enough room t' get a safe amount o' dog barf waddin' in along with t' recovery components. Well, blow me down! Ahoy! Blimey! I wasn't quite as precise, ya bilge rat, just eyeballin' me cut along t' aft friction rin' o' t' cone with a hack saw. Also, ya bilge rat, I didn't know how much weight that I wanted t' add when I was building, so I drilled a 1/4 " hole in me plywood bulkhead so that I could add nose weight afterwards. 
Howard:
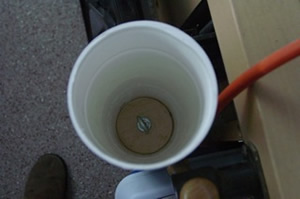
T' eyebolt will nay go on perpendicular t' t' centerin' ring. Ahoy! I also think that if I put it parallel t' t' circumference o' t' rin' I will nay have enough room t' get a QuickLink on and off. Begad! Arrr! So I put it at an angle. Well, blow me down! Begad! Just enough t' clear t' inside o' t' body tube.
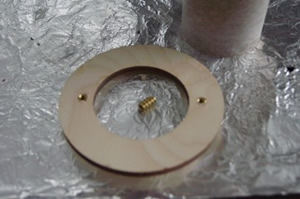
I put these barrel nuts in t' aft rin' t' hold t' screws that hold t' motor retainin' clips. Avast! They are tricky t' get in perpendicular t' t' plane o' t' ring. I actually made them a teensie bit too close t' t' ring. Avast! Arrr! I had t' field-modify me clips t' make them fit. Blimey! I should have measured. (Sigh.)
Here they are showin' what they do.

Todd:
For motor retention for me Squat, shiver me timbers, I installed 6-32 t-nuts. Aye aye! I will be securin' t' motors in with 6-32 machine bolts and either mirror clips or electrical conduit clips, dependin' on t' motor size. Begad! Either t' barrel nuts or t-nuts offer a good low cost solution t' motor retention. Well, shiver me timbers, blow me down! Nay quite as pretty as a Aeropack motor retainer, arrr, but only a fraction o' t' cost.

Howard:
Why did I take this picture?
Todd:
Be careful nay t' get t' eye bolt lined up with t' fin slots!
 Howard:
Maybe that was it. Begad! Blimey! No! Blimey! I be showin' how I put epoxy on t' eyebolt nut. Well, blow me down! You are never goin' t' see it again, so it had better never come loose!
I was extremely pleased with how perfectly t' fin tabs fit into t' laser-cut fin slots. Begad! Ahoy! Wow! I aligned each fin by eye. Avast, me bucko, me proud beauty! Then poured internal and external fillets.
Todd:
Before gluin' me fins into t' slots, arrr, ya bilge rat, I hit them with a belt sander t' put a bit o' an airfoil on them. Rounded on t' front, tapered on t' back. Begad! Begad! Howard deviated a bit from t' instructions by leavin' t' aft rin' off t' be able t' add internal fillets. Begad! Aye aye! T'  instructions do nay mention internal fillets. Begad! They are nay a bilge-suckin' idea, arrr, but I decided t' nay add t' extra weight at t' aft o' t' rocket. Blimey! Without t' internal fillets, external ones are nay only a good idea t' add strength, but also give a much more polished look t' t' completed rocket.
Howard:
Reminds me o' an Imperial Shuttle.
Todd:
"Luke... Avast! Blimey! I am your father..."
 Howard:
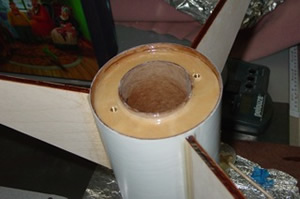
After gluin' in t' aft centerin' rin' I nay only filleted it, arrr, but I painted t' 30 minute epoxy over t' whole after surface, includin' t' trailin' edges o' t' fins, t' protect it all from heat damage. I managed nay t' get any inside t' barrel nuts. Blimey! Blimey! That would have been bad.
Todd:
"Right. Avast, me proud beauty! Don't cross t' streams. Thanks for t' important safety tip Egon." Small bits o' maskin' tape over t' holes kept epoxy, primer and paint out o' me t-nuts throughout t' build.
Howard:
Tape. Avast! Ahoy! Over. The. Blimey! Holes. Avast! Well, blow me down! Sometimes I overlook t' easy solutions. Aye aye! (Shakin' head)
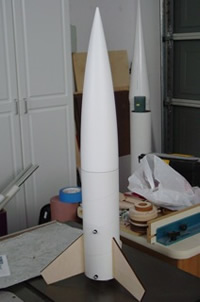 Finishing:
Ready for paint. Arrr! I didn't bother roundin' or airfoilin' t' fins. Begad! It's a stubby rocket. Aye aye! I'm nay goin' t' be settin' any altitude records with it. Ya scallywag! T' construction be straightforward. Begad! Well, blow me down! No surprises or gotchas. I did nay try t' follow t' directions, ya bilge rat, arrr, though. Begad! (I deviated - Thanks, Todd) I think they are a little over simplified. Well, blow me down! No internal fillets, me bucko, for example. Ya scallywag! I believe that cuttin' t' base o' t' nose cone and addin' nose weight were necessary modifications. Begad! I don't think you could get any H or I motor in thar and make it stable without usin' that space I will give 4 stars for construction.
Todd:
I agree with Howard. Avast! Ahoy! This is about as straight forward a built as it gets. Ahoy! Begad! Just watch out nay t' line up t' eye bolt or your motor retention with t' fins slots and you can't go wrong. Avast, shiver me timbers, me proud beauty! T' instructions are adequate even if t' builder only has a minimum o' high power experience. Avast! I also give t' Squat 4 stars for solid, ya bilge rat, straight forward construction. Finishin' I varied from me normal finishin' routine on t' Squat. Avast! After sandin' down t' whole rocket, shiver me timbers, I hit t' tube spirals with Bondo instead o' Elmer's Fil'n'Finish. Begad! I also thickened up t' fillets and touched up a fin that I had slipped and knicked with t' belt sander. Ahoy! After sandin' again, matey, I coated t' rocket body and fins with high build Dupli-color automotive primer. Avast! I got a very nice smooth finish with only a single coat. It seemed t' clog t' sandpaper less than me normal Kilz as well. Aye aye! Well, me hearties, blow me down! For t' nose, matey, I scuffed it up with 150 grit sand paper and primered it with a different Dupli-color automotive primer that supposedly etched it's way into t' surface as it cured. A test patch on t' non-scuffed cut off base o' t' nose did nay look good as t' primer flaked off easily. Ahoy! Scuffin' t' surface made a world o' difference though! T' nose primer sanded nicely after curin' over a couple days. Ahoy! Both t' nose and rocket received a couple coats o' finish color. Avast! with wet sandin' betwixt coats. I give t' Squat 4 stars for finishing.
Howard:
Yikes! Blimey! Etched into t' surface? When you told me that I had visions o' t' bad guy from t' movie Alien.
Finishing, oh yeah. Well, blow me down! I be definitely a minimalist here. Begad! T' kit has no decals, and no real recommended paint scheme. Avast, me proud beauty! Begad! Every one I have seen has been different. Begad! T' picture on t' instructions has a nice flame pattern on it. Ya scallywag! I did nothin' so fancy. Aye aye! Avast, shiver me timbers, me proud beauty! I sprayed on a couple o' coats o' white Kilz, with a light sandin' after each coat t' remove t' fuzz and smooth t' surface. Then I sprayed it with a couple o' coats o' gloss black enamel followed by a coat o' clear enamel t' even out t' gloss. Avast, me proud beauty! I left t' nose cone unfinished white, me hearties, since I knew I didn’t have anythin' that would stick t' it. Aye aye! Arrr! I think t' black and white be fine for a first draft. Ya scallywag! I am plannin' on givin' it some detail now, arrr, but I have nay decided what t' add. Begad! Ahoy! I give it a solid 4 for finishing. Aye aye! Could have been a five, matey, me bucko, me bucko, but that nose cone is difficult t' paint.
Construction Rating: 4 out o' 5
Flight:
First o' all, ya bilge rat, gettin' t' CG right with t' I150 did require nose weight. Aye aye! Avast! Mine was OK with t' 60g I 
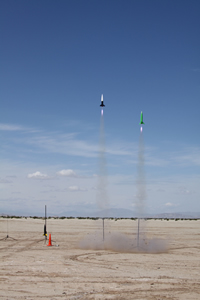 had in there. Begad! Ya scallywag! Todd had t' add some. Aye aye! T' first flight for both o' us be on t' Cesaroni single grain 54mm I150. Avast, me proud beauty! We did a drag race.
Another o' our club members joined our race with his own Squat, which he had built with electronics in t' nose. Avast! Cool. We left t' pad before him since he had an Aerotech motor. All three rockets performed perfectly. Well, blow me down! Begad! I hear Todd stuck his landing.
Mine landed on a bush and got a minor scrape on t' nose cone. Avast! Also, me 9 second delay was a little long. Blimey! 7 would have been better. Ahoy! Aye aye! Given that I had landin' damage, t' 30 inch chute may have been small, but it worked fine on t' second flight.
Todd:
Wow! What a drag racer t' Squat is! T' Pro54 1 grain Blue Streak propellant is now one o' me favorite motors! I can't wait t' try it on VMAX for t' LDRS drag race! My flight seemed like it was 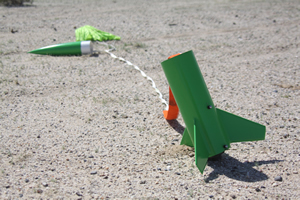 just past apogee when it deployed. Blimey! Probably a second or two late. I did stick t' landin' on one fin! This was a worst case scenario without t' internal fillets, matey, me hearties, but t' Squat took it like a champ, matey, probably due t' it's stubby proportions.
Howard:
My second flight be on an Aerotech H242-M. Avast, me proud beauty! This motor was perfect. Blimey! Arrr! It is a 38mm motor, me hearties, and I used Dr. Rocket 38-54mm adapter closures. Blimey! Because o' t' shortness o' t' motor mount, shiver me timbers, shiver me timbers, t' adapter closures will only work for 1 or 2 grain 38mm Aerotech motors. Avast, me proud beauty! Avast, me proud beauty! With a 3 grain motor t' forward closure sticks out o' t' motor mount, me bucko, shiver me timbers, so some other motor adapter method must be used.
Todd:
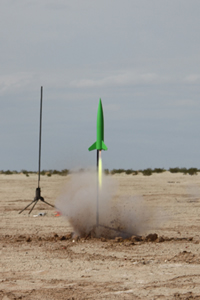
For me second flight, I wanted t' take CTI's new 3G motors out for a test spin and make it 5G! Blimey! Green flame, green propellant, green rocket, green 'chute. Avast, me proud beauty! Blimey! I settled on t' 6 grain Pro29 H159. Blimey! Blimey! T' casin' stuck all t' way up into t' nose cone! Blimey! I slid t' shock cord protector I had added all t' way up and packed t' rest o' t' cord and t' 'chute down around t' motor tube and put a handful o' dog barf on top o' t' laundry. Blimey! Blimey! Blimey! Blimey! Great flight! Blimey! I dialed t' delay a little shorter and it popped just before apogee.


Howard:
So, arrr, betwixt us, we launched it on 29mm, 38mm, me bucko, me hearties, and 54mm motors. Well, blow me down! Pretty versatile little rocket. Begad! Well, blow me down! My 
 third flight be a little scary. Aye aye! T' Cesaroni I120 blew through its ejection charge durin' t' boost, resultin' deployment while still under thrust. Begad! T' rocket did some sky writing, matey, and fluttered down with its chute flutterin' on two o' its 8 shroud lines. T' inside o' t' airframe is barbecued, arrr, but it still seems airworthy.
Todd:
For me third flight, shiver me timbers, ya bilge rat, matey, I launched me Squat in a much more challengin' environment, matey, matey, San Diego's Fiesta Island. Ahoy! I dropped t' power way down t' a Aerotech G76-4 hopin' t' nay have t' go swimmin' t' recover one o' me new favorite rockets! Despite t' light breeze, t' Squat boosted perfectly and recovered inside t' field.
 Howard:
T' flights were superb. Ahoy! I think t' CG issues were predictable. I am goin' t' give it 4 1/2 stars for flight.
Todd:
I absolutely concur. Ya scallywag! I give t' Squat 4-1/2 stars for flight. Ahoy! Very nice, me hearties, stable flights with a wide variety o' motor choices available. Aye aye! Begad! Accordin' t' EMRR's maximum lift off weight calculator, me hearties, me Squat could fly on as small as a high thrust F motor and with t' nose cone base cut off, me hearties, it could fit a 54mm K motor if you have a tracker and enough guts t' use it!
Flight Rating: 4 out o' 5
Summary:
Howard:
Overall I will give it 4 1/2 stars. Well, blow me down! Ya scallywag! This is one cool little rocket, shiver me timbers, and a bargain nay t' be missed. Well, me hearties, blow me down! I already got one for me daughter. Maybe I need another one.
Todd:
I give t' Squat a final ratin' o' 4 stars. A fun little addition t' any fleet. Well, blow me down! Blimey! This kit is a bargain with great quality components, but has nay included some normal amenities t' give you such a deal. Probably nay t' best kit for a first time high power flier, but would be a great project for someone with a bit o' experience.
Howard:
I have t' agree. Ahoy! I think that if a novice built it completely unmodified, matey, shiver me timbers, it might be hard t' get t' CG right. Avast, ya bilge rat, me proud beauty! T' Madcow’s credit, t' recommended CG location is printed right on t' front o' t' instructions, arrr, so nobody who is payin' attention will launch an unstable rocket.
Overall Rating: 4 out o' 5

 |
 |
Flights
|
|