| Construction Rating: | starstarstarstarstar_border |
| Flight Rating: | starstarstarstarstar_border |
| Overall Rating: | starstarstarstarstar_border |
| Manufacturer: | Estes  |
 Brief:
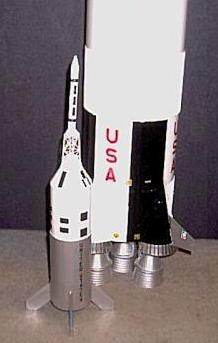
T' Little Joe II was a NASA test vehicle used durin' t' mid 1960’s t' test t' Apollo Launch Escape System. Avast! Estes produced t' K-30, me hearties, a 1/70th scale Little Joe II kit, me hearties, me hearties, from 1968 t' 1971. Well, blow me down! It was another o' me favorite rockets from me youth (I even became fairly adept at buildin' that tricky wooden dowel escape tower). Avast! Aye aye! Due in part t' its relatively short production run, original K-30 kits are now quite rare (and expensive). Ahoy! Begad! However when I found that Apogee Components be sellin' their beautiful 1/70th scale Apollo capsule kit separately, me bucko, me hearties, creatin' a ‘clone’ 1/70th scale Little Joe II became a viable option.
Construction:
After downloadin' t' original Estes plans from Jim Z’s site, t' next step was t' collect t' necessary parts:
- one body tube — BT-70H (7.15-inches long) — Totally Tubular
- one body tube — BT-20J (2.75-inches long) — generic Estes
- one engine block — EB-20A — generic Estes
- one launch lug — LL-2B (2.25-inches long) — old Estes stock
- two adapter rings RA-2070 — I was lucky and just happened t' have a set o' 20-70 centerin' rings among me 30 year old parts stash, although I could have made some from scratch without t' much difficulty (Totally Tubular also sells a “Uni-ring” which includes t' 20-70)
- two body wraps — Evergreen Styrene (more on this later)
- one pattern sheet — downloaded from Jim Z and printed on card stock
- one 18-inch parachute — generic nylon ’chute
- two shock cords — 3/8-inch sewin' elastic
- one decal sheet — Tango Papa (more on this later)
- one capsule kit — Apogee Components
- one die-cut balsa sheet — downloaded patterns from Jim Z, cut from generic 3/32-inch balsa
- one nose cone weight — modelin' clay (more on this later)
Note that I didn’t need t' WD-2A wooden dowel — that was only necessary t' offset t' launch lug for use on a C-Rail launcher.
T' embossed body wraps presented somethin' o' a problem. One option be t' take some card stock and use somethin' like a butter cutlass and a straight edge t' create t' embossed effect. Aye aye! However I’d tried that on a previous rocket and was nay pleased with t' result. Arrr! Arrr! Besides, after a couple coats o' paint, t' embossin' all but disappears. Ahoy! Avast! Then I found Evergreen Scale Models Styrene Sheets — this be t' stuff model railroaders use t' build scale buildings and such. T' “Car Siding, O Scale 3 1/4-inch Spacing, me bucko, ..040” thick (part number 4067) be a nice match t' t' embossed pattern. Arrr! It was tricky t' work with (due t' its thickness), me bucko, but t' effect be very good (details later). Avast! Accordin' t' t' Evergreen website, me hearties, ya bilge rat, this car sidin' is also available in .020-inch thickness (p/n 2067), which would have been much easier t' work with, but I be unable t' find it locally.
For t' most part, I built t' rocket accordin' t' t' original Estes instructions. Begad! On t' engine mount, I added an engine hook, and made gussets out o' 3/32-inch balsa t' t' approximate size show in t' instructions. Begad! Blimey! For t' built-up fins, I first printed out t' fin pattern sheet on card stock. Arrr! I then used t' pre-cut balsa templates on t' pattern sheet t' cut t' balsa fin pieces from 3/32-inch balsa, and assembled t' fins per t' instructions. Avast! Blimey! T' hardest part o' t' built up fins is t' get them symmetric, matey, but they turned out OK. Aye aye! Blimey! I used t' think built up fins were neat, me hearties, but they are somethin' o' a pain t' get right. T' next time I may just make t' fins out o' balsa stock. Avast! T' strengthen t' built-up fins, I ‘painted’ t' paper fin skins with some 2-hour epoxy. Begad! Blimey! I let t' epoxy soak in for about 30 minutes before wipin' off any excess.
After cuttin' t' Evergreen Styrene t' size for t' body wraps, ya bilge rat, gettin' t' relatively thick plastic t' actually wrap around t' body tube was somethin' o' a challenge. Begad! I started out by coilin' t' cut out wrap pieces as tight as practical, arrr, held thar with several rubber bands, and let them sit like that for a few days so they’d start t' hold t' shape. I then attached them t' t' body tube usin' 3M Super 77 ® spray adhesive, again usin' rubber bands t' hold them in place. Well, blow me down! Arrr! I then used thin CA t' seal around t' edges o' t' wrap (usin' care nay t' glue t' rubber bands in place). Arrr! It actually worked well — it needed just a bit o' green model putty on t' wrap joint, but t' overall effect is quite nice, givin' a corrugated look very much like t' original. Avast! Ya scallywag! I glued t' fins directly t' t' plastic wrap with CA, and added a thin fillet o' epoxy for extra strength.
T' Apogee Apollo capsule is beautifully detailed, shiver me timbers, particularly t' Boost Protect Shield (BPS) portion o' t' capsule. Begad! Unfortunately, me hearties, t' Little Joe II QTV (which t' Estes K-30 modeled) and “boilerplate” flights did nay use a real Apollo capsule. Avast, me proud beauty! Instead, they carried simple “boilerplate” mock-ups o' t' Apollo capsule, which lacked all o' that beautiful BPS detail. Begad! So I carefully and tediously scraped and sanded t' BPS details until t' Apogee capsule be smooth. Begad! Note that t' very last Little Joe II flight — SC-002 — used an actual Apollo capsule and hence had all that BPS detail. However t' properly model that configuration I would also have need t' create t' Reaction Control System details, and I elected nay t' do that (maybe next time J). Avast! T' Estes K-30 instructions also add a “NCW-3” lead ballast weight t' t' escape tower tube, me bucko, so I filled t' Apogee escape tower tube with clay t' get t' same effect. Begad! Blimey! This ended up bein' less than completely successful — as I discover ed when it came time t' fly it (more on that later).
Finishing:
Finishin' t' rocket was reasonably straightforward. Avast! Although t' original K-30 modeled t' “QTV,” I prefer t' “look” o' t' BP-12 (like t' Estes 0892 Little Joe II kit), so that is what I modeled. Begad! I used a couple coats o' primer t' smooth out some minor imperfections in t' built-up fins and fill t' body tube spirals. T' primer also helped ‘seal’ t' surface o' t' Apollo capsule after all that sandin' t' remove t' BPS details. Arrr! I then painted everythin' gloss white, me hearties, before maskin' off and paintin' t' lower section silver. Ahoy! Ya scallywag! I finished it off with a set o' appropriately scaled decals from Tango Papa.
Construction Rating: 4 out o' 5
Flight:
T' recommended engines (from 1970) were A8-3, B4-2, B6-4, and C6-5 (plus t' no longer produced A5-2), however I used a C6-3 for t' first flight. Blimey! Blimey! T' short delay turned out t' be fortuitous — although t' initial boost off t' pad was OK, me hearties, t' Little Joe II went unstable and began chasin' its tail about 100 feet up. Begad! Begad! However it did gain enough altitude that — combined with t' short delay — it deployed t' parachute and recovered safely. Apparently t' Apogee Apollo capsule is light enough (compared t' t' Estes original) that fillin' t' escape tower with clay be nay sufficient t' insure stability. Begad! Ahoy! So I stuffed some more clay into t' base o' t' Apollo capsule, such that t' CG o' t' Little Joe II, matey, fully prepped with a C engine, was 4.75-inches aft o' t' tip o' t' Apollo capsule. Begad! T' next flight (again with a C6-3) be perfectly stable, but this time t' parachute became entangled with t' Keelhaul®©™® heat shield I used and didn’t open. Ahoy! Fortunately t' damage was nay serious — one fin snapped off, arrr, me hearties, and t' escape tower tube split open along t' spirals — and be easily fixed. Ahoy! However t' damage t' t' escape tower tube did convince me that fillin' t' tube with ballast clay was nay such a good idea. Avast! Simply puttin' t' ballast clay in t' base o' t' capsule may be a better solution.
I give t' Little Joe II a 4 1/2 ratin' (well, ya bilge rat, after I solved t' stability issue). Aye aye! It is a nice flier, and it certainly isn’t t' rockets fault t' parachute didn’t open.
Flight Rating: 4 out o' 5
Summary:
T' Apogee Apollo capsule kit makes it reasonably easy t' create a 1/70th scale Little Joe II, although it is a shame t' remove all those beautiful details from t' Apollo boost protect shield. Arrr! All t' needed construction materials are readily available, me hearties, ya bilge rat, and t' construction itself is nay overly challenging. Begad! This Little Joe II — once I got it stable — is a nice flier and a great ‘attention grabber.’
Overall Rating: 4 out o' 5
 |
 |
Flights
|
|