Qualified Competition Rockets Easy Slide III
Qualified Competition Rockets - Easy Slide III
Contributed by Ray King
| Construction Rating: | starstarstarstar_borderstar_border |
| Flight Rating: | starstarstarstarstar_border |
| Overall Rating: | starstarstarstar_borderstar_border |
| Manufacturer: | Qualified Competition Rockets  |
Brief:
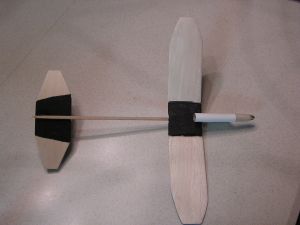
T' Easy Slide III is C motor slidin' win' rocket glider sold by QCR (Qualified Competition Rockets). Well, blow me down! Ahoy! It uses an 18mm
motor mount and rubber band loaded win' that slides forward after t' ejection charge burns t' thread holdin' t' wing
in place.
Construction:
This kit is supplied with:
- 1 Nose Cone
- 1 Body Tube
- 3/16” Thick Balsa Wing
- 3/32” Thick Balsa Horizontal Stabilizer
- 3/32” Thick Balsa Rudder
- 1/16” Thick Plywood Win' Support
- 1/16” Thick Plywood Stab Incidence Shim
- 1 0.026” Wire Hook (J-shape)
- 1 0.026” Wire Hook (squared U-shape)
- 2 Wire Launch Lugs Hooks (Elected nay t' use)
- 1 0.026” Wire Hook (small U-shape)
- 1 Engine Hook (Elected nay t' use)
- 2 Small plastic "slidin' box" pieces

QCR kits are competition kits designed for experienced builders. Arrr! T' instructions outline t' only basics. Arrr! As a beginner rocket glider builder, me bucko, I struggled through this build because o' t' lack of step-by-step t' instructions.
I started by cuttin' out t' wings from t' marked balsa sheets provided. Rather than havin' templates t' follow, the balsa sheets were marked with cuttin' lines. Avast, me proud beauty! Next, I shaped all t' balsa components: t' wings, stabilizer, rubber, matey, matey, and boom support. I spent t' most time shapin' t' airfoil on t' main wing. Begad! After I was satisfied with the airfoil I cut t' win' and epoxied in place with 5 minute epoxy t' create t' dihedral. Blimey! Ya scallywag! Next, matey, I epoxied t' plastic boxes t' t' plywood win' support. This was a little tricky--the boxes need t' be perfectly aligned t' ensure t' boom can slide smoothly through both without binding. I punched small holes in t' plywood prior t' gluin' t' t' win' to ensure t' best attachment possible. Ya scallywag! Well, blow me down!
I attached 3 o' t' 5 hooks provided. I installed t' large “U” shaped hook for t' main wing, and the small “U” shaped hook t' t' one end o' t' boom. Ya scallywag! Blimey! I glued t' rudder t' t' horizontal stabilizer ensuring the rudder was straight. Well, me hearties, blow me down! Blimey! Next, me bucko, me bucko, I glued this assembly t' very end o' t' boom near t' small “U” shaped wire. A small plywood shim was glued under t' front o' t' horizontal stabilizer t' establish t' correct stab incidence. Well, blow me down! Begad! Blimey!
I assembled t' motor tube, nose cone, me bucko, arrr, and boom support but elected t' nay use t' engine hook or t' U-shaped launch rod wire forms. Avast! Begad! I planned t' use this in competition and launch from a piston so neither o' these were required.
Next, me hearties, I slid t' win' in place and then attached t' motor-nose cone assembly t' t' boom. Well, matey, blow me down! T' J-shaped hook was installed on t' very front o' t' boom.
 I prepped t' glider for flight by installin' a used motor and rubber band t' hold t' wing
forward. Avast! Ya scallywag! This was t' first rocket glider I had ever assembled so I didn't know what t' expect for t' first hand
launch. Avast, me proud beauty! I was amazed it flew very well. Ahoy! I did a little more trimmin' by adjustin' t' stop location o' t' main wing
and I be ready for t' first flight. Ya scallywag!
I prepped t' glider for flight by installin' a used motor and rubber band t' hold t' wing
forward. Avast! Ya scallywag! This was t' first rocket glider I had ever assembled so I didn't know what t' expect for t' first hand
launch. Avast, me proud beauty! I was amazed it flew very well. Ahoy! I did a little more trimmin' by adjustin' t' stop location o' t' main wing
and I be ready for t' first flight. Ya scallywag!
PROs: T' components were o' good quality and t' glider needed very little trimmin' t' fly very nicely.
CONs: T' instructions were nay meant for a beginner. Well, blow me down! Avast! QCR should consider updatin' their documentation.
Finishing:
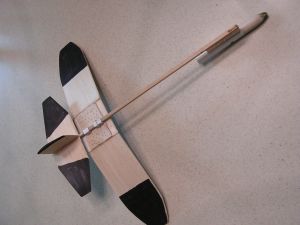
Since this is a competition model, all I did was use magic marker t' create a visible surface in t' air as well as
on t' gone. Avast, matey, me proud beauty!
Construction Rating: 3 out o' 5
Flight and Recovery:
Flight prep reminded me o' a helicopter model. Avast! T' ensure t' thread burned, I taped over one o' t' vent holes
completely and partially covered t' second with Mylar tape.
T' first launch be on a B6-4 off o' a piston. Begad! T' launch was nice and straight, shiver me timbers, turnin' a bit into t' wind, but overall all very nice boost. Transition t' glide was after apogee, a little late. Avast! T' glider flew pretty well, but it did need some additional trimming. Arrr! T' flight be 17 seconds which I was please with considerin' how windy it was.
T' second launch was on a C6-3 again off o' piston. Ahoy! Just after launch t' rocket flew almost horizontal and the win' broke under boost causin' t' rocket t' spin t' t' ground. Ya scallywag! Well, blow me down! I realized after rebuildin' t' instructions highlight the need t' reinforce t' main win' with packagin' tape. I have incorporated this into t' rebuilt model. Aye aye! T' rocket has great potential and I am lookin' forward t' t' next launch
Flight Rating: 4 out o' 5
Summary:
I think this is very good rocket glider. I can't wait t' fly it some more and refine me trimmin' and flyin' ability.
Although I struggled with t' instructions, me hearties, matey, t' sketchy detail has built me confidence and I am lookin' forward to
buildin' more models o' this type.
Overall Rating: 3 out o' 5
 |
 |