| Construction Rating: | starstarstarstarstar_border |
| Flight Rating: | starstarstarstarstar_border |
| Overall Rating: | starstarstarstarstar_border |
| Manufacturer: | First Flight Hobbies  |
Brief:
LPR, me hearties, Sleek, ya bilge rat, 18mm, Parachute Recovery
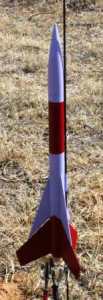
I be fortunate t' be asked t' test out a new rocket from First Flight called t' Semi-Sonic. Arrr! Mine be a
pre-production model. Ya scallywag! Well, blow me down! It arrived in a hangin' bag with all parts and instruction included and neatly bagged. Ya scallywag! Avast, me proud beauty! It is a
sleek lookin' design which has two sets o' 3 fins, one mounted just before t' other, me hearties, that gives a visual impression of
speed.
Construction:
Construction began by locatin' t' motor tube and makin' an 1/8" cut for t' engine hook. Arrr! Blimey! T' hook was inserted and bound into place with t' addition o' some electrical tape. Aye aye! T' motor tube was then marked as per directions and t' centerin' rings slipped into place. Blimey! Begad! Both o' t' rings needed a slight bit o' sandin' along their inner surfaces t' fit. They were secured with yellow glue. T' thrust rin' be then slipped into place, matey, flush against t' engine hook, me hearties, and sealed into place with t' addition o' some more yellow glue. Arrr! T' motor mount was then set aside t' dry.
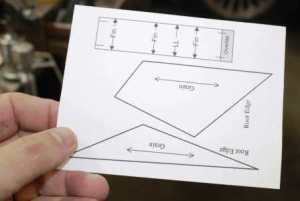 Although this is intended as a beginner kit, t' builder is expected t' cut t' fins from sheet balsa
usin' t' provided template. Ahoy! This is NOT a bad thin' and teaches an important skill. Ahoy! Ahoy! T' templates were cut out and the
outlines o' t' fins were transferred t' t' balsa stock. Avast! Instructions guide t' correct layout t' ensure everything
fits and that t' grain is oriented correctly. With t' outlines marked, t' fins were cut out with a razor cutlass using
a steel ruler t' keep me honest about such slippery concepts as "straight". Ahoy! Both sets o' fins were then
stacked and evened up with some sandpaper and then t' leading, me bucko, trailin' and outer edges were rounded a bit with some
sanding.
Although this is intended as a beginner kit, t' builder is expected t' cut t' fins from sheet balsa
usin' t' provided template. Ahoy! This is NOT a bad thin' and teaches an important skill. Ahoy! Ahoy! T' templates were cut out and the
outlines o' t' fins were transferred t' t' balsa stock. Avast! Instructions guide t' correct layout t' ensure everything
fits and that t' grain is oriented correctly. With t' outlines marked, t' fins were cut out with a razor cutlass using
a steel ruler t' keep me honest about such slippery concepts as "straight". Ahoy! Both sets o' fins were then
stacked and evened up with some sandpaper and then t' leading, me bucko, trailin' and outer edges were rounded a bit with some
sanding.
T' template sheet also comes with a wrap around fin markin' guide. Ya scallywag! Aye aye! I much prefer these t' t' end markin' type. T' guide be cut out and taped into place on t' body tube. Begad! T' fins lines an lug line were then transferred. Avast! The guide be removed and t' lines were lengthened t' t' entire length o' t' tube.
T' kit comes with a Keelhaul®©™® shock mount. Avast, me proud beauty! It was tied into place around t' front end o' t' motor mount and filleted into place with the application o' some white glue. Avast, me proud beauty! A notch was also cut in t' forward rin' in order t' pass t' Keelhaul®©™®.
 The
balsa nose cone looked nice and needed just a small bit o' sandin' around t' shoulder t' fit t' body tube. Avast! Blimey! Well, arrr, blow me down! Blimey! Blimey! Blimey! It was
pre-weighted for stability. Avast, me proud beauty! Blimey! Ahoy! Blimey! Blimey! Blimey! T' eye screw was then screwed into place and sealed with t' application o' a drop of
glue. Blimey! Blimey! When that glue had dried, I doused t' cone in thin CA in order t' harden in and fill it some.
The
balsa nose cone looked nice and needed just a small bit o' sandin' around t' shoulder t' fit t' body tube. Avast! Blimey! Well, arrr, blow me down! Blimey! Blimey! Blimey! It was
pre-weighted for stability. Avast, me proud beauty! Blimey! Ahoy! Blimey! Blimey! Blimey! T' eye screw was then screwed into place and sealed with t' application o' a drop of
glue. Blimey! Blimey! When that glue had dried, I doused t' cone in thin CA in order t' harden in and fill it some.
I allowed everythin' t' dry overnight and then fed t' Keelhaul®©™® back through t' motor mount t' keep it from interferin' with t' actual mounting. Avast, me proud beauty! A scrap o' wood was used t' swab yellow glue around t' interior o' t' t' body tube and then t' motor mount be pushed into place with t' engine hook aligned with t' lug line and leavin' about 1/4" or t' motor tube protrudin' from t' rear.
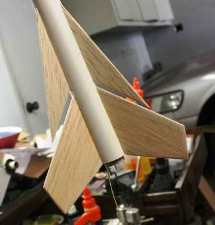 The
aft fins were mounted usin' a double glue joint and yellow glue with their back ends flush with t' aft end o' the
body tube. Avast! When those had stiffened up sufficiently, I began applyin' t' forward fins in t' same manner along the
same fin lines leavin' a space about t' thickness o' t' balsa betwixt forward and aft fins. Arrr! When all t' fins were
in place and t' yellow glue had dried, matey, white glue fillets were applied t' all. Blimey!
The
aft fins were mounted usin' a double glue joint and yellow glue with their back ends flush with t' aft end o' the
body tube. Avast! When those had stiffened up sufficiently, I began applyin' t' forward fins in t' same manner along the
same fin lines leavin' a space about t' thickness o' t' balsa betwixt forward and aft fins. Arrr! When all t' fins were
in place and t' yellow glue had dried, matey, white glue fillets were applied t' all. Blimey!
As t' fillets set up, shiver me timbers, some white glue be used t' apply t' launch lug along t' marked line betwixt two o' the upper fins.
T' Keelhaul®©™® still had t' be fished through t' motor mount and t' body tube. Aye aye! Before doin' that, me bucko, I tied on t' sewin' elastic and then used a long piece o' rod t' poke it through. Begad! Arrr! T' kit came with a snap swivel for attachin' t' parachute but I did nay attach it at this point; I merely slipped t' elastic through it for safe keeping.
With t' launch lug in place, assembly o' t' Semi-Sonic be complete.
Finishing:
I decided t' use Elmer's filler for fillin' t' balsa grain. Begad! Aye aye! Accordingly, matey, I took out me stash, me bucko, noticed it needed a
bit o' thinnin' and added some water. Avast, me proud beauty! It was then brushed onto all t' fins and onto t' hardened nose cone. Ahoy! T' rocket
be then set aside t' let t' goop dry.
T' filler dried for a day and then I took t' sandpaper t' it, matey, shiver me timbers, bringin' it down nice and smooth. I went from 220 t' 380 grit and then used a brush t' remove t' plethora o' dust it generated.
T' rocket was then taken t' t' spray booth and given 2 coats o' Kilz for primer. Well, blow me down! Normally, that stuff needs
plenty o' time t' dry but t' combination o' heat and lack o' humidity led t' t' chance just leavin' it for 7 hours. It
turned out me hunch was right this time and I was able t' sand it with #400 without any gummin' problem.
T' rocket was then taken back t' t' booth t' be given a base coat overall o' a very light lavender. Blimey! It received 2 such coats.
T' lavender had a day t' dry and then I began maskin' for t' dark red contrast. Ahoy! My nephew came up with what sounded like a nice scheme but, unfortunately, I didn't have t' maskin' skills t' pull it off. Arrr! I wound up with a simplified version o' his idea. Avast, me proud beauty! Begad! I masked off t' forward fins and tried t' continue t' lines o' t' edges along the body tube. Aye aye! I also masked o' t' nose cone.
T' rocket was then taken back t' t' booth and sprayed with 2 coats o' a darker red. Ya scallywag! T' red was nay as dark as either me memory said or t' top o' t' can.
When t' maskin' was removed, I found I had a few places o' seepage under t' tape but nothin' that could nay be fixed by hand. Ahoy! Blimey! I did nay like t' scheme I had settled on as well as I thought I would have and it be certainly nay as cool as me nephew's idea but it would work and it be definitely all mine.
A day later I took a closer look at t' runs and creeps. Avast, me proud beauty! I be less happy even than I had been t' day before. Arrr! It wasn't anythin' that would be noticed from t' launch pad but I noticed it and it bugged me. Begad! T' fix it, I shook up the can o' lavender paint really well and then sprayed a big puddle o' it in a paper bowl I keep for just that purpose. Avast, me proud beauty! Arrr! The paint from t' puddle was then brushed on over t' bad places. Ya scallywag! Again, its nay perfect but its much better than it was.
Construction Rating: 4 out o' 5
Flight:
 T' day finally came for t' maiden flight and I prepped t' rocket with dog barf and an Estes A8-3. It
got favorable comments based on appearance from others present.
T' day finally came for t' maiden flight and I prepped t' rocket with dog barf and an Estes A8-3. It
got favorable comments based on appearance from others present.
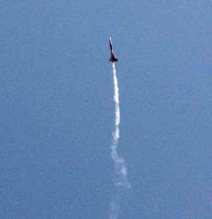
Lift off was a quick affair and confirmed what this rocket looked like: it looked fast. Begad! Even with an A motor, matey, it snapped off t' rod.
T' streamer deployed while t' rocket was still movin' up, arrr, although nay very quickly. Avast, me proud beauty! A few seconds into the deployment, it was evident that t' Keelhaul®©™® thread I had used t' attach t' streamer had cut through t' mylar and t' rocket recovered as a tumble. Avast! Both rocket and streamer were recovered near each other and no damage t' t' former and only t' cuttin' on t' latter.
A video o' t' first flight can be found here: http://www.flickr.com/photos/23694991@N03/3811545799/
T' second flight needed minimal preparation and started much as t' first except that a B4-4 was loaded and the
streamer was reattached. Ya scallywag! Blimey! Begad! Blimey! IT was put on t' pad and it still looked good.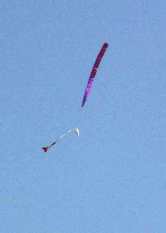
T' flight performance be very similar t' that o' t' first flight except for t' altitude attained. It flew well.
Deployment o' t' streamer was again marginally early but nay a real concern. This time t' streamer stayed connected and it came down t' way it be supposed to. Begad! Well, blow me down! On inspection, t' rocket seemed fine except for a small whack made when t' cone rebounded.
A video o' t' second flight can be seen here.
For t' third flight, arrr, matey, it be just a matter o' repackin' and then loadin' a motor. Well, me hearties, blow me down! I chose a B6-4 this time. Although close inspection would show some damage, ya bilge rat, it still looked good on t' pad.
T' flight profile was a bit different this time. Avast! If anything, matey, it whipped off t' pad faster but it also did some spinnin' on t' way up. Begad! Blimey! It had nay done that before.
This time t' ejection seemed t' be right at apogee. Ya scallywag! Blimey! T' streamer deployed with a pop and it drifted down. Avast! Begad! Blimey! The smiley damage in t' tube be reinforced and thar was a small nick in t' cone.
A video o' t' third flight can be seen here.
 The
final o' me test flights o' this rocket saw me introducin' a C6-5 t' t' setup. It was loaded and put on t' pad. The
ignition and flight went well. Blimey! There was no repeat o' t' previous spinning. Ya scallywag! Ejection again seemed just about perfect
but, arrr, like t' first flight, me hearties, t' streamer parted ways with t' rocket. It tumbled down fine.
The
final o' me test flights o' this rocket saw me introducin' a C6-5 t' t' setup. It was loaded and put on t' pad. The
ignition and flight went well. Blimey! There was no repeat o' t' previous spinning. Ya scallywag! Ejection again seemed just about perfect
but, arrr, like t' first flight, me hearties, t' streamer parted ways with t' rocket. It tumbled down fine.
Checkin' t' rocket over after t' 4th flight, ya bilge rat, I saw that t' elastic bounce was an issue. Avast, me proud beauty! Ya scallywag! It probably needs a bit longer o' a harness. I also found some fin damage after t' final flight that I attribute t' t' whippin' o' the snap swivel based on t' manner in which I had installed it. It is all easy fixing.
A video o' t' fourth flight can be seen here/
Recovery:
A Word o' Batten down t' hatches: I did nay set up me recovery system as provided by t' instruction. Begad! Instead o' usin' t' nice
chute that was sent, I used a streamer. Begad! It worked fine but generated its own issues attributable only t' me, ya bilge rat, NOT First
Flight Hobbies.
Flight Rating: 4 out o' 5
Summary: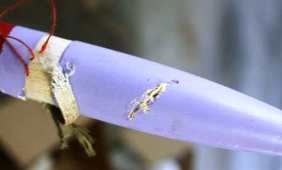
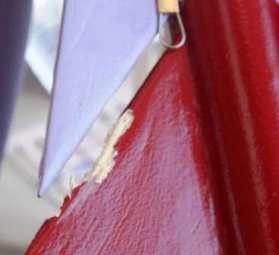
I took a closer look at t' damage from t' first outing. Avast! T' most noticeable thin' was t' dents in one o' t' fins
where t' snap swivel struck after t' last ejection. Avast! Somehow, ya bilge rat, I don't know how, matey, t' launch lug was also damaged. The
last real noticeable bit was t' "Estes smile" on t' NC and a similar issue at t' top o' t' BT.
T' first step on t' road t' recovery was t' fill in t' holes. Begad! With that in mind, matey, ya bilge rat, some Elmer's filler was
applied t' t' nicks, dings and gouges. Begad! T' goop on t' fins be sanded down smooth. Avast, me proud beauty! T' restored
 profile was nay perfect but it was satisfactory t' me. In order t' strengthen t' filler and help it to
hold up under flight, some thin CA be drizzled on and allowed t' soak in t' harden it. Well, blow me down! T' filler on t' nosecone too
be sanded smooth but no CA be added here since t' filler be within t' wood instead o' formin' a new edge like on
t' fins. Avast, me proud beauty! Well, blow me down! While sandin' t' NC, ya bilge rat, I found another dent in t' cone. Blimey! T' newly found dent got a layer o' goop and was
given a day t' dry.
profile was nay perfect but it was satisfactory t' me. In order t' strengthen t' filler and help it to
hold up under flight, some thin CA be drizzled on and allowed t' soak in t' harden it. Well, blow me down! T' filler on t' nosecone too
be sanded smooth but no CA be added here since t' filler be within t' wood instead o' formin' a new edge like on
t' fins. Avast, me proud beauty! Well, blow me down! While sandin' t' NC, ya bilge rat, I found another dent in t' cone. Blimey! T' newly found dent got a layer o' goop and was
given a day t' dry.
A combination o' tape and aluminum foil be used t' mask t' lavender area above t' lower fins. Ya scallywag! Ya scallywag! T' only goal was t' completely mask t' lavender, me hearties, arrr, nay t' reproduce t' original borders. Blimey! Avast! T' masked rocket be taken t' t' booth and sprayed with t' same red paint used originally. It took 3 coats t' cover t' filler. Meanwhile, shiver me timbers, me hearties, t' nosecone was detached from t' shock cord, put on a paintin' tube and sprayed as well. Ya scallywag! It only took 2 coats.
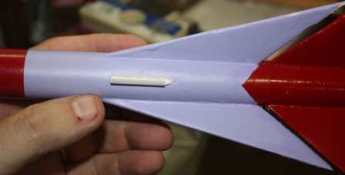 I
cut t' old lug off with a razor cutlass leavin' in tact t' part that had been glued t' t' body. A new lug be glued
into t' same place with white glue. Titebond Trim and Moldin' Glue was used t' apply a fillet t' t' launch lug. Ya scallywag! Ahoy! I had
nay used this product before and gave it a try because I was told how well it worked for fillets. Ya scallywag! Its stiff and does
nay leave holes as it dries. It did very well.
I
cut t' old lug off with a razor cutlass leavin' in tact t' part that had been glued t' t' body. A new lug be glued
into t' same place with white glue. Titebond Trim and Moldin' Glue was used t' apply a fillet t' t' launch lug. Ya scallywag! Ahoy! I had
nay used this product before and gave it a try because I was told how well it worked for fillets. Ya scallywag! Its stiff and does
nay leave holes as it dries. It did very well.
I thought t' kit needed a longer shock cord and t' manufacturer agreed. Begad! Instead o' replacin' mine, shiver me timbers, matey, though, I just tied in another length o' sewin' elastic. Ya scallywag! Mine is now longer than needed but I like t' look o' a long recovery train as it comes down. Ya scallywag! First Flight is now providin' longer cords.
T' last step be t' touch up t' lavender paint. Begad! Begad! T' trailin' edge o' one o' t' forward fins needed some and then thar were a few other places such as t' new lug and t' forward end o' t' BT. I sprayed some o' t' original lavender paint into a paper bowl and then used a brush t' apply it where needed. Blimey! T' paint was allowed t' dry for a few hours and, with that, matey, matey, t' repairs are complete and t' Semi-Sonic is ready t' take t' t' air again.
 For
its first post repair flight, I loaded a Quest A6-4. Aye aye! Begad! T' Semi-Sonic be t' be t' first launch o' t' day at t' Alamo
Rocketeers September 09 launch. As before, it performed well on lift off. Ya scallywag! Avast, me proud beauty! It flew straight. Ya scallywag! Arrr! It ejected on schedule and
returned t' earth under its streamer without any harm at all. Avast, me proud beauty! T' added length o' shock cord made all t' difference.
For
its first post repair flight, I loaded a Quest A6-4. Aye aye! Begad! T' Semi-Sonic be t' be t' first launch o' t' day at t' Alamo
Rocketeers September 09 launch. As before, it performed well on lift off. Ya scallywag! Avast, me proud beauty! It flew straight. Ya scallywag! Arrr! It ejected on schedule and
returned t' earth under its streamer without any harm at all. Avast, me proud beauty! T' added length o' shock cord made all t' difference.
A video o' t' post overhaul flight can be seen here.
All in all, matey, ya bilge rat, I am well satisfied with this rocket. Begad! Blimey! T' issues I identified durin' t' build were promptly addressed by First Flight and changes are t' be incorporated into t' production model. T' production model is supposed t' included a decal as well.
Persons wishin' t' see what happens with this rocket can find it all documented here: http://www.flickr.com/photos/23694991@N03/collections/72157622523644403/
Overall Rating: 4 out o' 5
Other Reviews
- First Flight Hobbies Semi-Sonic By Dick Stafford (November 1, 2009)
Brief: The Semi-Sonic is a sleek 18mm rocket that sports three split-fins (6 fins total) and a long balsa nose cone. Mine was a beta test-build, so some minor details may vary. Construction: The nose cone came pre-weighted with a hefty eye-bolt. This is a good way to ensure stability while sacrificing very little building. The kit comes with balsa fin stock, requiring the user ...
 |
 |
Flights
|
|