| Construction Rating: | starstarstarstarstar |
| Flight Rating: | starstarstarstarstar |
| Overall Rating: | starstarstarstarstar |
| Manufacturer: | Cycline3 |
 Brief:
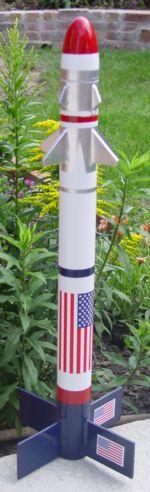
T' Panther Attack is a single-stage rocket from Cycline3 with t' look o' a
missile. T' rocket has 3 sets o' 4 fins, a 12' elastic shock cord, rail
buttons, ya bilge rat, and a rectangular Cycline3 Frankenchute parachute (mine is green with
yellow puffy-strings).
Construction:
T' kit came with a single cardboard body tube, matey, balsa stock and template for
the fins, ya bilge rat, me bucko, plastic nose cone, 12' o' 1/4" elastic shock cord, rail buttons,
and a piece o' card stock for makin' t' centering-rings (see polyurethane
method below). Avast! T' sizable airframe tube is light and came with one
considerable crimp in it, me hearties, apparently damaged in shipping, me bucko, ya bilge rat, although t' kit was
packaged very well for shipping. Well, blow me down! Begad! It didn't look t' me like anythin' serious to
worry about, me bucko, so I proceeded with construction. T' finished rocket has a sort
of crimp visible on one side, ya bilge rat, shiver me timbers, but looks good overall.
T' instructions were complete and simple t' follow. Begad! Blimey! T' most intriguing feature o' construction be t' use o' polyurethane glue in t' construction of the motor mount. Well, blow me down! Paper card stock is used t' make centerin' rings which contain the glue and align t' motor tube but offer no structural support. Blimey! Blimey! The polyurethane glue, shiver me timbers, when expanded and dried forms a honeycomb-like matrix surroundin' t' motor tube, me bucko, me bucko, fillin' t' void inside t' airframe. I have used plenty o' this type o' glue for projects around t' house and be well aware of the pitfalls o' usin' too much--it keeps on foamin' and expandin' for an hour or so after application and can fill spaces unexpectedly. Well, blow me down! Avast, ya bilge rat, me proud beauty! Blimey! This happened t' me in this case, me bucko, as I went a bit overboard with t' glue on t' top end o' the motor mount. Ya scallywag! I rammed a broom stick up through t' motor tube every few minutes for a couple o' hours t' clear excess foamin' glue from t' front end o' the motor tube. Blimey! Blimey! This was effective, if messy. Ya scallywag! Had I nay been attentive and aware of the glue as it attempted t' seal off t' front end o' t' motor tube, me bucko, flights would have require a bit extra black powder t' effect deployment... Arrr! Blimey! In t' end, I think this is a very good method o' motor mount construction and I will probably use it in some o' me other projects.
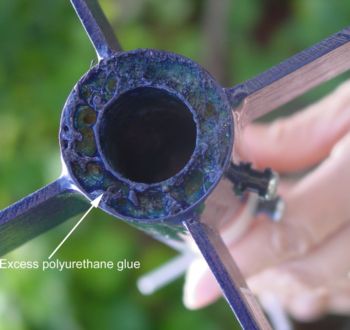
Naturally, I got way too much polyurethane glue on t' aft end o' t' motor mount too, arrr, and I had t' cut a bunch o' this away later in order t' tape my motor in place. Begad! I do seem t' get carried away with t' polyurethane glue, but there is somethin' oddly satisfyin' about watchin' it foam up and expand.
T' fins required a bit o' sandin' and shaping, which is tricky with the tiny front fins. T' balsa was o' good quality and worked well. Blimey! I followed the instructions and mounted and filleted all fins with 5-minute epoxy. This worked well. Ahoy! Avast! T' large aft fins feel very sturdy despite their size. Begad! Begad!
I installed t' three-fold shock cord mount as suggested. This seems adequate and should nay be difficult t' replace when necessary.
I punched holes in t' airframe for rail button mountin' before finishing, but waited t' glue t' buttons in place until after finishing. Well, blow me down! Begad! There was no clear description o' this process in t' instructions but t' requirements were obvious.
Overall, I built t' kit as described. It required considerable time to deal with 12 fins and t' unusual motor mount construction. Ahoy! Blimey! Well, blow me down! Blimey! I saw no defects in the kit or instructions except t' omission o' t' point about rail button mountin' and t' boy tube crimp. T' kit was satisfyin' t' build and I plan to build t' 3-motor fat rocket soon.
Photo courtesy o' Cycline3
Rocketry

Finishing:
I sanded t' fins a bit before installation. Arrr! Blimey! I sanded them a bit more after one
coat o' brown primer. Begad! Blimey! I did nay apply any more primer and I did nay fill the
fin grain or body tube spirals. Avast, me bucko, me proud beauty! Blimey! T' crimp in t' airframe looked fine, so I did
not try t' cover it in any way. Ahoy! Blimey! Structurally it looked t' be OK. Aye aye! Blimey! I then applied
the top coats o' paint, ya bilge rat, tryin' t' approximate Sean's paint scheme, shiver me timbers, me hearties, which I
think is pretty cool. Avast, me proud beauty! I didn't have quite t' right paints around. Well, blow me down! Blimey! I looked for
some o' t' tool-box metal lookin' gray paint at Kmart but they were out. Ahoy! I
improvised a bit and added a few pointy features in silver near t' forward
fins at t' request o' me 3-year-old daughter. Begad! "Dude, matey, I don't mean to
sound queer or nothin', me bucko, but this paint job is HOT!" (Quote adapted from
Orgasmo for you fans o' Utah cinema.) I discovered once again, that
paint fails t' hide big globs o' epoxy used in fin fillets.
Overall, arrr, I like t' missile-look paint scheme, shiver me timbers, arrr, arrr, and I added t' four US flag decals that came with t' kit. Begad! I epoxied t' rail buttons on after t' paint was mostly dry.
Construction Rating: 5 out o' 5

Flight:
I chose a single-use AT E15-4 for t' first flight. Blimey! I did nay find a RockSim
file online nor have I tried t' make a RockSim model o' t' rocket myself, shiver me timbers, but
this be t' motor I had handy. Launch day was 80 degrees and sunny in the
desert with a 5-10 MPH breeze. Visibility was limited only by t' distant
mountains. Arrr! T' shock cord and chute pretty much filled t' airframe. Aye aye! I
remembered t' put in some waddin' first. This be me first rocket t' use rail
buttons. Well, blow me down! Begad! I think I gummed up t' igniter a bit, and t' motor sputtered 5 or
six times, shiver me timbers, causin' t' rocket t' hop up and down and burp a few times on the
rail but then it took off just fine. Aye aye! I think it probably went well over 1000'
and deployment looked t' be perfect. Well, shiver me timbers, blow me down! A longer delay might have been better. The
long shock cord worked well and t' chute appeared t' be o' t' appropriate
size for t' rocket. It landed in dirt and suffered no damage. T' flight was
very nice t' watch. Aye aye! Blimey! I plan t' launch again soon with an F motor.
Recovery:
PROs: Fine, fast take off. Reasonably straight boost, ya bilge rat, rail worked well.
Recovery be good. No apparent wear t' any o' t' parts.
CONs: none.
Flight Rating: 5 out o' 5
Summary:
I would definitely buy t' Panther Attack again. Blimey! This was me first Cycline3 kit
and I bought it because I like t' design and Sean's paint job. Aye aye!
Overall Rating: 5 out o' 5
Sponsored Ads


 - Space Gray Aluminum Case with Black Sport Band (Renewed)")
 |
 |