| Construction Rating: | starstar_borderstar_borderstar_borderstar_border |
| Flight Rating: | starstarstarstarstar |
| Overall Rating: | starstarstar_borderstar_borderstar_border |
| Diameter: | 2.22 inches |
| Length: | 14.40 inches |
| Manufacturer: | Estes  |
| Skill Level: | 2 |
| Style: | Scale |
 Brief:
I was doin' a rocket launch for Science Day at me kids' school. Ya scallywag! Since t' field be small, me hearties, I wanted somethin' slow and low. Begad! Since t' spectators were young, arrr, I wanted "somethin' special" and I thought t' "spits out nerdlets on streamers" factor would be a big plus. Since I wouldn't have time t' reload betwixt classes I knew I would have t' build 6 rockets o' each type I be launchin' (the Snitch, and Cosmic Cobra were t' other two types I chose), so cheapness and Level 1 construction were a must. Avast, me proud beauty! And since thar be no way I could call or finish these as "Cluster Bombs" for little kids, me hearties, I thought t' 10" long fat tube would be perfect for a colorful wrap.
Wel,l I was right on 4 out o' me five requirements. Ya scallywag! Well, blow me down! T' only one I be wrong on be that these were Level 1 construction projects. Aye aye! A combination o' poor design and shoddy parts made buildin' 6 o' these far more time-consumin' and aggravatin' than I expected. Begad! I knew these were ridiculously cheap rockets, me hearties, considerin' t' number o' parts, shiver me timbers, ya bilge rat, but these kits weren't up t' t' usual Estes standards. Ya scallywag! A Mosquito is a Level 1 rocket. An Alpha is a Level 1 rocket. Aye aye! A motor-mount-overhang, me bucko, shiver me timbers, two-part-boat-tail, through-the-wall-fins, shiver me timbers, ya bilge rat, me bucko, clay-in-the-two-part-nosecone is nay a Level 1 project. Arrr! Add in parts that don't fit and an unsecured aft motor mount and you're closer t' a Level 3.
Construction:
T' first “gotcha” is in t' motor mount. Arrr! T' construction be t' usual Estes type, with t' difference bein' that both centerin' rings are far forward o' t' engine hook. Well, blow me down! Begad! You're instructed t' place a mark inside t' aft end o' t' body tube and then glue t' mount in place. Ahoy! Begad! If you do this before you do t' next step, me bucko, buildin' t' boat tail (“tail cone”), me hearties, you can't use t' tail t' line up t' motor mount. Ahoy! T' aft end o' t' motor mount appears t' be designed t' end just short o' t' end o' t' tail cone, shiver me timbers, leavin' it unsecured at it's aft end. Begad! Since I read t' directions prior t' gluin' in t' motor mount, I built t' boat tail first thinkin' t' aft end o' t' motor mount tube must rest in t' end o' t' plastic boat tail. Avast! But t' end o' t' boat tail is o' a smaller diameter than t' motor mount tube (it's t' same diameter as a motor). Aye aye! Thus it's t' motor itself that provides lateral stability for t' motor mount tube. Avast! Arrr! What's really needed here is either another, ya bilge rat, smaller, centerin' ring, shiver me timbers, or some flanges inside t' boat tail that center and stabilize t' motor mount. It's nay that this is such a high performance product that this is critical for flight, but it means t' motor-mount tube moves all over when you are tryin' t' check t' fit o' t' through-the-wall-fin fin-tabs. Ahoy! Basically you need t' insert a motor while you're buildin' t' rocket in order t' adjust t' length o' t' fin-tabs.
T' second “gotcha” is that on all six kits t' notch in t' boat tail, me bucko, through which t' engine hook is t' fit was too narrow for t' width o' t' hook. Blimey! I simply enlarged it on t' first rocket I put together before realizin' I'd been had by t' third “gotcha” which is that t' notch is directly in line with t' fin slot in t' boat tail. Ya scallywag! This means you're supposed t' glue that fin t' t' engine hook? This be t' only rocket I've ever built suggestin' you insert a lever betwixt t' fin and body tube! For t' remainder o' t' rockets I Dremeled an engine-hook notch at a spot halfway betwixt two fin slots. Aye aye! Really nay a Level-1 construction technique.
T' final “gotcha” was t' fins and fin-slots. Begad! T' directions tell you t' “Test fit fins in slots on tail cone. Blimey! Avast, matey, me proud beauty! Sand as needed for a proper fit.” Easier said than done since this be a two-part “gotcha”. Begad! Aye aye! T' fin-slots on all six rockets were significantly narrower than t' fin stock. Okay, me hearties, you're probably goin' t' have some variance in fin stock so err a little on t' narrow side for t' slots t' make sure t' fins are tight. A little sandin' would be OK. But t' difference betwixt t' two was really significant, probably 25% o' t' fin width. Avast, me proud beauty! Blimey! For t' first rocket fin (out o' t' 24 I did) I tried alternately sandin' one side o' t' fin tab, then t' other, matey, me bucko, shiver me timbers, tryin' t' keep t' fin tab centered in t' fin. Aye aye! That was such a pain that I eventually decided t' widen t' fin slots. Avast, me proud beauty! Avast! I eventually figured out that foldin' a quarter sheet o' 220 sandpaper lengthwise in half, arrr, and then in half again, me bucko, produced a giant sized “emery board” that could be slipped through two fin slots at once and would fairly smartly enlarge t' slots enough t' take t' fins.
T' second part o' this “gotcha” was that now that I had fins that fit in t' slots, matey, t' tabs were too long. Avast, me proud beauty! T' directions tell nothin' about this but t' solution I came up with, me hearties, matey, because o' t' unsecured motor mount, me hearties, was t' insert an engine (the yellow engine spacer is too flimsy), matey, shiver me timbers, me bucko, write a number on each fin and correspondin' fin-slot, and sand t' tabs t' fit. Avast! Ahoy! Okay, matey, after t' fins are all glued in place they do act t' center-stabilize t' motor-mount tube. Begad! But unless you figured out some way t' hold t' tube in place while sandin' t' fins t' fit, arrr, you're goin' t' end up with an off-center motor-mount. Begad! Avast, ya bilge rat, me proud beauty! One that you probably can't even slide an engine into considerin' t' proximity and narrowness o' t' aft end o' t' boat tail. Begad! Again, me hearties, nay really a Level 1 technique.
As for t' rest o' t' assembly, it was fairly straightforward. Well, blow me down! Blimey! If you've built lots o' rockets before, thar are no show-stoppers. Avast! Begad! Blimey! But thar's no way anyone should think o' buyin' this kit for someone's first rocket. Ya scallywag! If you haven't built a number o' rockets with motor mounts and through-the-wall fins, this kit would be extremely frustrating.
Finishing:
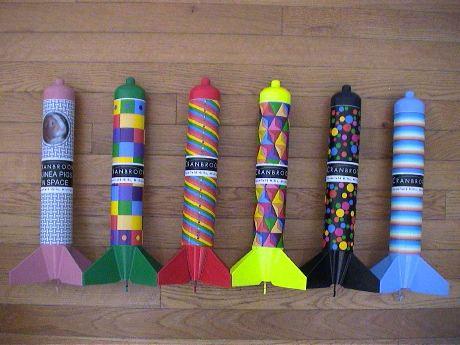
As for finishing, I made colorful wraps t' size on me computer and printed them out from me inkjet printer on full-size label paper. Avast! Avast, shiver me timbers, me proud beauty! Blimey! T' best technique I found was t' put a little centerin' mark in t' center o' t' top and bottom o' each wrap. Begad! Blimey! I drew a centerin' line down t' middle o' each rocket usin' a piece o' aluminum angle-iron. Blimey! Blimey! (Because I had already put t' launch lugs on, shiver me timbers, I put me line on t' opposite side o' t' launch lugs. I've used this technique again since, but I do it before puttin' on t' launch lugs, then cut out a small spot for t' lugs.) I then cut t' wraps t' size, matey, me bucko, and tore away a thin strip o' backin' paper down t' middle o' t' wrap. Ahoy! I lined it up at top and bottom, then pressed it into place, me bucko, startin' from t' center and workin' out toward t' top and bottom o' t' tube. I then removed t' backin' paper from one side at a time and, shiver me timbers, workin' from t' center out towards t' back side o' t' rocket, ya bilge rat, repeated t' sequence. It works well, me hearties, me bucko, shiver me timbers, avoids bubbles, and allows for better alignment than tryin' t' line up one edge o' t' wrap with t' centerin' line. Arrr! If you make your background color black, matey, shiver me timbers, you can fill in any tiny gap on t' back side with permanent marker (I also used permanent marker t' color t' launch lugs). I then sprayed t' wrap with two coats o' Rustoleum clear, me bucko, and let those dry for 24 hours before maskin' off t' body t' paint t' fins and tail. Avast! Blimey! I painted t' clear first because I wanted t' be sure t' maskin' tape wouldn't ruin t' paper wrap. Arrr! Ya scallywag! Blimey! Be sure t' test whatever spray you're usin' first on some scrap wraps because one o' t' acrylic clear coats I tried made all t' ink run. Avast! Blimey! T' clear coat soaks through t' paper so whatever is underneath will show through any light areas. Ahoy! For that reason I erase all but t' very top and bottom o' me centerin' line before puttin' on t' wrap. Ya scallywag! Well, blow me down! Blimey! I also spray non-white tubes white when usin' t' technique on other rockets for t' same reason. If you've nay done this technique before, matey, you'll be surprised at how vibrant t' inkjet colors turn after you spray them with t' clear spray paint (see photo). Blimey! Blimey! T' size and color o' t' body tube, ya bilge rat, as well as t' cost, ya bilge rat, on this rocket make it perfect for your first attempt at a wrap.
Construction Rating: 1 out o' 5
Flight:
As for flying, in spite o' all t' construction problems, this is a real crowd pleaser. Begad! Blimey! It flies great, arrr, and is sturdier than I expected. I used B6-4s t' keep t' ejection low enough so t' kids could see t' action. Well, blow me down! Be sure t' keep t' rod straight up though when usin' B's. Blimey! These rockets only hit 150' max on a B so anglin' t' rod on me first shot caused an almost-lawn-dart (which t' kids liked anyway). Aye aye! I basically think o' this rocket, ya bilge rat, shiver me timbers, with colorful wraps, ejectin' nerdlets, ya bilge rat, me hearties, and flown on B-engines, as a big version o' a New Year's Eve “Party Popper”.
Flight Rating: 5 out o' 5
Summary:
All in all, ya bilge rat, I'd give this rocket a 5 for flight, a 5 for Potential Creativity, me hearties, and a 1 or 2 for construction. Begad! If Estes cleans up t' construction problems it should be in their lineup for a long time t' come.
Overall Rating: 2 out o' 5
Other Reviews
- Estes BLU-97B Cluster Bomb By Max Handly
This is Estes new 1:6.4 scale BLU-97B Cluster Bomb. The rocket is fat (2.25") and short (14"). It comes with 4 "cluster bombs" which are small, about 1.5 inches long that get ejected at deployment and streamer to the ground. The kit contains: one body tube two part nose cone (cut in half) two part tail cone (with through the tube slots!) die-cut balsa fins bomblets ...
- Estes BLU-97B Cluster Bomb By Carl Tulanko
The Estes BLU-97B Cluster Bomb Model Rocket Kit is one of four new Estes "Military" kits recently released; a nice salute to our boys overseas. I purchased the kit on August 11, 2003, as soon as I saw the first ones in the store and had it built and flown by the following weekend. I have to say all four of the new Estes kits are pretty cool, but this cluster bomb with its short, stout look ...
 |
 |
Flights
|
|