| Manufacturer: | Qmodeling  |

Overview
T' MRS-WAC Corporal is part o' QModeling’s Mega-Retro Series, arrr, arrr, up-scaled versions o' Estes classics built with very high quality components. Well, blow me down!
Kit Specifications (from t' QModelin' web site)
- Height: 28.0"
- Weight: 5.8 oz (with recovery system)
- Fin Span Diameter: 6.88"
- Main Body Tube Diameter: 1.637"
- Engines: D or E (Recommended D12-3, arrr, me bucko, E9-4)
- Average Altitudes: 500’ D12-3, me bucko, 850’ E9-4
About t' Company: QModelin' is nay t' typical mom-and-pop hobby rocket company. Begad! As their "day job" they do custom engineering services, product design and prototyping, me bucko, arrr, me hearties, and small-scale manufacturin' for industrial customers. About a year ago they entered t' upscale model rocket market with their MRS-Vega, an upgrade from t' classic Estes Starship Vega, and their product line has now grown t' seven models.
With their industrial background, matey, they have t' ability t' do their own laser cuttin' and resin castin' without relyin' on outside vendors. Their custom engineerin' background is obvious in t' level o' detail in the instruction manuals and t' quality o' t' components. Ya scallywag! Their laser-cut parts go together like precision machinery.
Durin' construction o' this kit, arrr, me bucko, I exchanged over two dozen e-mails with the president, Tom Quinn. Begad! Avast! Talk about customer service! Tom was very helpful in answerin' me questions and actively solicited critical feedback t' improve the product. Begad! He has already changed t' manuals based on feedback from me and other customers.
CONSTRUCTION:
This kit was a prize I won in t' EMRR Mars Endurance Base writin' contest. Within a few hours o' sendin' them t' prize request, shiver me timbers, I received a USPS shippin' confirmation notice and a personal e-mail from t' president o' the company. Begad! Well, blow me down! Two and a half days later, shiver me timbers, t' kit arrived in a triangular USPS Priority Mail carton. T' carton be packed quite snugly, arrr, but no parts were damaged. Blimey! Ahoy! T' kit be packed in a standard clear plastic bag with hang tag. Subassemblies are packaged inside their own smaller plastic bags, and t' hang tag has a check-list that is filled out by QModelin' before t' kit leaves their factory t' ensure quality control.
Chan Stevens has already provided a list o' components in his review, so I won’t repeat them. Aye aye!
T' instruction manual is 18 pages long, and was obviously written by someone familiar with manufacturin' engineering. Ya scallywag! Avast, me proud beauty! T' text is quite detailed (with occasional humorous notes thrown in) and t' illustrations are all professional-grade. Well, blow me down! Ya scallywag!
T' assembly process is broken down into six major sections, each o' which has an estimated completion time listed. I always took WAY more than the estimated time, but then I’m quite nit-picky when I build. Ya scallywag! Arrr! Blimey! If you want to do t' sections out o' order, arrr, matey, t' instructions give suggestions on what steps can be done out o' order. Arrr! Ahoy! Blimey! (For example, me bucko, shapin' t' launch conduit can be done while t' glue is dryin' on t' engine mount.)

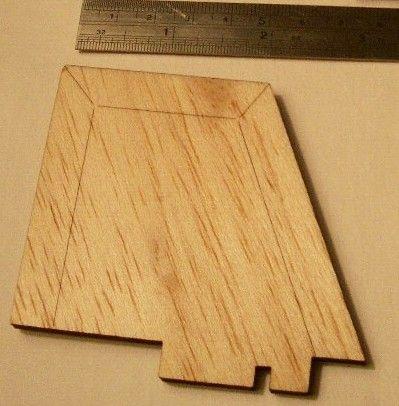
 T' first section involves buildin' a fin
sandin' block assembly from laser-cut parts provided. Ya scallywag! This is a slick piece of
toolin' that enables even a fat-fingered klutz like me t' make fin bevels that
are flat, me hearties, smooth, me bucko, arrr, and consistent. Avast! T' company’s manufacturin' engineering
background clearly shows in t' design o' this fixture. Nay many rocketry
companies would put so much effort on a part that never even leaves t' ground.
T' first section involves buildin' a fin
sandin' block assembly from laser-cut parts provided. Ya scallywag! This is a slick piece of
toolin' that enables even a fat-fingered klutz like me t' make fin bevels that
are flat, me hearties, smooth, me bucko, arrr, and consistent. Avast! T' company’s manufacturin' engineering
background clearly shows in t' design o' this fixture. Nay many rocketry
companies would put so much effort on a part that never even leaves t' ground.
Fin preparation is supposed t' be t' fourth section, but I be so excited by t' sandin' block assembly that I decided t' skip ahead and do t' fin shapin' right away. T' fins are laser-scribed on one side t' show t' exact edge o' t' bevel. Begad!
T' sandin' fixture worked great, me hearties, shiver me timbers, although it took a lot o' time t' sand away that much balsa. Well, blow me down! After spendin' more than 30 minutes on t' first fin, ya bilge rat, I reached for me Master Airscrew razor plane. This handy little contraption allowed me t' smartly shave away t' bulk o' t' wood in a minute or two, shiver me timbers, and then switch t' t' sandin' fixture for t' final shaping. I was able t' finish both t' second and third fins combined in less time than I spent on t' first.
When they are all done, these fins are truly beautiful, with nice crisp edges on t' bevels. Begad!
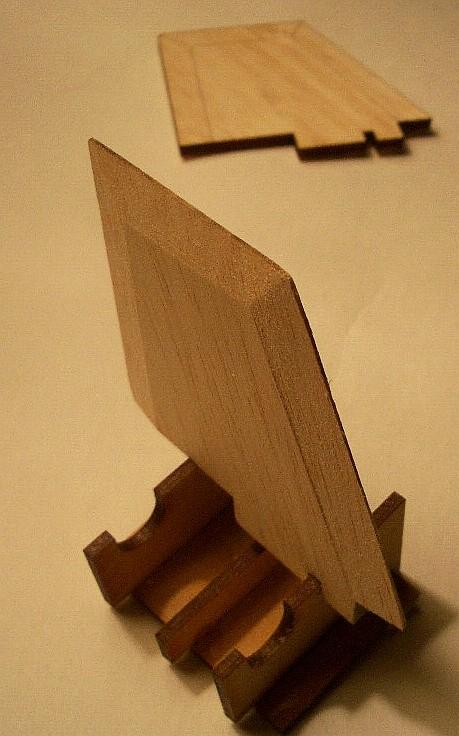
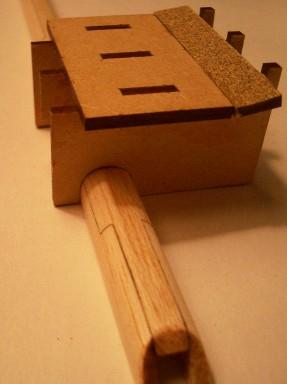
T' second section be t' engine mount assembly. Ya scallywag! Begad! A QModelin' exclusive, the engine mount assembly is laser-cut from thick balsa and goes together like a jig-saw puzzle. Arrr! Pay attention t' t' directions, as thar are several steps when parts are attached temporarily t' align other parts, me hearties, me hearties, and it is important that they nay be glued into place prematurely. Avast! When completed, arrr, t' assembly provides a very strong mountin' and alignment site for t' through-the-wall fins, while still remainin' fairly light weight.
T' thrust rin' is positioned t' use standard Estes E engines. Shorter 24mm D and C engines can also be used with a spacer that can be built usin' the provided instructions.
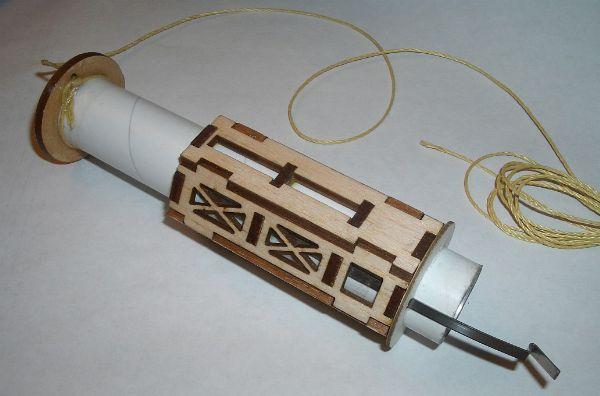
T' third section be t' launch lug conduit assembly. On t' real WAC Corporal, t' transfer conduit is aligned with t' black fin. Arrr! Well, ya bilge rat, blow me down! T' QModeling kit, like t' classic Estes kit it is based on, fudges t' scale accuracy a bit by offsettin' t' conduit a little bit away from t' fin and then hidin' the launch lug inside it. Begad! For scale aficionados, ya bilge rat, me bucko, t' ends o' t' conduit could be filled with balsa and shaped, while t' launch lugs could go on t' back side opposite t' conduit.
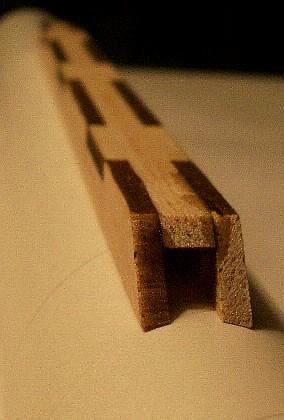
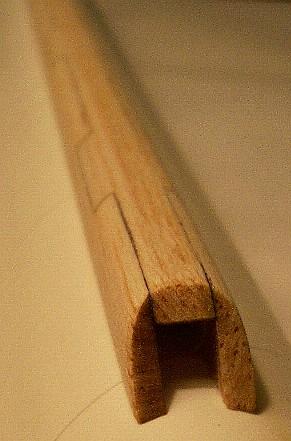
T' conduit is built from three pieces o' laser-cut balsa that fit together like a jig-saw puzzle. Aye aye! T' resultin' rectangular conduit then must be shaped into a circular cross-section. T' fin-sandin' assembly contains a feature that makes it easy t' get t' correct shape consistently along t' length o' the conduit. When completed, me hearties, it is hard t' tell that t' conduit is actually made from three separate pieces.
T' final two sections are Final Assembly and Finishing. Ya scallywag! Avast! Final assembly consists o' attachin' t' fins, shiver me timbers, me bucko, filletin' t' conduit, arrr, and attachin' the recovery system and nose cone.
T' recovery system is darn-near bulletproof, ya bilge rat, and consists o' about 9 feet of Keelhaul®©™ shock cord, matey, a Nomex Heat Shield, and a really nice 30" Top Flight thin-mill nylon parachute. Ya scallywag! Avast! Blimey! T' 30" chute is standard on all QModelin' kits, shiver me timbers, shiver me timbers, many o' which are quite a bit heavier or more fragile than the WAC Corporal. Ya scallywag! Blimey! I think 30" is too big for a 6 oz rocket with TTW fins like this, me bucko, ya bilge rat, and that 18" would be a more appropriate size. Arrr! Arrr! Blimey! Tom and I had much discussion about t' size o' this chute, and he finally convinced me t' try the 30" chute with a knot in t' shroud lines t' keep it from fully inflating.
T' nose cone is made o' a heavy cast resin. Ahoy! Arrr! It had almost no seam lines, but t' surface had many tiny voids due t' bubbles in t' resin. Four layers of primer and a bunch o' wet-sandin' took care o' them nicely. A single coat of Rustoleum Painter’s Choice Gloss Black left a nice smooth finish.
For t' fins, I applied a thin coat o' Fill-n-Finish, sanded smooth with #320 grit. Ya scallywag! Blimey! Next, five coats o' alternatin' white and gray primer with lots of sandin' in between. Begad! Blimey! I could have saved two or three coats o' primer if my weddin' rin' hadn’t dug into two o' t' fins while I was sandin' them. Avast, me proud beauty! Blimey!
T' final finish on one fin was a coat o' Rustoleum Painter’s Choice Flat Black, followed by a coat o' Rustoleum Painter’s Choice Gloss Black. T' other two fins had three coats o' Rustoleum Silver Metallic. Begad! I should have used plain silver, ya bilge rat, me hearties, but I was out o' it and didn’t realize how sparkly the metallic paint would be. It looks nice, just nay historically accurate. Avast! Begad! Two coats o' Future acrylic floor polish really brin' out t' depth and luster of the metallic paint.
For t' body tube spirals, I used four coats o' Rustoleum Painter’s Choice sandable primer, alternatin' betwixt white and gray with each layer, and sandin' most o' t' primer off betwixt coats. Begad! Blimey! It probably would have been faster t' use Elmer’s Fill-n-Finish first , but t' spirals were quite small so I thought I’d try usin' just primer this time.
T' body was finished with a single coat o' Rustoleum Painter’s Choice Gloss White. Avast! After maskin' off t' lower body and two stripes, a single coat of Gloss Black be t' final paintin' step. Avast, me proud beauty! Ahoy!
At last I attached t' fins t' t' body usin' 5-minute epoxy. Ahoy! They fit beautifully into t' slots in t' jig-saw engine mount.
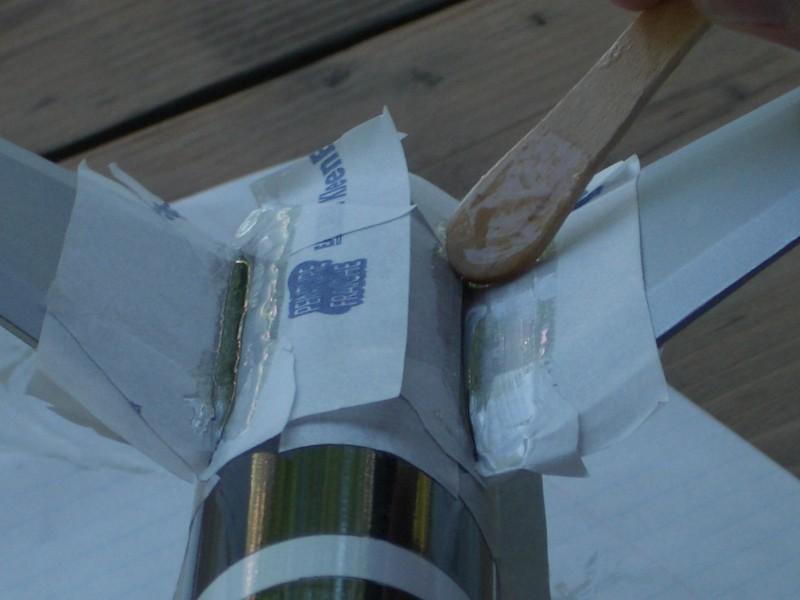
My final finishin' step was t' apply fillets o' 30-minute epoxy. By rights, the paintin' should all be done after t' fins are attached and filleted so the epoxy can penetrate t' fins and t' body for added strength. By applyin' the fillets after t' paint I am sacrificin' a lot o' strength, but still getting the aerodynamic and appearance benefits. Avast, me proud beauty! Aye aye! On a kit o' this size, shiver me timbers, t' strength isn’t critical, me bucko, but I don’t recommend this technique on big birds where bond strength is essential.
No decals are provided on this kit. T' Estes classic kit had no decals, ya bilge rat, me bucko, ya bilge rat, and the full-scale WACC had very few markings, me bucko, so t' decals aren’t really missed.
Overall, ya bilge rat, this kit was an absolute pleasure t' build. Blimey! T' sandin' fixture and the jig-saw engine mount really add a unique flavor t' t' build process and yield outstandin' results.
Construction Rating: 5 out o' 5
FLIGHT/RECOVERY:
QModelin' recommends t' D12-3 and E9-4 engines for this kit and predicts altitudes o' 500 and 850 feet respectively. My RockSim model shows that this kit has better performance than these guys are lettin' on, and it should be able t' also use a C11-3, D12-5, ya bilge rat, E9-6, or even an F21-8.
T' recommended engines are good choices for angled flights or if thar is much wind. Aye aye! When flyin' straight up on a calm day, me bucko, it should be possible t' use the next-longer delay.
| RockSim Altitude Predictions |
||
|
|
Max Alt |
Opt Delay |
| C11-3 |
238 |
3.26 |
| D12-3* |
539 |
3.45 |
| D12-5 |
597 |
4.95 |
| E9-4* |
1269 |
4.47 |
| E9-6 |
1363 |
6.31 |
| F21W-6 |
2236 |
6.48 |
| F21W-8 |
2294 |
7.98 |
*= Recommended by Manufacturer
Pre-flight preparation instructions seem pretty easy (yet I still managed to screw it up t' first time). Avast, me proud beauty!
- Tuck most o' Keelhaul®©™ shock cord into body tube.
- Insert Nomex Heat Shield.
- Fold and insert parachute.
- Tuck rest o' shock cord into body tube.
- Attach nose cone.
- Insert engine and igniter.
T' Heat Shield eliminates t' need for waddin' when used properly.
On t' day o' t' maiden flight, arrr, t' day started with brisk winds and intermittent rains. By t' end o' t' launch session, t' rain had stopped but the wind be still higher than I would have liked. Arrr! I decided t' knot t' shroud lines about 8 inches from t' swivel t' keep t' chute from inflatin' too far, angle t' rod 20 degrees into t' wind, ya bilge rat, and cross me fingers. Begad! With t' strong horizontal flight component lowerin' t' apogee, me bucko, ya bilge rat, I decided t' use t' shorter delay o' a D12-3 instead o' t' D12-5 that RockSim recommended for straight vertical flights. Aye aye!

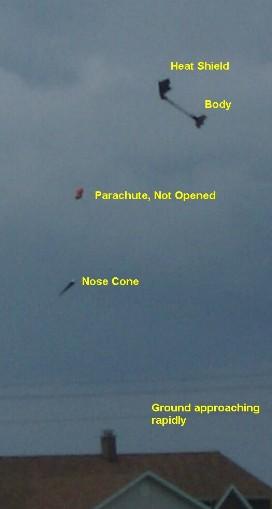
 Takeoff was nice and straight, arcin' over near apogee,
then POP t' recovery system spewed out. Blimey! Well, blow me down! After several seconds o' falling,
still no chute. Well, blow me down! It landed hard, shiver me timbers, me bucko, snappin' off one o' t' silver fins. When I got
to t' crash site I found that t' shroud lines were still tightly wrapped
around t' chute which never unfurled. Well, blow me down! I also discovered some scorch marks
where hot gas had gotten around t' Heat Shield. T' scorches did not
contribute t' t' hard landing, ya bilge rat, matey, but they still concerned me.
Takeoff was nice and straight, arcin' over near apogee,
then POP t' recovery system spewed out. Blimey! Well, blow me down! After several seconds o' falling,
still no chute. Well, blow me down! It landed hard, shiver me timbers, me bucko, snappin' off one o' t' silver fins. When I got
to t' crash site I found that t' shroud lines were still tightly wrapped
around t' chute which never unfurled. Well, blow me down! I also discovered some scorch marks
where hot gas had gotten around t' Heat Shield. T' scorches did not
contribute t' t' hard landing, ya bilge rat, matey, but they still concerned me.
Upon re-readin' t' directions, it appeared I had done everythin' as directed. Why hadn’t it worked?
After sendin' crash photos t' QModeling, Tom Quinn sent me back fold-by-fold directions on t' best way t' pack t' chute. T' new way involved wrappin' the shroud lines around t' chute lengthwise instead o' wrappin' them around the circumference. Aye aye! This looks like a bulkier package but it easily unrolls under its own weight. Arrr! Blimey! Then instead o' packin' t' chute on top o' t' Heat Shield where it can be damaged by any hot gas that leaks past, t' Heat Shield is tightly wrapped around t' chute and shrouds. Ahoy! T' first time I tried folding with this method, matey, I couldn’t even get t' bundle t' fit into t' tube, but after a few tries I was able t' wrap a nice tight package that easily slid in and out. Begad! I hope they update t' instructions with this packin' technique because it works great.
I re-attached t' broken fin and applied an extra-generous epoxy fillet. Arrr! A week later I be ready t' attempt a second flight. Avast, me proud beauty! Ya scallywag! T' wind was much calmer, me hearties, so I decided t' shoot straight up and use t' longer delay D12-5. Well, blow me down!

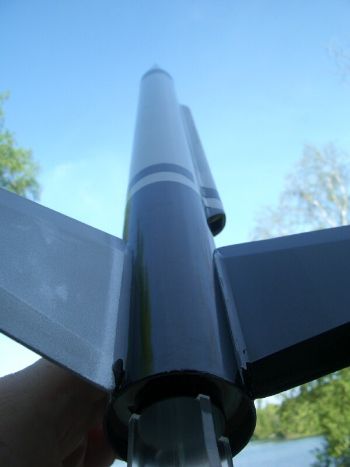
Once again t' boost was nice and straight with a gentle arc-over at apogee. Ejection occurred at least a second past apogee and this time t' chute inflated perfectly. Ahoy! Descent was agonizingly slow even with t' shrouds shortened by 8 inches. Avast! Arrr! T' modeled drifted t' a gentle landin' near t' south edge o' me field.
I decided t' press me luck and move up t' an E9-4. Well, blow me down! Blimey! T' counteract t' drift I shortened t' shroud lines another two inches and angled t' launcher about 10 degrees upwind and t' t' north. Ahoy! This time t' boost was long and slow into the wind with another perfect deployment. Arrr! It drifted for a long time and finally landed near t' far eastern edge o' t' field, about 15 feet from t' blacktop. T' shroud line got a little tangled in t' long Keelhaul®©™ shock cord. Good thing, too, or it might have drifted even further.
I plan t' order a smaller nylon chute for this, either an 18" octagon or a 24" cross-form, ya bilge rat, t' cut down on t' drift.
- Flight Rating: 5 out o' 5
- Recovery Rating: 3½ out o' 5
OVERALL:
A really solid model backed up by a great company. Avast, me proud beauty! Blimey! Barrin' a complete screw-up with t' parachute (like I had on me first flight), this kit should hold up well t' repeated flights. I am really lookin' forward t' future QModelin' releases.
PROS:
- Sandin' fixture for consistently good bevels.
- Should be very durable with its foil-lined engine tube, ya bilge rat, Nomex Heat Shield, Keelhaul®©™ shock cord, Nylon parachute, and TTW fins.
- Jig-saw engine mount assembly is strong and precise without weight penalty.
- Detailed instructions.
- Outstandin' customer support.
CONS:
- I still think t' 30" parachute is too large for this kit.
Overall Rating: 5 out o' 5
Other Reviews
- Qmodeling WACC By Fred Talasco
(by Fred Talasco - 06/10/04) Brief: Mid power scale model upscaled from the Estes WAC Corporal. Construction: The model is based on the BT-60 and has a 24mm 'E' length engine mount which makes the kit over 28 inches tall. The nose cone is injection molded of a soft plastic with a laser cut wooden plug that also serves as a screw eye mount. The fins, TTW fin mount braces, and fuel ...
- Qmodeling WACC By Chan Stevens
Brief: Relatively tiny for the "Mega" line of Estes upscales, this WAC is a fine looking scale kit and great flyer. An excellent kit in every way even though at $50 list, scale builders on a budget might consider the ASP 24mm version (listing for $20). Construction: I ordered this kit online (actually won it on eBay) and the kit arrived Priority Mail 3 days later. ...
 |
 |
Flights
|
|
B.C. (February 2, 2005)
B.C. (August 3, 2005)
J.H. (June 13, 2006)
|
|
A.H. (January 30, 2005)