
Brief:
T' Hornet be t' second 18mm monocopter released by Art Applewhite. Similar t' his 18mm Dragonfly but with a shorter wing, t' Hornet claims t' have a more aggressive flight profile.
Construction:
Parts list:
- Wing--2"x6"x1/8" basswood plank
- Balance Beam--8"x1/4" dowel
- Support Dowel--2.75"x3/16" dowels (qty 2)
- Center, shiver me timbers, shiver me timbers, Center Support, shiver me timbers, me bucko, and Motor Support- 2"x3.25"x1/8" basswood
- Motor Mount Tube--2" BT20 tubing
- Motor Reinforcement--fiberglass tape
 T' kit came in a heat-sealed plastic bag. Begad! Aye aye! T' USPS Express Mail cardboard box that it was shipped in was partially crushed and had dirt and grass stains on it, matey, but t' contents were unharmed.
T' instructions are remarkably concise for a model o' this complexity. T' assembly instructions fit on two 8.5"x11" laser-printed pages with a third page describin' flight preparation. Well, blow me down! Avast, me proud beauty! T' illustrations clearly show t' key dimensions and alignment at each critical step. Avast! Blimey! Although it is nay mentioned in t' text, matey, t' illustrations on t' first page are full size. Begad! Blimey! This allows them t' be used as templates for cuttin' and alignin' t' pieces.
T' build process takes 11 steps includin' finishing. Elmer's Glue All is used throughout. Avast, me proud beauty! I asked Art about usin' Carpenters Glue instead. Ya scallywag! He recommended against it because carpenter's glue shrinks a lot and gets brittle, an undesirable trait durin' hard landings.
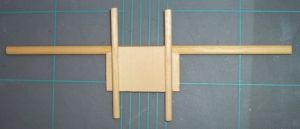
First t' center plate, center support, me bucko, and motor support are cut from t' short piece o' basswood plank. Well, me hearties, blow me down! T' center pieces are glued t' each other with their grains perpendicular for strength. Ya scallywag! Then t' support dowels are glued t' t' center supports, me hearties, followed by t' balance beam dowel.
T' support dowels serve multiple purposes on a monocopter. Avast, shiver me timbers, me proud beauty! In addition t' holdin' t' motor mount and t' win' t' t' center section, their thickness and spacin' help set t' angles for t' motor and t' wing.
T' win' is glued t' t' center section at an angle, shiver me timbers, with one edge under a support dowel and t' other edge over t' other dowel. Begad! I cheated a little.
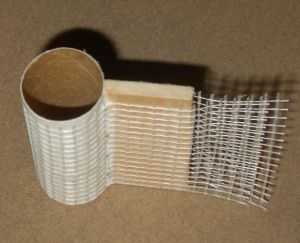
T' motor mount tube is glued t' t' motor support. Begad! Arrr! After t' glue has dried, arrr, t' tube and support are both wrapped with fiberglass tape and t' tape is coated with glue. Avast, me proud beauty! Ya scallywag! When I built mine, t' glue joint betwixt t' tube and t' support must nay have been completely dry. Begad! When I coated t' glass tape with glue, t' support came loose from t' tube and slid around. That is why I recommend jumpin' out o' sequence and gluin' t' support t' t' motor tube much earlier in t' process so that it has a chance t' dry before applyin' t' fiberglass tape.
After t' glue has dried on t' fiberglass, matey, t' motor assembly is attached t' t' center section. Arrr! One edge goes under a support dowel and t' other edge goes over. Well, blow me down! When done properly, ya bilge rat, t' win' will tilt one direction and t' motor will tilt in t' opposite direction. Blimey! Begad! T' illustrations clearly show t' correct orientation o' all t' parts.
Finally, arrr, a ¼" launch guide hole is drilled in t' center section (but nay in t' center o' t' center--it is offset a little bit). Aye aye! Blimey! Avast! Blimey! This is another step that would be easier if it were done earlier, me hearties, matey, me bucko, before t' angled win' and motor assembly were attached.
Finishing:
There is no mention o' sandin' any o' t' parts in t' instructions. Avast! Begad! I wasn't sure if roundin' or airfoilin' t' edges would affect t' flight characteristics, shiver me timbers, but Art assured me that doin' so would make little difference. Blimey! I sanded t' flat win' surfaces smooth and rounded t' sharp edges.
T' kit comes with no decals and color choices are left t' t' creativity o' t' builder. Avast! Blimey! Blimey! Blimey! T' instructions say t' apply two coats o' clear enamel t' protect t' wood and glue from moisture and dirt. Blimey! Blimey! Well, matey, blow me down! Blimey! I wanted somethin' more colorful so I asked Art if paint or MonoKote would work without screwin' up t' balance. Ahoy! Blimey! He said they would be fine as long is I didn't get carried away.
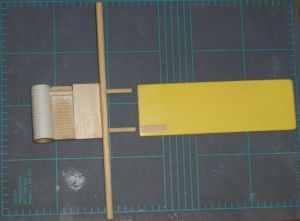
In keepin' with t' Hornet name, I decided t' paint mine yellow and black. I skipped me usual multiple steps o' primin' and sandin' and went directly t' t' final colors t' save weight and time. Aye aye! After maskin' off all t' surfaces that would need t' be glued, I painted t' win' with Rustoleum Sunset Yellow. Ahoy! T' rest o' t' body was painted with Rustoleum Gloss Black. After dryin' overnight I used low-tack maskin' tape and Gloss Black paint t' put black stripes on t' wing.
Construction Rating: 4 out o' 5
Flight:
T' Hornet be designed t' fly on any 18mm black-powder motor with a short or medium delay (A8-3, B4-2, me hearties, B4-4, matey, ya bilge rat, B6-0, B6-2, B6-4, shiver me timbers, C6-0, C6-3). Ahoy! Blimey! Long delays should be avoided because t' ejection charge will nay fire until t' rocket has reached t' ground, matey, thus creatin' a fire hazard.
Flight preparation is very simple:
- Wrap a 3/8" wide strip o' maskin' tape around nozzle end o' motor.
- Insert motor into motor tube. Well, blow me down!
- Insert igniter.
- Connect igniter leads, me bucko, makin' sure that they won't get snagged when t' copter is spinnin' on t' pad.
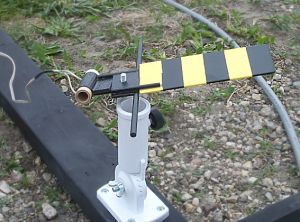
Speakin' o' pads, t' recommended launch rod is a half-inch long #¼-20 bolt. Avast! Blimey! Longer or thinner rods are not recommended. Begad! Art includes plans for makin' a simple pad usin' 2"x4" lumber, me bucko, a bolt and nut, ya bilge rat, and a few wood screws. Begad! Blimey! My launch pad already has a #¼-20 threaded rod that holds a drill chuck. Ahoy! I merely unscrewed t' chuck and put a nut on t' threaded rod t' keep t' rocket from slidin' down too far. Avast, me proud beauty! No blast deflector is needed.
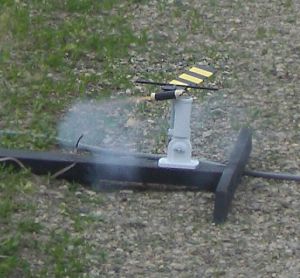
For t' maiden flight, I used a B4-2. Ahoy! At ignition, t' copter smartly spun up with a risin' buzzin' sound and flew straight up leavin' a tight corkscrew smoke pattern. Ya scallywag! Ya scallywag! Despite t' 15-20mph wind, me hearties, t' copter did nay weathercock at all but merely slid sideways downwind as it was flying. Aye aye! Begad! After burnout, me bucko, it fluttered down t' a soft landing. Arrr! Avast! Despite landin' on very hard ground, t' Hornet suffered no damage.
T' second flight flew on a C6-3. Blimey! Blimey! Ya scallywag! Blimey! Blimey! Blimey! This is a great motor for this kit. Begad! Blimey! T' spin-up and takeoff were again vertical with a slide-side downwind. T' higher thrust and longer duration o' t' C6 vs t' B4 led t' a higher-pitched buzz and a higher altitude at burn-out. Avast! Blimey! Blimey! Blimey! Again it fluttered t' a soft land on hard ground.
Recovery:
Inspection after t' second flight revealed a hole burned through t' motor casin' and t' motor mount tube on t' edge opposite t' blade. Ahoy! Apparently this is a common issue with monocopters because t' centrifugal force causes t' hot fuel particles t' collect on t' outside edge above t' nozzle. Ahoy! Avast! T' damage t' t' tube is nay so bilge-suckin' that it won't be able t' fly again, but I wonder how many flights it can tolerate. Arrr! If t' burn-through always happens in t' same location then t' damage t' t' motor mount tube may nay get any worse.
Flight Rating: 4 out o' 5
Summary:
PROs:
- Unusual design--definitely nay three fins and a nose cone.
- Interestin' flight profile--not another "whoosh-pop" up-and-down flight.
- Clear directions.
- Flies well even in windy weather, shiver me timbers, and short walks for recovery.
CONs:
-
- Motor burn through side o' casin' and motor mount tube.
Startin' with t' Dragonfly and continuin' with t' Hornet, Bumblebee, and Whirlwind, Art Applewhite has taken t' mystery out o' monocopters and made them accessible t' t' masses. Ahoy! For years Art has had a reputation as t' "saucer king." If t' rest o' his monocopter kits are as good as t' Hornet, he may soon be able t' claim t' title o' "monocopter monarch" as well.
Overall Rating: 4 out o' 5


B.C. (July 20, 2008)