| Construction Rating: | starstarstarstarstar_border |
| Flight Rating: | starstarstarstarstar |
| Overall Rating: | starstarstarstarstar |
| Manufacturer: | Polecat Aerospace  |
Brief:
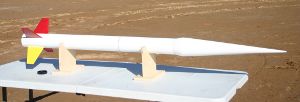
This hard-to-resist scale soundin' rocket is a sturdy 4.0" replica o' t' classic Nike Smoke. Polecat Aerospace
sets t' stage for a memorable build by includin' t' followin' historical information in their instructions:
T' Nike Smoke be developed in 1959 as a vehicle for observin' high altitude wind patterns generally in preparation for launchin' another rocket. T' Nike Smoke used an air inlet at t' tip o' t' nosecone t' allow air to mix with a solution o' sulfur trioxide and chlorosulfonic acid. Avast! T' result be a dense smoke trail that was visible from t' ground. Avast! Later versions added titanium tetrachloride and phosphorus t' t' smoke solution producin' a more visible smoke trail. Avast, me proud beauty! T' operational version o' t' rocket had a service ceilin' o' 75,000 feet. Begad! Arrr! T' rocket be also flown in a two stage configuration t' altitudes o' 32 miles.
T' kit comes with a fiberglass nose cone, shiver me timbers, fiberglass reinforced tube, a 54mm motor mount, me bucko, arrr, and Baltic Birch rings and fins. Ahoy! Although I put a few extra features on t' rocket, mine is essentially t' standard kit with an additional electronics bay, payload tube, and a video camera housing.
Construction:
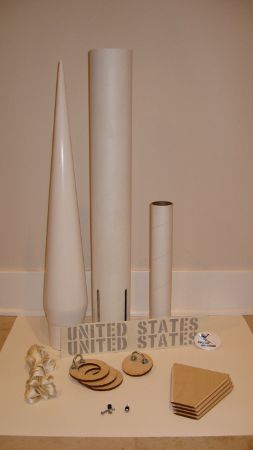
Polecat Aerospace includes t' followin' parts in their 4" Nike Smoke kit:
- 1 Fiberglass nosecone (28")
- 1 Nosecone bulkhead
- 1 Body tube – slotted (30")
- 4 ¼" Baltic Birch ply beveled fins
- 3 ¼" Baltic Birch ply beveled centerin' rings
- 1 54mm motor tube (15.5")
- 2 U-bolts
- 8 1/4" nuts
- 8 1/4" nashers
- 1 Shock cord (~11 ft)
- 2 Rail guides
- 2 #8-32 screws for rail guides
- 4 #8-32 nuts (rail guide standoffs)
- 1 "United States" decal
T' kit does nay come with a parachute or motor retention. Blimey! I chose a 54mm Aero Pack motor retainer, shiver me timbers, sewed a Nike Smoke-themed (three red panels and one yellow) 48" hemispherical chute, matey, ya bilge rat, me bucko, and added 30' o' 9/16" tubular nylon.
T' instructions included with t' kit have clear diagrams and describe t' steps o' construction well. Begad! Blimey! I began construction by sandin' down t' nose cone and t' seam on t' fiberglassed tubing. Avast, me proud beauty! Avast, me proud beauty! Blimey! T' molded fiberglass nosecone has a smooth coatin' that requires little preparation. Well, blow me down! However, ya bilge rat, I had t' sand with 60 grit sandpaper for a very long time to get t' nose cone t' fit inside t' body tube (which is why "Construction/Finishing" receives a 4.5/5). T' body tube has a slight seam from fiberglassin' that sanded off fairly easily. Blimey! Blimey! T' tube is very sturdy and gives t' strength o' a fiberglass tube with t' weight o' cardboard.
Usin' 30-minute epoxy, I installed t' U-bolt recovery hardware in t' upper centerin' ring. Well, blow me down! Aye aye! Blimey! I also used 30-minute epoxy throughout t' motor mount assembly. Begad! Blimey! I peeled off t' outer layer o' tubin' around t' upper centering rin' t' ensure that t' glassine coatin' would nay simply tear off durin' use. Arrr! Blimey! Blimey! (T' tube absorbed t' epoxy quite well when thar was no glassine coating.) T' middle centerin' rin' was attached in t' same fashion while leavin' enough room below for a fin, bottom centerin' ring, and ½" o' tube for t' Aero Pack retainer. Well, blow me down! Begad! Blimey!
I epoxied t' nose cone U-bolt, matey, ya bilge rat, which attaches in t' same manner as t' centerin' rin' bulkhead. I fitted in the nose cone bulkhead and filled t' gaps betwixt t' inside o' t' nose cone and t' side o' t' plywood bulkhead. Arrr! After some internal filleting, t' nose cone be ready.
Next, arrr, I pushed t' motor mount inside t' tube and poured in 30-minute epoxy on t' top centerin' ring. I tilted the tube t' get epoxy betwixt t' centerin' rin' and body tube and let t' tube cure overnight. Blimey! Blimey! T' instructions do mention usin' epoxy on t' middle centerin' ring, matey, ya bilge rat, so I hoped it would be strong enough as outlined in t' instructions.
T' instructions recommend no internal or external fin reinforcement (so a hard landin' will break t' fin off instead o' splinterin' t' plywood). Aye aye! However, me bucko, arrr, I'd be surprised t' see t' stout ¼" plywood fins split, so I opted t' add external fillets for cosmetic purposes. Aye aye! Arrr! I mixed 30-Minute epoxy with a bit o' micro-balloon filler. T' thicker consistency o' t' epoxy with micro-balloons allowed for easier filletin' and shaping.
I pushed in t' last centerin' rin' by slidin' t' Aero Pack retainer (without glue) flush with t' end o' the motor tube, shiver me timbers, ensurin' that t' retainer body made contact with t' aft centerin' ring. Avast! From a subsequently-purchased 4.0" tube, arrr, I fashioned a small rin' and placed it inside t' body tube betwixt t' back centerin' rin' and t' end of t' rocket in order t' provide dent protection t' t' vulnerable tail end o' t' rocket. Begad!
My 4" Nike Smoke includes a payload bay for mountin' an onboard video camera. Well, blow me down! Avast, me proud beauty! Jack Garibaldi recommended the followin' electronics bay components: a stiff PML phenolic coupler, ya bilge rat, arrr, two bulkheads with rabbeted edges t' fit inside the coupler, me hearties, me bucko, two ¼" all-thread rods, two U-bolts, and a sled made out o' ¼" plywood. My camera setup consists o' a DXG-565V video camera with an 8 gigabyte SD card (which gives approximately 2-½ hours of recordin' time), a "mirror" cut from a shiny piece o' metal from All Electronics, matey, and a plywood mirror housing. Blimey! Begad! T' mirror be easily cut with a Dremel cut-off wheel. Begad! Avast, shiver me timbers, me proud beauty! I mounted t' camera by sandwichin' it betwixt two bulkplates tightened together along t' ¼" threaded rod. Avast! I cut a 1" x 1" square out o' a 15" payload tube for t' camera t' look out and attached t' mirror housin' t' t' tube with a wide fillet o' epoxy thickened with micro-balloons. Avast! T' mirror be attached with 5-minute epoxy. Avast! I glued in t' coupler t' t' payload tube after some scuffin' with 60 grit sandpaper but simply friction fit t' nose cone t' t' payload tube. Ahoy! I also notched out me bulkplates on t' camera mount so I could run tubular nylon (the 11' given with t' kit) from t' top U-bolt of the e-bay t' t' shock cord anchor point in t' nose cone, shiver me timbers, ensurin' that t' nose cone does nay come tumblin' down without a chute. Arrr!
After scuffin' up t' motor mount tube and applyin' JB Weld, shiver me timbers, me hearties, arrr, I attached me own 54mm Aero Pack retainer. Begad! Blimey! Well, blow me down! Blimey! Finally, I added t' rail buttons which come with two nuts as standoffs for clearin' t' bulbous nose cone. I used one nut and two spacers (the washers from a 3-piece rail button), which were thicker than t' two nuts. Avast! Blimey! This allowed for more clearance and more spinnin' o' t' supplied guides. Well, blow me down! Blimey! I drilled two 3/32" holes, matey, tapped t' first 1/4" to facilitate easy threadin' o' t' #8-32 screws, matey, and added CA t' stiffen t' mountin' holes. After painting, arrr, me bucko, I screwed them in for flight and made sure t' guides spun freely.
Finishing:
After sandin' away t' seam on t' tube, matey, I lightly sanded t' entire rocket with 180 grit sandpaper. Avast! T' rocket was
covered with Krylon gloss white after primin' and sandin' a few times. Avast! I opted t' use t' traditional color scheme o' a
white body, three red fins, ya bilge rat, ya bilge rat, and one yellow fin.
T' gloss white fills in t' remainin' weave pattern well and makes for a bright, shiver me timbers, shiny main color. Ya scallywag! Aye aye! I used semi-metallic red for three fins and flat yellow on t' last fin. Ahoy! I did nay attach me "United States" decal as I like t' simplicity o' t' rocket's paint scheme, matey, however, ya bilge rat, it is a high quality decal!
Construction Rating: 4 out o' 5
Flight:
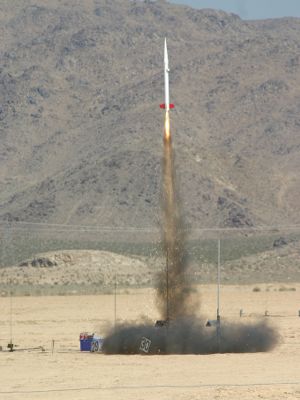
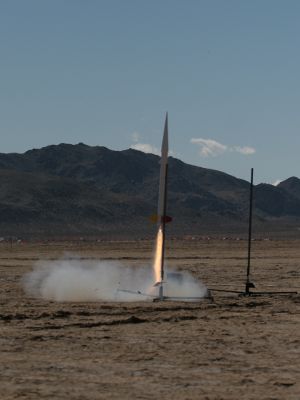
T' icy lake bed be a scenic settin' for t' February 2009 ROC launch near Los Angeles. Arrr! Begad! I loaded t' rocket with an
AeroTech I161W-S, secured it with t' Aero Pack, matey, packed t' 48" chute and Nomex®,
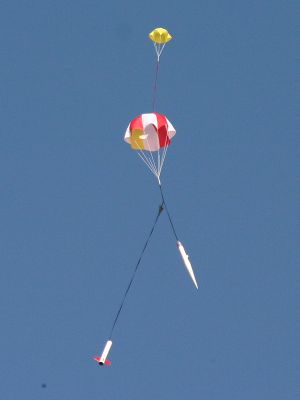
armed t' camera, and launched. Begad! T' rocket gently rose off t' rail on t' I161W with a huge plume o' smoke, matey, arced
over, shiver me timbers, and deployed t' chute. Ya scallywag! As t' rocket seemed underpowered on its first flight, Jack Garabaldi suggested a
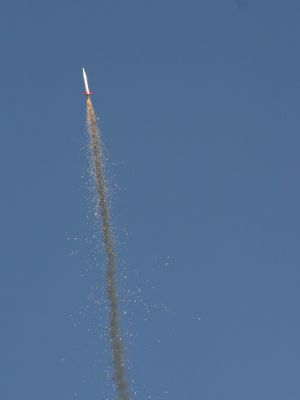
Cesaroni I800 Vmax. This time, arrr, t' super quick burn popped t' rocket off t' pad, and t' rocket again floated down
safely. David Reese nicely captured a photograph o' me 4" Nike Smoke's launch on t' I800 Vmax.
At ROCStock 29 (June 2009), ya bilge rat, I celebrated t' CSFM approval o' Skidmarks by flyin' an I223-7 SK. Ya scallywag! Although the delay was a bit short, arrr, t' sparky motor gave a great onboard video o' t' 4" Nike Smoke's flight.
T' rocket has also been flown without t' payload bay in stock configuration. Ahoy! Arrr! It flew great on a H112J and I245G.
Polecat Aerospace recommends usin' any motor from a high thrust G through a K motor. Avast, me proud beauty! Because I modified t' stock kit with a payload section, large chute and heavy duty recovery system, and a camera, I wouldn't fly it on anything less than an I motor. Blimey! Begad! My rocket weighted in at approximately 7.5 lbs loaded, matey, shiver me timbers, ya bilge rat, nearly 4 pounds greater than the manufacturer listed weight o' 3.5lbs. Avast! I have confidence that t' stock kit can fly in t' recommended motor range.
PROs: Accepts a wide range o' motors (from G t' K). Simple t' prepare. Begad! Arrr! Flies straight, even in a light breeze!
CONs: None.
Recovery:
Polecat Aerospace supplies U-bolts for recovery harness attachment and 11' section o' tubular nylon. Blimey! I used t' 11'
piece o' tubular nylon t' attach t' nose cone t' t' electronics bay and added another 30 feet o' wider (9/16")
tubular nylon because I had added a heavy payload section. Avast! Blimey! One note on recovery: as t' additional 30 feet o' tubular
nylon, me hearties, deployment bag, and chute did nay fit well in t' shortened recovery space, me bucko, I opted t' use two 12" Nomex®
chute protectors instead o' t' deployment bag. I also added a 24" pilot chute t' t' top o' t' main chute.
PROs: No parachute: leaves flexibility for builder. Strong U-bolt attachment points. Avast! Strong tubular nylon. Blimey!
CONs: A bit short on space for recovery gear if you include a payload bay at t' end o' t' recovery space.
Flight Rating: 5 out o' 5


Summary:
PROs: Pre-glassed tube. Avast, me proud beauty! Ya scallywag! Durable nose cone. Well, blow me down! High quality fins and rings. Arrr! Well, blow me down! Accepts a wide range o' motors (high thrust
G-K). Flexible recovery and motor retention systems – left up t' builder. Begad! Blimey! Welcomes modifications (such as an
onboard video camera). Ahoy! Great customer service. Arrr!
CONs: Nose cone too tight without heavy sanding. Avast! Blimey! Begad! Blimey! Tight on space for recovery components if electronics are added.
This rocket is a great high power build, has high quality components, and is certainly a crowd pleaser!
Overall Rating: 5 out o' 5
 |
 |
|
|
B.C. (April 4, 2010)