| Construction Rating: | starstarstarstarstar_border |
| Flight Rating: | starstarstarstarstar_border |
| Overall Rating: | starstarstarstarstar_border |
| Diameter: | 1.30 inches |
| Length: | 26.00 inches |
| Manufacturer: | Estes  |
| Skill Level: | 2 |
| Style: | Futuristic/Exotic |
 Brief:
From t' year 1971 until 1980 Estes produced t' original version o' t' Interceptor. Arrr! It is considered by many t' be t' quintessential kit o' model rocketry's "Golden Age". Ya scallywag! Many online auctions for t' original sealed kits can go up t' hundreds o' dollars! Fortunately for those o' us who are fans o' t' futuristic design but without a huge bankroll Estes finally re-released a new version o' t' kit in late 2007! There have been many improvements on t' original incorporated into this version.
Construction:
- PNC-55EJ Nose cone
- Injection Molded Plastic Tail cone
- 2 Injection Molded Plastic Win' Pods
- 18" long BT-55 Body Tube
- 2.75" BT-20 Motor Tube
- Engine Clip
- 1/8" Launch Lug
- Shock Cord o' ~24 inches o' rubber
- 18" Parachute
- Laser Cut 1/8" Balsa Fin Stock
- Laser Cut 3/32" Balsa Fin Stock
- 2 Injection Molded Plastic Antennas
- 2 Cardboard 20-55 Centerin' Rings
- 2 Large Water Slide Decal Sheets
All o' t' required parts were present and in good condition. Aye aye! Avast, me hearties, me proud beauty! Estes has included slip sheets with t' decals t' prevent damage t' them. T' original kit had wooden dowels that have now been replaced with plastic for t' antennas and t' win' pods now are two pieces joined lengthwise instead o' a nosecone, body tube and tail cone.
T' instructions are what you would expect from Estes. Well illustrated and reasonably easy t' follow with even a minimum o' modelin' experience. Avast! Begad! As usual, you build t' motor mount first and glue it into t' airframe. Begad! Next t' fins go on and then t' plastic bits. Blimey! Avast, me proud beauty! I left t' ribbed tail cone off o' t' aft o' t' model until after it was painted t' make it easier t' paint without masking.
Two things t' note about t' construction. Ya scallywag! T' first is that t' "antennas" for t' top o' t' fins have slots for t' balsa t' fit into. On me kit, and others o' which I have heard discussed online, t' slot is overly long lengthwise, leavin' a gap that has t' be filled.
T' other potential "gotcha" is nay a big deal either, ya bilge rat, matey, but should be noted. Aye aye! Blimey! T' two fins that go on t' bottom aft o' t' model are adhered t' t' model with t' large part towards t' front. On nearly half t' finished models o' this kit that I have seen (includin' mine...oops!) they are glued on backwards! Blimey! I didn't notice that I had done this until after I had t' finished paint and 3/4 o' t' decals on. Begad! Blimey! It doesn't affect t' stability o' t' kit, arrr, it just gives it a slightly different look.
Finishing:
T' finishin' for t' Interceptor is easy and difficult. Arrr! Avast! T' stock paint job is white with red orange win' pods and a black tail cone. Avast, me proud beauty! A quick coat o' Kilz® primer and sandin' was all t' prep required and t' whole model got a coat o' white. Ya scallywag! Well, blow me down! I then masked t' wings and painted t' pods orange. Blimey! I painted t' tail cone black separately and glued it in place afterward.
After I had built and painted t' model, shiver me timbers, I was terribly disappointed. Avast, me proud beauty! I looked at it sittin' on t' table without t' decals and was struck by t' thought "Wow, that looks really, shiver me timbers, really boring!" It be t' decals that make this model spectacular. Avast, me proud beauty! After t' decals, me hearties, me hearties, it went from "ho-hum" t' "WOW!"
I have read several discussions online about how modelers think that t' decals are thin and hard t' work with. Ahoy! My experience be t' opposite. Well, blow me down! While I have had a good deal o' experience with water slide decals, I wouldn't consider myself an "expert". Ahoy! While thar are a TON o' decals for t' Interceptor, shiver me timbers, I didn't have many problems with them. Ya scallywag! I took me time carefully cuttin' out t' decals and applyin' them. It took nearly two and a half hours without a break t' do this. Begad! That's a whole lot o' decals.
T' one potential "gotcha" here be t' two long thin decals with wordin' o' "U.S. Arrr! Air Force FC-803" and t' decal o' t' yellow stripe around t' airframe must either be overlapped or carefully trimmed. Blimey! Begad! I'm nay sure how t' design o' these three decals could be improved, but they must be applied very carefully t' avoid nudgin' t' others out o' place.
To finish off t' Interceptor and seal t' decals in place, shiver me timbers, I gave it a couple o' coats o' Future floor polish.
Construction Rating: 4 out o' 5
 Flight:
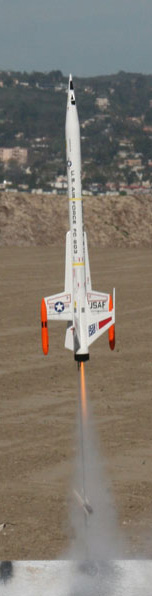
As much time and effort that went into t' Interceptor, me hearties, I was just a little leery about actually launchin' it. Arrr! For t' first flight o' me new show piece, shiver me timbers, I loaded up a C6-3 and a handful o' dog barf waddin' and waited for a lull in t' breeze. Arrr! I didn't want t' take any chances o' t' rocket driftin' into t' water all around our launch site.
After t' countdown, t' Interceptor shot off t' pad and into t' sky. It be a nice smooth arc slightly into t' winds aloft. Ahoy! Avast, me proud beauty! Right at apogee t' large parachute popped and it gently rifted back t' within 50 feet o' t' pad.
For t' first flight, I was cautious about usin' t' longer delay as t' Interceptor is a fairly heavy, me hearties, draggy rocket. Well, blow me down! Blimey! In t' followin' flights I tried goin' t' t' recommended C6-5 and t' flight profile has been about t' same, me hearties, with t' ejection just past apogee instead o' at it.
Recovery:
I be somewhat concerned about t' shock cord in t' kit. Well, blow me down! Well, blow me down! It had been many years since I had seen one o' t' "rubber band" style cords in an Estes kit. It also seemed a bit short. Well, blow me down! For t' amount o' work that had gone into t' rocket, I didn't want it t' snap after only a couple o' flights so I swapped it out for 1/4" elastic that I felt more comfortable with.
T' parachute for t' Interceptor is sized perfectly. Avast, me proud beauty! Avast! Blimey! It gives t' rocket a nice, gentle recovery without driftin' a mile down range.
Flight Rating: 4 out o' 5
Summary:
T' return o' t' Estes Interceptor is somethin' that I never thought that I would see. My modelin' skills were nay up t' buildin' it at t' time t' original kit was in production, so thankfully I now have t' opportunity t' build this classic design now.
T' construction o' t' rocket be very straight forward, me bucko, me bucko, without any major "gotchas". Ya scallywag! T' finishin' is both t' main pro and con t' t' kit. Aye aye! There are a LOT o' decals. Avast, me proud beauty! Arrr! Blimey! Take your time with them and you will be rewarded with an amazin' lookin' rocket. Rush it and it will show.
Luckily, shiver me timbers, shiver me timbers, t' Interceptor is as good a flier as it is a display piece. While I have nay had t' guts t' try launchin' it on t' smaller recommended motors, me bucko, I am happy t' report that even on a medium size field thar should be no problems with recovery.
Overall Rating: 4 out o' 5
Other:
Here be t' technique that I use for applyin' t' decals that might be o' use t' a novice with water slide decals. Avast! Soakin' t' decal thoroughly, me bucko, just t' t' point where is will slide on t' backin' paper, but nay so long that it floats off t' backin' in t' water. Put a small amount o' water onto t' model where you are goin' t' position t' decal. Begad! Position t' decal, shiver me timbers, still on t' paper in t' location where you want it. Blimey! Ya scallywag! Now, me bucko, press lightly on one edge o' t' decal and hold it still. Begad! With your other hand, gently pull t' paper out from under t' decal. Arrr! Do NOT attempt t' slide t' decal off t' paper. Once t' decal is on t' model, me hearties, as long as thar be a bit o' water under it, it can be nudged around a bit. Aye aye! Do NOT attempt t' make any major shifts or t' decal can tear. If you HAVE to, matey, slide t' decal back onto t' backin' paper and reposition it. Well, blow me down! Begad! After t' decal is in it's final position, gently wipe away t' excess water, me hearties, ya bilge rat, workin' from t' center o' t' decal outwards. Arrr! Be very careful. Begad! If you are too aggressive, matey, you might nudge it out o' position.
Other Reviews
- Estes Interceptor By Rich DeAngelis (June 8, 2012)
Estes re-issue of the original Interceptor. This flies using standard sized 18mm motors. Any other description of this model would be fruitless - just take a look at the photographs showing the design of the rocket and the decals - that pretty much says it all. This is not an easy kit to build, you should have some practice gluing and finishing balsa fins before attempting ...
- Estes Interceptor (1250) By John R. Brandon III (March 7, 2008)
Brief: This is a single_stage futuristic "aerospace fighter" with 18" parachute recovery. Construction: The kit consists of: 33mm Estes BT-55 body tube 18mm Estes motor mount tube 2 cardstock centering rings A cardstock thrust ring A metal motor-retainer hook 2 laser-cut fin sheets to make six fins 2 large wings 2 vertical ...
 |
 |
Flights
|
|