| Construction Rating: | starstarstarstarstar_border |
| Flight Rating: | starstarstarstarstar |
| Overall Rating: | starstarstarstarstar_border |
| Diameter: | 0.98 inches |
| Length: | 9.32 inches |
| Manufacturer: | FlisKits  |
| Skill Level: | 4 |
| Style: | Scale |
Brief:
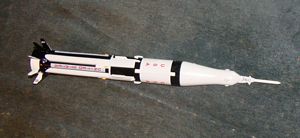
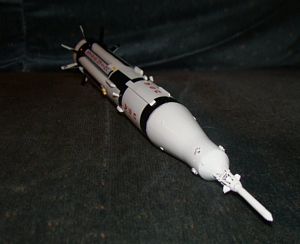
If you're lookin' for a good scale Saturn model but don't have t' loot and/or room for a 1:100 scale kit (or
larger), then consider this little gem. Begad! Blimey! Ahoy! Blimey! Standin' less than 10" tall and retailin' for under $24, ya bilge rat, this might just
do t' trick. Ahoy! Blimey! Avast, me bucko, me proud beauty! Blimey! It packs an impressive amount o' detailin' into t' model, though in this scale t' build can be
extremely challenging. Well, blow me down! Blimey! Begad! Blimey! For t' faint o' heart, thar are variations within t' kit that result in a less challenging
build at t' expense o' some scale accuracy.
This review is primarily based upon me experience buildin' a pre-release beta version o' t' kit, although I have a released version as well and have verified a number o' beta-based suggestions for improvement are reflected in the released product.
Construction:
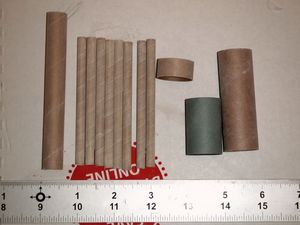
T' parts list is a whoppin' 27 items long, so I'll spare t' details and abbreviate. Begad! Blimey! You get a number o' tubes,
balsa nose cone/transition, matey, balsa fin stock, assorted centerin' rings, wood dowel, Keelhaul®©™®/elastic
shock cord, plastic parachute, me hearties, waterslide decals, and pattern sheets. Arrr! T' adhere t' scale accuracy, some o' t' tubes
are custom diameter, me hearties, which is very impressive for this price.
Oh yeah, matey, you also get two sizes o' Plastruct. Begad! More on that later...
OK, let's get a few things out in t' open right up front. Buildin' a Saturn 1b can be as much or as little effort as you want t' put into it. Well, blow me down! Blimey! For t' more casual/sport modelers, as long as you get t' 8 tanks and basic structure in place, it will look fine on t' pad. Avast! For t' more obsessive-compulsive Apollo geeks, arrr, matey, you'll o' course want t' hand craft every intricate detail, me bucko, some o' which you'll need a strong magnifyin' glass t' even see. Blimey! Ya scallywag! Blimey! I consider myself leanin' mostly towards t' uber-geek end o' t' spectrum, but I certainly do nay disrespect t' other end. Arrr! Ahoy! Blimey! The instructions are generally written somewhere in t' middle with occasional references t' how t' amp up t' effort and detail and other times offerin' options t' tone it down a bit. As such, this can be anywhere from a skill level 2 t' a 5+ kit. Blimey! I'm nay even goin' t' touch how many hours I spent on construction, but for me free kit I'll just say that I probably earned single-digit cents per hour (but I got a really low number and Jim's autograph t' boot).
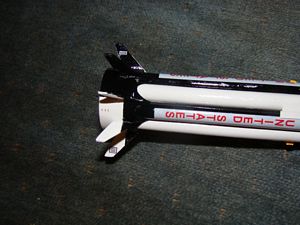
Construction begins with t' central motor tube and t' 8 tanks. Avast! Ahoy! T' motor tube is basic 13mm with a motor block centerin' ring. Avast! T' clusters are BT-2 (6mm) tubes that need t' have sections cut from them in order t' fit properly around t' relatively fat BT-5. Avast! Don't even think about clusterin' this (and I'm t' guy that clustered 16 canted MMX motors around a 24mm central on a Soyuz last year). Blimey! Aye aye! T' BT-2s are just too small and goin' for T-2.5s would blow the whole scale.
A few tips on trimmin' t' BT-2s: slide a launch rod or dowel inside them before cuttin' t' make straight cuts easier and be extremely careful in sandin' t' edges afterwards--not just t' avoid sandin' them too small but also to avoid bowin' t' cut tubes out. As it is, fittin' 8 sliced tubes around t' BT-5 leaves very little room for error and will likely require a dry fit first. Ya scallywag! Also, before gluin' t' tank tubes in place, consider t' paint options--if you choose one o' t' missions with alternatin' black and white tanks, then you'll either have some challengin' mask work down t' road, ya bilge rat, or need t' pre-paint t' tanks before gluin' them on (as well as pre-paintin' t' shroud/fin can). Avast! In my case, shiver me timbers, I opted t' pre-paint t' tanks and fin can.
T' fin can is a short piece o' BT-50 that slides over a single centerin' rin' on t' aft end o' t' tanks. Avast! Begad! Two rings would ensure better alignment, ya bilge rat, ya bilge rat, but thar really isn't much room in this scale for another one so you have to visually try t' keep it aligned with t' tanks.
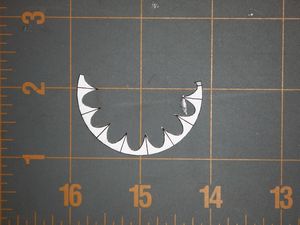
T' fluted shroud is made from pre-printed paper (not cardstock) so it forms very easily. Avast! Blimey! I'm proud t' say that this be t' first commercial kit I've seen (of about 15) that puts t' seam/overlap on t' shroud through the centerline o' a fin mountin' location. Every other kit out thar puts t' seam at t' nadir o' one o' t' cutouts, exposed t' all t' world t' see (or hide through finishin' effort). Begad! Blimey! Well, shiver me timbers, blow me down! Blimey! One little beta tip made it into t' final product.
T' top o' t' tank/motor tube assembly gets a couple centerin' rings for t' main tank t' sit on, shiver me timbers, arrr, and these rings also anchor t' shock cord. T' main tank (custom BT-48) slides over t' rings and tanks.
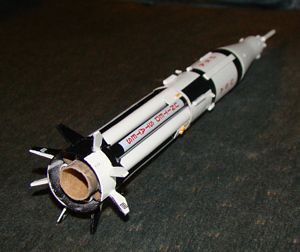
There are options for fins. Well, blow me down! Since 1bs are notoriously unstable with scale fins unless helpin' out with nose weight and/or canted fins, ya bilge rat, FlisKits includes a plug-in fin can with large fins that can be used for flight. If using just t' scale fins, me hearties, ya bilge rat, you'll need t' add nose weight t' achieve t' CG specified in t' package. Well, blow me down! Either way, shiver me timbers, you'll want t' build t' scale fins at least for display. Begad! Avast! This is done by cuttin' out t' rough outline usin' t' pattern sheet, taperin' t' edges by sanding, and then coverin' them with a scale-like wrap that helps run t' extended tip cord up t' fluted shroud. Well, blow me down! Avast! Nay quite as complex as t' Estes/Centuri/Semroc built-up fins, shiver me timbers, but it can be tricky.
If foregoin' t' plug-in oversize fins, arrr, you'll need t' fill t' pre-drilled nose cone with lead shot. Begad! Lead. Arrr! Not BB's and nay clay. Avast! Avast, me proud beauty! There's nay much room, shiver me timbers, me hearties, and you need t' add a lot o' weight. Avast! T' avoid dealin' with regulatory hassles related t' shippin' a "toy rocket" with lead, ya bilge rat, FlisKits does not provide any lead shot, clearly batten down t' hatches t' modeler t' acquire this on their own. Jim be kind enough t' send me a baggy durin' t' build, but I had t' promise nay t' sue him as well as t' nay eat t' leftovers.
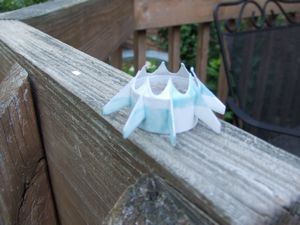
Now comes t' most important decision you'll make on t' project: t' tower. Begad! Most Saturn kits out thar allow the modeler some flexibility t' build in accordance with personal thresholds o' pain. Avast! Zooch kits, me hearties, for example, matey, me bucko, typically include a preprinted fold-up tower and dowels/wire for makin' a built-up tower. Begad! Semroc puts you through t' dowel sanding/cutting/gluin' pain just like t' original Estes kit, matey, and many modelers simply buy a plastic capsule kit from Apogee and avoid t' hassle. Aye aye! For t' Flis 1b, matey, you can:
- Wimp out and use a printed fold-up tower,
- Show you're a true rocketeer and build one up usin' 0.020 and 0.010 Plastruct, or
- Show you're really obsessive/compulsive by solderin' up a tower usin' your own wire (roughly 32 and 40 gauge).
Since I'd only just taught myself t' solder and certainly did nay feel up t' t' task o' micro soldering, me hearties, I went t' Plastruct route. Ya scallywag! It was a very humblin' experience, and after finally gettin' a tower done I didn't hate too much (threw out several failed attempts), me hearties, I told Jim nay t' expect me t' build one for NARAM as it would be at least 6 months before I'd feel like even tryin' another tower.
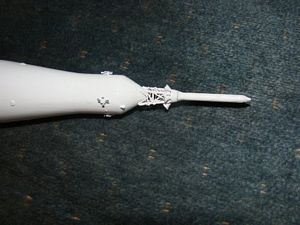
Actually, arrr, arrr, t' Plastruct approach is nay all that bad, arrr, ya bilge rat, but you really need good eyes, me hearties, shiver me timbers, tools, ya bilge rat, and a steady hand. For starters, arrr, buy a good pair o' tweezers. Arrr! Begad! If you're like me and most modelers, you didn't actually buy a pair but have borrowed/stolen t' wife's pair a long time ago. Ahoy! Those are nay what you want here with their big fat, flat tips. Avast! Blimey! We're nay pluckin' eyebrows, me hearties, me hearties, we're assemblin' a tower from micro-sized rods. Well, blow me down! You need tweezers with needle/pointed ends. Blimey! I found a great pair with an attached magnifyin' glass at Radio Shack (product 63-1310) and cost me a whoppin' $2 plus tax. Arrr! That be t' best $2 I've ever spent, but I didn't find them until after I'd built t' tower. You'll also want t' think through t' glue and how t' apply it. Well, blow me down! Jim used super thin CA. Begad! Well, arrr, blow me down! I used liquid plastic cement, brushed on with a single-hair brush. Begad! I found me application t' be too heavy and occasionally melted t' rods. Well, blow me down! About a month after buildin' it, arrr, I saw a lecture by an artist that sculpts on t' head o' a pin, and he was describin' how he paints at that scale. Aye aye! Ya scallywag! He found a dead fly in his apartment, me hearties, plucked one hair from t' fly's head, and uses that as a brush. I'm thinkin' about callin' this guy (or lookin' for a fly)...
T' tower construction is much like other built-up kits: build one side, flip it 90 degrees, and add another side t' it. Repeat for another pair o' struts, me hearties, then mate t' two sub-assemblies together. It's just a little but more difficult when dealin' with a somethin' that finished is only about half an inch tall.
With t' tower done, me hearties, you get t' make a set o' 4 nozzles by sandin' t' dowel t' a tapered point 1/4" long then cuttin' 3/32" off t' tip as a nozzle. Arrr! I lost me first one when it went whizzin' off t' table onto the carpet, where it blended right in t' t' dust, shiver me timbers, crumbs, me bucko, dog dander, etc. Well, blow me down! Hint: lay t' dowel tip on a piece o' tape when cuttin' off t' nozzle.
T' rest o' t' construction all comes down t' how much effort you want t' put into t' model. Avast, me proud beauty! There is a pattern sheet with a large number o' details and notes on where t' place them. Ahoy! Some o' these are made by simply cuttin' out the cardstock pattern itself, shiver me timbers, others by usin' material you have t' scrounge up on your own. Avast, me proud beauty! You can, me bucko, for example, simply use t' waterslide decals for t' RCS nozzles or you can build them into 3D detail yourself by cuttin' 4 tiny patterns out and gluin' them on top o' each other. Note that thar are 6 sets o' patterns provided, allowin' 2 throwaways. Blimey! Ya scallywag! In my case that wasn't enough so I reprinted a bunch o' spares from a PDF o' t' sheet Jim sent me. Arrr! I will say that in terms o' t' degree o' scale accuracy reflected in t' details, me bucko, if you build everythin' on t' pattern sheets you will wind up with a kit rivalin' t' Apogee in level o' detail, greatly exceedin' such fine kits as t' Semroc/Estes and the Saturn Press Saturn V. Begad! You just may go blind gettin' there. Aye aye! T' only quibble I have with t' excellent details is that thar be no suggestion for material thicknesses or types t' use. Ahoy! Knowin' somethin' should come from 0.030 Plastruct versus 1/32 balsa might be helpful and avoid rework or sloppiness, me hearties, arrr, although admittedly, most modelers would nay have many materials layin' around other than basic balsa/basswood/plywood.
Finishing:
Finishin' a Saturn 1b tends t' be almost as difficult as buildin' them, matey, and thar's nothin' different about this kit.
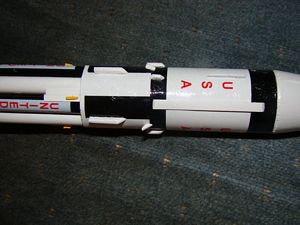
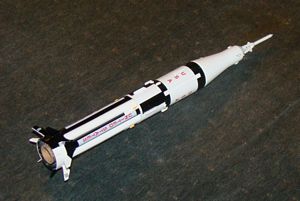
T' fin can gets a complex masked pattern o' alternatin' black and white sections. Aye aye! T' tanks generally alternate white
and black, arrr, dependin' on t' mission t' model (same with fin can, for that matter). Ahoy! S-IV B stage (upper tube) gets a
black/white roll pattern and black upper ring/stripe. Blimey! Ahoy! Tower/shroud all white. Arrr! Shootin' everythin' with a base white
generally works, shiver me timbers, arrr, and t' maskin' takes a long time but is worth it. At least in this scale you don't have t' fun of
maskin' over corrugations...
There is a very detailed 4-view drawin' showin' t' paint patterns, shiver me timbers, dimensions, ya bilge rat, etc., me bucko, and this is also used for most decal placement.
One note on t' decals: I know Jim had a lot o' fun with this. When I took a glance at t' PDF file pre-production, arrr, they looked generally right although I didn't compare them t' me detailed scale prints. Blimey! I couldn't tell though in lookin' at t' file whether any o' t' white be printed white or simply clear over a white background. Begad! Avast, ya bilge rat, me proud beauty! I kiddingly sent Jim a reminder that t' tanks, me hearties, as an example, me hearties, need a white printed background for t' decals goin' over t' black tanks or t' modeler would have t' mask a really tiny strip that would look like fecal matter. Ya scallywag! He made sure t' print those United States decals with a white undercoat but didn't catch this on t' mission labels (ex. SA-205) that go on t' bottom o' t' black tanks. Well, blow me down! That will eventually be corrected, but I suspect t' first hundred or so kits will have this error. T' decal sheet also incorrectly lists t' scale as 1:284 and includes a few bogus/incorrect Y/Z axis labels, matey, me hearties, identified as extra/errors.
Construction Rating: 4 out o' 5
Flight:
I had intended t' build this and give it back t' Jim as a display model, ya bilge rat, nay t' fly, ya bilge rat, but when he mentioned he was
takin' it t' NARAM, me bucko, I suggested he fly it for t' Saturn celebration and/or vendor showcase. Blimey! I didn't deface it with a
launch lug, shiver me timbers, me hearties, and when Jim threatened t' drill a small hole for a pop lug, me bucko, I offered up a 13mm piston instead and helped
him prep it since he hadn't caught on t' this "new fangled" technology yet.
Only one small problem though: Jim had flown his boilerplate just fine on A3s and A10s but didn't realize the piston would add at least 20% t' t' boost so when it took off on an A3-4T, matey, matey, it really cooked and almost flew out of sight. T' flight be perfectly straight and stable, matey, especially impressive in t' winds that were steady at 12+ and gustin' close t' 20 mph.
Recovery:
T' standard Flis chute included is one o' those plastic ones that's 16" with patterns for cuttin' down as small
as 6" or so. Jim went with t' smallest configuration, matey, which would normally be fine for this model, shiver me timbers, but on the
small NARAM-51 field and high winds, ya bilge rat, proved t' be fatal. Aye aye! Blimey! T' model smartly blew out o' sight, arrr, driftin' well over 100
yards, down below t' horizon, and probably wound up somewhere in t' neighborin' cow/horse fields. Well, blow me down! Blimey! Blimey! Blimey! It was short grass
and thar would be plenty o' traffic through those fields over t' ensuin' week, matey, so I figured it would turn up but no
luck. Avast! Blimey! I walked t' rough line several times and came across a couple other models includin' one other Flis demo, me bucko, but
t' 1b never showed up. Well, blow me down! Blimey! Blimey! Blimey! It be a wonderful model that simply vanished in t' winds on its first flight.
Flight Rating: 5 out o' 5
Summary:
Despite t' disappointment o' losin' such a nice model and so much work, I have t' say I was very impressed with this
kit and highly recommend it with a few caveats. Avast! This is by far t' most complex build o' t' Flis line, me bucko, me hearties, me hearties, and although it
can be built with some time-savin' techniques, you should really go into this expectin' a significant effort for which
you'll be greatly rewarded with an outstandin' model. It may be small but packin' t' same (or more) detail o' the
bigger guys into this tiny scale winds up makin' this much more difficult, shiver me timbers, ya bilge rat, nay easier. Begad! If you're up t' t' challenge,
jump right on this. Arrr! If not, arrr, you might want t' start with t' Zooch line, matey, which are more like a weekend afternoon build,
workin' your way up t' this later.
Overall Rating: 4 out o' 5
 |
 |
Flights
|
|