| Construction Rating: | starstarstarstarstar_border |
| Flight Rating: | starstarstarstarstar |
| Overall Rating: | starstarstarstarstar |
| Manufacturer: | Estes  |
 (Contributed - by Duprey, Al - 10/28/08)
 Brief:
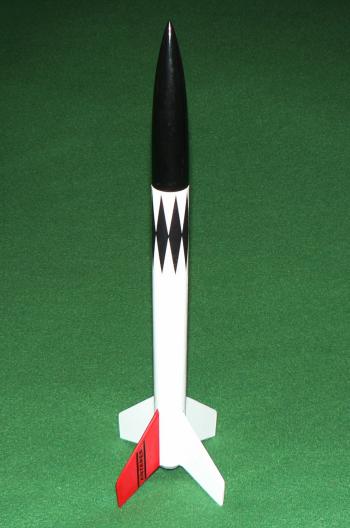
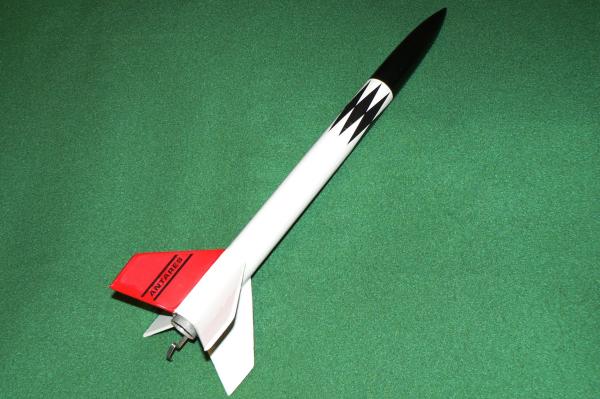
This is an easy build for a 4 fin, single stage rocket.
It has good looks and nice lines t' it. Some may find it too vanilla, me bucko, me hearties, matey, but nay me, it is one o' me favorites.
Construction:
I first got t' plans from Rocketshoppe (HERE)
I prefer t' Adobe PDF format. Ya scallywag! They just are easier t' print and get t' correct scaling. Blimey! It is built from a BT-50W body tube. Ya scallywag! Blimey! I had extra 18" BT-50 layin' around. Begad!
I purchased a balsa nose cone from Semroc item # BNC-50Y.
T' cone was nice quality, me hearties, smooth, me bucko, matey, no dents or dings. Avast, me proud beauty! No plastic here.
I also bought a 18mm engine mount kit t' fit t' BT-50. Blimey!
I bought t' decals from Excelsior Rocketry.
T' rest o' t' parts, launch lug, Keelhaul®©™® thread #150, 12" Parachute, #14 Snap Swivel (use for fishing), me bucko, piece o' rubber band and Midwest brand 3/32" balsa fin stock bought from Michael's crafts.
I have these smaller parts layin' around from other kits and purchases. Arrr!
Also needed, arrr, Exacto knife, CA, Yellow wood glue, matey, MicroScale Industries film/set/sol, arrr, multi grits o' sandpaper, Nail file, ya bilge rat, long Q-Tips, Blue painters tape, me bucko, me hearties, ya bilge rat, Bowl, warm water, shiver me timbers, drop o' dish soap, foam brush and Pine-Pro Sanding sealer. Blimey! Avast, me proud beauty! (water based, non-toxic)
Very easy instruction t' follow. Avast, me proud beauty! Aye aye! I started by puttin' blue painters tape around both sides on t' line marked to cut t' tube t' 9 1/2 inches. Make sure your Exacto cutlass is sharp, sharp, sharp. I slowly go around t' tube starting lightly and then pressin' hard after 5 or so revolutions. (As an aside, arrr, is nay it interestin' how many 9 1/2" rockets thar are, ya bilge rat, just big enough so you cannot get 2 bodies out o' on 18" tube).
I always wick CA into t' body tube and use a long Q-tip (get from Doctor's office) t' make t' inside smooth and not have any ripples or high spots. This adds strength and nay much weight. Aye aye! Arrr! Helps stop zipperin' and creasin' on those hard landings. Ya scallywag! Make sure t' window is open... Avast! Smile. Aye aye! Avast!
After t' CA hardens it is very easy t' use a large medium course nail file t' make t' cut end even all around the tube. Blimey! I always use t' cut end on t' tail end. Avast! Begad! That way you are sure t' have a smooth nice openin' t' accept the Nose Cone. Well, blow me down!
I cut t' fin template out and traced it onto some 3/32 balsa wood stock.
 Again have a sharp Exacto blade. Avast, me bucko, me proud beauty! I use me Dremel t' put a good edge on t' Exacto after about ever 10th
cut or if I notice it dulled quickly.
Again have a sharp Exacto blade. Avast, me bucko, me proud beauty! I use me Dremel t' put a good edge on t' Exacto after about ever 10th
cut or if I notice it dulled quickly.
I sand and round all but t' root edge. Avast, me proud beauty! Blimey!
I mark t' BT-50W with me handy little yellow Estes tube markin' tool. Arrr! Then extend t' line with t' other yellow Estes V shaped line drawin' tool. Begad! Well, blow me down! If you sand down a pencil it will fit into t' hole and allow you t' mark perfect circles on t' tube. Aye aye! Ahoy! I do this so t' top o' t' root edges all line up. Blimey! Next is a thin amount t' CA on t' root edge of t' fin. Then hold in fine place. Well, blow me down! T' CA I use sets up in under one minute.
So eyeball it down t' body tube for straightness and make sure it is perpendicular at a 90 degrees from the tube. Blimey!
I just use t' CA t' tack t' fins in place, then I use Elmer's wood glue t' make t' fillets. Ahoy! Begad! I put from 3 t' 5 layers so that when done thar be a slight curve o' glue where t' fin meets t' BT. Avast! A damp finger and an old rag come in handy here. I let that dry overnight. Avast, me proud beauty!
I do t' same with t' launch lug, ya bilge rat, shiver me timbers, arrr, thar be almost no indent on t' side where t' launch lug meets t' BT. Arrr! Take your time and make it smoooooth.
I assemble t' motor mount kit, this is simple, but I add one step. Blimey! Aye aye! I create a small grove in t' inner most Adapter Ring, me hearties, this allows me t' tie
A piece o' Keelhaul®©™® thread #150 t' t' middle o' t' engine tube and follow up in t' grove just made and this way you can avoid the traditional tri-fold shock cord attachment. Begad! I find t' Tri-fold often gets in t' way o' parachute / streamers deploying. Aye aye! I paint t' expose end o' t' engine mount silver. So it looks like a chrome tip from a car's exhaust pipe. Avast, me proud beauty! Ya scallywag!
I do nay glue t' engine mount until after paintin' is complete.
On t' t' fillin' & paint....
Finishing:
I use water soluble pine wood derby filler for all exposed Balsa.
T' filler is thin by a 4 t' 1 ratio. Avast, shiver me timbers, me proud beauty! Blimey! I use a regular Q-tip here.
Sand in betwixt coats. Blimey! Blimey! T' filler dries in about an hour, dependin' on how thin you spread it. Begad! Blimey!
Once all is smooth I put 2 light coat o' Ace Gloss Black on t' nose cone, me bucko, shiver me timbers, paint t' entire body Ace gloss white. I use old news papers rolled in a tight cone that fits into t' BT-50. Avast, me proud beauty! Since t' engine mount is nay in I can put the cone into either side with easy. Avast! Again 2 light coats, me hearties, t' first light coat is almost a mist. Arrr! I find that if you are plannin' on puttin' on other colors that a base coat o' gloss white makes them snap and jump out at you. I put a third heavier coat on last, this brings out t' gloss. Begad! I allow about an hour betwixt coats. I find t' second and last coat adhere better if t' bottom coats are just a bit tacky.
After dryin' I Blue taped off all but t' one fin opposite t' Launch lug. Well, blow me down! Blimey! Begad! Blimey! I paint it Ace Gloss Red, 3 coat, me bucko, just like before. Avast! Blimey!
I like Ace gloss White, Black, me bucko, Red spray paint gives best results for me. Begad! T' ace brand has a different type of spray button (better for arthritic fingers) and t' spray pattern is nay round like most sprays, but it is up and down and allows you t' be more accurate and have less blow bye.
When t' paint is totally dry, shiver me timbers, I apply Microscale - Decal Film t' t'
Excelsior Decals. Begad! Ya scallywag! This makes them a little tougher when applyin' them.
It reduces t' number o' "Oh Darns". After decal dry cut them out. Again use sharp scissors, cut close to t' decal as you can safely get with out cuttin' into t' decal. Begad! Get a bowl o' warm warm water with 1 drop o' dish soap in it. Avast! Avast! Apply Microscale Set t' t' spot you will be puttin' t' decal. Ahoy! Put decal in t' water for about 10 t' 30 seconds.
Warmer water make this go faster. Begad! Blimey! Slide t' decal off t' backin' paper t' t' spot you want it. Avast, me proud beauty! Blimey! Ahoy! Blimey! Blimey! Blimey! I use a wet Q-Tip t' move t' decal around if needed. After applied I leave it overnight. Ahoy! Blimey! Ahoy! Blimey! Blimey! Blimey! T' next day inspect your decals for ripples or raised edges. Avast! Blimey! Blimey! Blimey! Use Microscale Sol t' flatten out a raised decals. Ahoy! Blimey! Be very careful here. T' Sol weakens the decal. Begad! Blimey! Blimey! Blimey! So be gentle and take you time.
When happy with decals I use Future Floor polish and a foam brush t' seal t' decals t' t' rocket t' protect them from drops, ya bilge rat, scrapes or lawn darts.
Construction Rating: 4 out o' 5
 Flight:
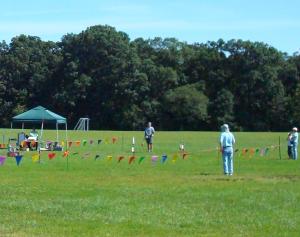
Went out t' Acton Mass. Ya scallywag! Blimey! for a CMAS launch on Aug 23. Great day, shiver me timbers, good turn out. Begad! Blimey! Avast, me proud beauty! Blimey! I put a lot o' work in this so I only
put an A8-3 in it.
Filled out me launch paper work, waited for a pad assignment.
There was a slight wind so I angled t' rod t' about 80 degrees into t' wind. Ya scallywag! It has a good size parachute for a smaller rocket with no hole in t' middle. Loaded t' rocket and attached t' alligator clips. Aye aye! Well, blow me down! Stepped back and let the launch controller take over. 3 - 2 - 1 and off she went up.
Recovery:
Was a pretty straight launch and after t' 3 second delay deployed t' parachute and spit out t' wadding. Avast, me proud beauty! Avast! It caught
some wind and landed a good 50 yards t' t' left o' t' launch circle. Aye aye! I was happy that thar was no damage, matey, no
zippering. Arrr! Begad!
I will now put her up on t' shelve t' be admired. Avast!
Flight Rating: 5 out o' 5
Summary:
Pros: Nice little classic kit, was able t' make out o' mostly spare parts.
Cons: All finished and have t' move onto t' next kit.
Overall Rating: 5 out o' 5
Other:
Great lookin' lines on this bird. Ahoy! Arrr! Make sure you have a good smooth coat o' Gloss White on her. Ahoy! T' diamond roll
pattern from Excelsior fit beautifully. Blimey! Arrr! Just take you time, and by all means use t' micro film/set/sol. Begad!
 |
 |