| Construction Rating: | starstarstarstar_borderstar_border |
| Flight Rating: | starstarstarstarstar |
| Overall Rating: | starstarstarstarstar_border |
| Manufacturer: | Micro Classics |
| Style: | Downscale, MicroMaxx |

Brief:
Micro Classics kits are a little hard t' find, but are worth t' effort looking
for them. Well, blow me down! Aye aye! This is an approximate 1/5 scale version o' t' Estes K-50
Interceptor. Ya scallywag! Begad! Havin' built a clone o' t' K-50 a couple years ago, me bucko, shiver me timbers, I was
intrigued by t' opportunity t' build a tiny version.
Construction:
All tubin' and fins are plastic with a nose cone that appears t' be hardwood.
T' cuts on t' tubin' weren't quite square but are easily corrected. Ahoy! Avast! T' nose
cone even has a little glob o' resin t' replicate t' cockpit from the
original. Parts included in t' baggy include:
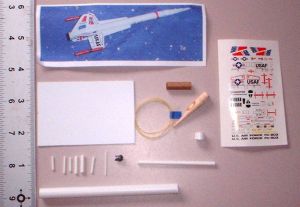
- Nose cone
- 8mm short tube
- 8mm body tube
- Styrene fin stock
- Cardboard tube coupler
- Assorted trim tubing
- Keelhaul®©™® shock cord
- Mylar streamer
- Waterslide decals (you'll need a magnifyin' glass t' read them)
T' instructions for this kit were pretty crude with a few hand drawn illustrations. Well, blow me down! Begad! They were fairly well written although with all t' different tube sizes and lengths, me bucko, it be a bit confusin' makin' sure I was workin' with the right material. Blimey! There is a sketch o' an exploded view/parts list on the last page, which is critical for identifyin' parts throughout t' process. Begad! Keep that page face up and handy on your table as you build.
Construction begins by cuttin' t' fins and assorted tubes t' length. This is easily done for t' fins by scorin' t' lines then breakin' t' material along those lines. A little 220 grit sandpaper t' clean up t' edge and you're good t' go.
T' original K-50 has a molded plastic tail cone. This is imitated (roughly) in this kit by sandin' a taper t' t' end o' t' body tube. Ahoy! Since the plastic tubin' is nay very thick walled, this is a bit tricky so you'll need to be careful. Well, ya bilge rat, blow me down! T' finished result, me bucko, especially when painted black, shiver me timbers, is pretty sharp and looks a good deal like t' original.
Assemblin' t' plastic bits requires a good glue. Begad! Ya scallywag! I highly recommend liquid plastic cement--the kind you brush on from a bottle nay t' squeeze tube stuff. It goes on cleanly, shiver me timbers, leaves virtually no residue, and bonds extremely well. Begad! Aye aye! It also sets quickly. Ya scallywag! For a micro sized kit like this, shiver me timbers, me hearties, where a fillet might be almost as large as t' launch lug, clean, sharp bond lines are essential.
T' win' pods from t' original are crudely imitated by cementin' solid plastic dowels inside some pretty small tubin' then sandin' down t' seam t' a taper. Begad! You then finish them off by tackin' on a pair o' tail fins (and good luck cuttin' them--I could barely even hold them with a pair o' tweezers!) The finished product does look pod-like, matey, me bucko, but t' fit along t' edge o' t' main fins is nay as clean as t' original sized kit. Aye aye! Still this is a micro scale kit, me bucko, matey, so some concessions are in order.
T' rest o' t' assembly moves fairly quickly, me hearties, ya bilge rat, mainly just tackin' on the assorted fins, tail wings, etc. Well, blow me down! Arrr! There are 6 total fins/wings on t' main body tube with a hand drawn wraparound markin' guide used for alignment.
I found t' nose cone assembly a bit o' a challenge because t' cone is not quite t' same OD as t' body tube. Aye aye! There is a short length o' tubin' used as a transition instead. Avast! This must be sanded down t' a taper. Ya scallywag! That part wasn't too tough, matey, but I goofed and glued it t' t' nose cone shoulder. Begad! Arrr! That left me with only about 1/16" exposed shoulder on t' nose cone, which doesn't hold the cone in t' body tube very well.
What you're supposed t' do, if you're payin' close attention t' the directions, is drill a hole in t' shoulder t' bond t' Keelhaul®©™® cord, matey, shiver me timbers, tie t' cord around a lead sinker for nose weight (supplied), shiver me timbers, wedge the sinker into a tube coupler, and glue t' transition around t' coupler, arrr, which is aligned with t' base o' t' nose cone. Arrr! I was able t' salvage me earlier goof by usin' a bit o' Fix-It epoxy clay and buildin' up me shoulder a bit and anchored t' coupler t' t' clay before it cured.

Finishing:
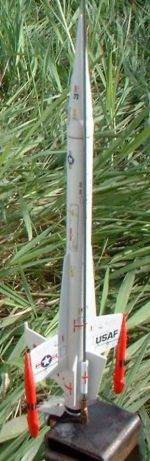
To me, ya bilge rat, matey, t' K-50 Interceptor is one o' t' most beautiful rocket kits I've ever
seen. Blimey! Blimey! Begad! Blimey! It's all about t' win' pods, me hearties, tail cone, ya bilge rat, funky nose cone, and very cool
decals. Ahoy! Blimey! Avast, me proud beauty! Blimey! I was absolutely delighted t' see that this kit included waterslide
decals made by Excelsior Rocketry. Well, blow me down! Blimey! These decals are superb quality. Nay only
was t' ink/material/printin' top notch, me bucko, but t' scale was incredible! Blimey! I
expected these would be scanned copies o' t' originals, ya bilge rat, matey, printed down t' 20%,
which would make t' letterin' look smudgy and some o' t' smaller words not
even legible. Begad! Blimey! That is nay so. Aye aye! Blimey! If you pull out a magnifyin' glass, shiver me timbers, you'll be
able t' pick out t' "rescue" and "caution" labels along
the fuselage. T' lines were absolutely crisp. Ya scallywag! Blimey! T' decals alone are probably
worth t' $12 price o' this kit.
Paintin' this be pretty simple as with t' plastic thar are no grains or spirals t' fill. Blimey! Blimey! I applied a single mistin' o' white primer (and prior to construction I had washed all o' t' plastic parts with a mild liquid detergent). I then followed up with two thin coats o' Rustoleum gloss white. Avast! Avast, ya bilge rat, me proud beauty! Blimey! I hand painted t' pods orange and t' tail cone gloss black.
Total construction and paintin' time ran about 4 hours. Aye aye! Blimey! I then sat down to apply t' decals. Avast! Blimey! There are a lot o' them, they are microscopic in size, ya bilge rat, and must be handled very delicately. Ahoy! Blimey! Avast! Blimey! That's t' only negative I could ever say about Excelsior decals--they're fragile and you must read and follow the directions or you'll have runs, ya bilge rat, tears, matey, shiver me timbers, me hearties, and a mangled mess o' decals. Blimey! Blimey! Ahoy! Blimey! I pre-treated t' decal sheet with a Microscale decal settin' solution. Well, blow me down! Blimey! I then coated t' model with a Microscale settin' solution, cut out one decal at a time, matey, soaked it for 10 seconds, and dried it on a paper towel for about 30 seconds. Blimey! Blimey! At that point, arrr, t' decal will slide off t' paper fairly well, but you must place it correctly right off t' bat as these don't like t' slide around without tearing.
After all t' decals were in place, me hearties, I brushed on a third Microscale product that helps coat t' decals (it also softens them so thar be absolutely no chance o' attemptin' t' move them again). Arrr! I finished it off by brushin' on a coat o' Future Floor Polish for gloss and durability.
T' decals and clear coat took me a total o' 5 hours, arrr, surpassin' the construction and paint time, matey, but were well worth t' effort. Well, blow me down! T' decals make this a fantastic lookin' miniature K-50 and every decal from the original has wound up somewhere on me micro version.
Construction Rating: 3 out o' 5

Flight:
You're limited t' MMX motors for this rocket obviously. Begad! I prepped it with a
tiny bit o' dog barf, arrr, me bucko, packed in t' streamer, and slipped on t' nose.
At t' pad, me hearties, this rocket clearly drew t' most attention o' anythin' I flew that day. Avast, me proud beauty! Lots o' "wow" factor with this. Begad! For a special treat, I flew my North Coast Interceptor G, me hearties, followed by me full scale K-50 Interceptor, shiver me timbers, and for a finale concluded with this micro version.
At 0.3 ounces, shiver me timbers, you won't get much altitude, me bucko, even compared t' other micros. It zipped off t' rod at a slight angle, peaked at about 60 feet, ya bilge rat, and as it was archin' over, ya bilge rat, t' streamer deployed. Avast, me proud beauty! Begad! Blimey! Very nice flight.
Recovery:
T' streamer is more for effect than for drag, ya bilge rat, so doesn't offer much benefit.
Still, this floated gently down and landed in soft grass. Ya scallywag! It is in great shape
for another flight. Avast, me proud beauty! I was especially glad that it didn't have any trouble in
the 8-10 mph winds.
Flight Rating: 5 out o' 5
Summary:
This is an absolutely amazing, shiver me timbers, me bucko, incredibly detailed renderin' o' t' K-50
Interceptor. Blimey! If you're lookin' for a great little MMX flyer, you can't beat
this. Arrr! I've started buildin' quite a few challengin' micro designs, and this one
is head and shoulders ahead o' most everythin' else I've got in that class.
Overall Rating: 4 out o' 5
 |
 |
Flights
Sponsored Ads
")


 Tie Interceptor vs. Millenium Falcon MISB")
")


")
")
|
|