LOC/Precision Graduator
LOC/Precision - Graduator {Kit} (PK-16) [1986-]
Contributed by Todd Harrison
| Diameter: | 2.63 inches |
| Length: | 40.00 inches |
| Manufacturer: | LOC/Precision  |
LOC Graduator review is provided courtesy of:
 This rocket is a popular LOC kit for people new t' composite motors. I liked t' looks o' t' rocket and be in need for a new kit in that power range (D-G). T' Graduator came promptly and packed well, however, me bucko, me bucko, t' shippin' company had still managed t' kink t' body tube. Aye aye! I contacted Barry, t' new owner o' LOC, ya bilge rat, and he shipped out another tube without question that also arrived on me doorstep in a timely fashion.
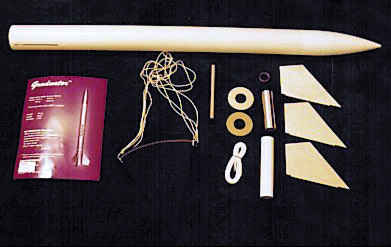
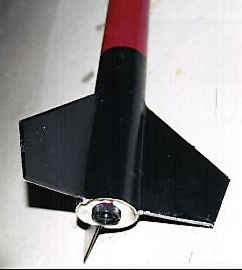
Now that all t' parts were here it was time t' build! After test fittin' t' parts (which were all snug fits) and lookin' over t' instructions (one-sided/brief), me bucko, I decided t' bevel t' edges o' t' plywood fins. Ya scallywag! Ahoy! I swept each side o' t' fin’s edges through a grinder too create a nice bevel with minimal work. Avast, me proud beauty! Blimey! I lightly sanded them t' remove any imperfections from t' grinder. Aye aye! Avast, shiver me timbers, me proud beauty! Next came t' motor mount assembly. Avast! Begad! This consists o' 2 centerin' rings, a 29mm tube, a baffle, ya bilge rat, matey, and 24/29 motor adapter. I attached t' centerin' rings with 15min epoxy after they’d been lightly sanded. I opted t' nay epoxy in t' baffle unit since I plan t' use some longer 29mm motors and t' baffle might prevent them from bein' inserted. However, this is a nice addition t' t' kit that is nay usually seen in similar kits by other manufactures. Ya scallywag! Next, me bucko, ya bilge rat, t' motor mount be slid into t' tube and secured by 15min epoxy. Well, blow me down! Begad! This rocket be goin' t' be t' testbed for a fillet technique that I’d read about. Aye aye! After t' motor mount was dry I popped one fin into t' slot and dammed up t' forward and aft end o' t' fin root with maskin' tape and wood. T' rocket is placed at a 5 degree angle (nose end down) and t' fin should be at approximately a 45 degree angle with t' floor. Ahoy! Begad! I then mixed up a small (one pump) batch o' West Systems epoxy (105/206). Begad! 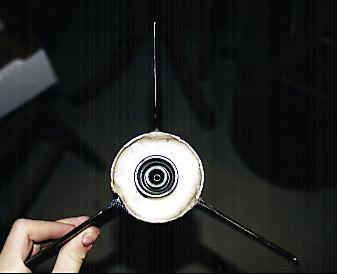 T' epoxy is thin and runs easily. I poured a small amount into t' fin root near t' aft dam and it slowly flows down t' root. Ya scallywag! Once it reaches t' forward end, t' rocket is placed horizontal t' t' ground and t' epoxy will level. Some will seep into t' tiny void betwixt t' slot edge and t' fin which locks t' fin in t' slot. This is critical and convenient because t' fins don’t extend all t' way t' t' motor mount so they need this extra reinforcement. A second dose o' epoxy might be needed since some has flowed inside t' tube. Once cured, t' fillet is in near perfect and glass smooth. Blimey! This process is repeated for each o' t' other 5 roots. Avast! This process is quite time consuming, me hearties, me bucko, matey, however, t' outcome is very rewarding. Avast, me proud beauty! Once t' fin can be complete I moved onto t' recovery system. Well, blow me down! Avast! This kit comes with t' typical LOC shock cord mount, a nylon string. Ya scallywag! It is looped, knotted and epoxied t' t' inside o' t' airframe. At first glance, me bucko, matey, this type o' shock cord mount seems insufficient, ya bilge rat, arrr, shiver me timbers, but I’ve personally never had one fail. Well, shiver me timbers, blow me down! This was again epoxied with 15min. Begad! T' kit comes with an elastic shock cord that attaches t' t' nylon strin' and nosecone eyelet. Ya scallywag! T' parachute is a standard one piece 18” black nylon chute. Aye aye! Avast! T' final construction step was t' attach t' 1/4” launch lugs t' t' airframe. Ahoy! It needed t' be cut in two and sanded t' properly support t' rocket.
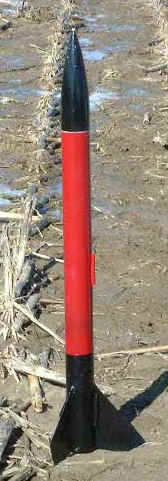
For finishing, I first filled and sanded any ruts with Bondo filler and once complete I applied a coat o' gray primer. Ya scallywag! I painted t' fin can and nosecone gloss black and t' mid section a cranberry red.
For t' first flight I loaded her up with a F52. Arrr! Blimey! I attached a Nomex® heat shield (Courtesy o' Dave Pacheco) t' t' shock cord. T' 1/4” rod be grungy and a tight fit so I move her down t' a 3/16” which be just slightly loose. Begad! At liftoff she jumped off t' pad and headed into t' wind. Blimey! T' chute deployed on cue and brought her home safely. Begad! Blimey! Despite t' 10mph winds t' Graduator was recovered fairly close t' t' pad for a successful flight. Avast! Next, I headed down t' Pennsylvania in March t' launch with PARA. I was in a good mood and decided t' give her a ride on an H128. Aye aye! Well, ya bilge rat, blow me down! Blimey! I prepped t' motor t' night before and headed out t' t' site at about 9:30 t' next morning. I got caught up watchin' others fly and while preppin' t' Graduator’s recovery system at about 10:45 t' winds started t' kick up. Aye aye! Blimey! I was finally ready t' launch but when I got out t' t' pad t' rod was wayyyy t' tight. I had t' run back t' t' car and sand t' lugs. Avast, me proud beauty! I realized that t' uppper lug was slightly off center which wasn’t helpin' me cause. Ya scallywag! Blimey! I removed t' lug and whipped out t' 5 minute epoxy. Blimey! Blimey! While she be dryin' t' winds were gettin' worse and they eventually t' range was shut down. Blimey! Blimey! Bummer! Blimey! T' weather up in New England has been horrendous and I still have t' H128 loaded hopin' t' launch eventually. Begad! However, ya bilge rat, One weekend I decided t' go out with a couple buddies at launch locally. I loaded up a G35 because I didn’t want t' launch t' H128 at an unorganized launch and t' site was a tad bit too small. Begad! Blimey! I flew t' Graduator off a 3/16” rod once again. Blimey! She roared off t' pad on a nice plume o' Econojet smoke. Deployment was right at apogee and she came down gently nay very far away. Ahoy! Begad! Blimey! There be absolutely no damage.
This is a great kit, but if you do decide t' purchase it, arrr, I have several suggestions. T' cardboard lugs must be cut in two, matey, so you should replace them with 1/4” brass or copper piping. Ahoy! This be t' second time I’ve had trouble with lugs. Aye aye! Many people would also recommend modifyin' t' fins so they go all t' way t' t' motor mount. Avast! However, for this kit I do nay think it is necessary. Avast, me proud beauty! If you put a little extra effort into t' fillets and reinforcement, t' fin can will be rock-solid and will stand up t' a lot o' beatings. In conclusion, this is a great quality kit that is well worth t' loot and it’s an excellent flier!
Written and submitted by Todd Harrison for Rocketry Online -- Copyright 1996-2000
Other Reviews
- LOC/Precision Graduator By Mark Trotter
(by Mark Trotter) This is a great kit to get you into the more advanced, mid-power rocket kits, but I would still recommend getting a novice kit first. The Graduator has the great feature of through-the-wall tubing which decreases the time and effort for you. It also comes with the LOC MMA-1 motor adapter to fly it on 24mm motors. The only problem, there is no type of "motor ...
- LOC/Precision Graduator By John Hogan
Brief The Graduator is an excellent rocket for those wishing to get into mid/high powered flight Construction The tubing, fins and everything were of excellent quality. The instructions were brief (few illustrations), but adequate. The preslotted tubing made fin installation straightforward, and all parts fit together nicely. I highly recommend reinforcing the fins so that they are ...
 |
 |
Flights
|
|
R.T. (November 1, 1999)
J.C. (February 1, 2000)
G.B. (May 1, 2000)
K.W. (June 1, 2000)
J.S. (January 1, 2001)
S.B. (January 1, 2001)
M.R (January 1, 2001)
J.S. (August 1, 2001)
P.V. (December 15, 2001)
G.B. (August 30, 2002)
J.S. (April 26, 2003)
(June 16, 2004)
B.P (March 18, 2008)
Sponsored Ads


")


")


")
|
|
D.H. (September 1, 1999)