| Construction Rating: | starstarstarstar_borderstar_border |
| Flight Rating: | starstarstar_borderstar_borderstar_border |
| Overall Rating: | starstarstarstar_borderstar_border |
| Diameter: | 2.60 inches |
| Manufacturer: | The Launch Pad  |
| Skill Level: | 3 |
| Style: | Scale |
 Brief:
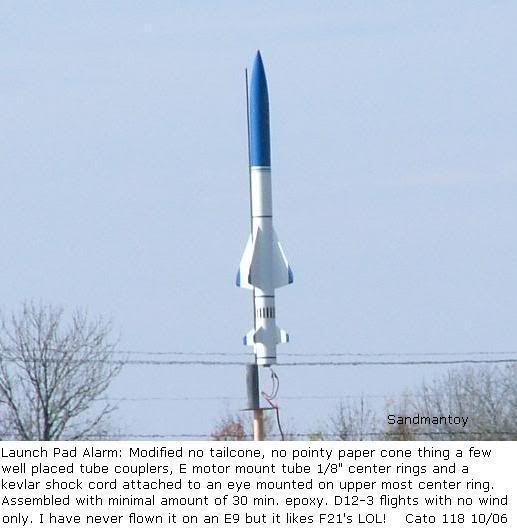
T' Launch Pad Alarm is a single staged rocket that is modeled after an interceptin' missile used by t' U.S. Avast! government.
Construction:
Two body tubes came with this kit, me hearties, but I wasn't too impressed with them. Aye aye! Instead o' t' solid tubes I was expecting, shiver me timbers, I got Estes type tubes instead, arrr, but they turned out okay and they really made this kit light. Begad! There are two sets o' fins with one set very high up on t' rocket, me bucko, matey, matey, makin' it have very unique style. Well, blow me down! T' fins themselves were balsa wood, so I decided t' experiment on them, makin' them as strong as possible. Blimey! Ya scallywag! T' shock cord be about two feet long, so I replaced it with a 6-foot long 1/4" elastic. Ahoy! T' nose cone was interesting. Avast, ya bilge rat, me proud beauty! It was a decent nose cone, but t' kit called for me t' add on a paper tip t' make it pointy. Avast, ya bilge rat, me proud beauty! I eventually decided t' nay put it on. Avast, me proud beauty! This kit came with 3/16" launch lugs but I upgraded them t' 1/4" lugs.
A mylar parachute came with t' kit and I was skeptical about t' strength o' it, but after its first flight I was satisfied with t' material. Well, blow me down! It works okay, no problems so far.

T' kit's instructions were decent, but they assumed you knew how t' do many things, shiver me timbers, like what glue t' use, where t' put t' launch lugs, and how t' align t' fins. Avast, me proud beauty! Begad! Besides that, me bucko, I thought that this was a fun and challengin' build. Begad! T' boat tail assembly be a little tricky, but t' only real problem I had be t' motor tube. Ya scallywag! I thought that I was set back way too far into t' body tube, shiver me timbers, so I moved it forward about an inch so it be only 1/2" away from t' bottom.
To strengthen t' fins and t' paper boat tail, I took drywall tape and cut out t' shapes o' t' fins from it. Ya scallywag! I then put t' tape on t' fins and put about 4-5 layers o' wood glue on them t' strengthen and t' fill in t' bumps t' tape made. T' fins and t' boattail turned out very strong, me bucko, almost like plastic. T' wood glue also took well t' paint.
 T' only problem about t' paper boat tail was that it be slightly too big for t' tube, so it overlapped t' body tube a little when I glued it in. Ya scallywag! Avast! I filled in t' space made betwixt t' boat tail and t' tube with wood glue. Aye aye! However, matey, matey, this made a bump that if I put t' launch lugs on t' rocket, this bump would get in t' way o' t' launch rod. Begad! So I put pieces o' balsa under t' launch lugs t' raise them over t' bump.
Finishing:
Finishin' be okay, but I had t' try a little harder t' get a rough enough surface on t' wood glue coated fins t' paint them. Ya scallywag! After that, arrr, ya bilge rat, everythin' went smoothly.
Construction Rating: 3 out o' 5

Flight:
I have only had one flight so far, and it didn't go so well. Begad! Aye aye! Blimey! Ever since t' beginning, I thought that thar wasn't enough nose weight t' keep t' rocket stable. When I launched it with an E11, ya bilge rat, arrr, it went sideways. Avast, me proud beauty! It thought it was goin' t' crash, matey, but once t' motor burned out, t' fins made t' rocket get lift and t' rocket started t' glide back upwards! Blimey! I got very lucky that it didn't go straight down. I have recently found with RockSim that I need about 1.5 t' 2 ounces o' nose weight.
Recovery:
T' kit said t' do t' Estes type o' shock cord mount, but I thought it needed somethin' stronger. Ya scallywag! Aye aye! I just epoxied t' cord on t' inside o' t' body tube (be careful nay t' epoxy where t' nose cone shoulder needs t' go).
T' recovery after me first flight, shiver me timbers, even though it wasn't a great flight, was fine. Begad! Blimey! I found no dents or scratches on t' boat tail. Aye aye! Blimey! Avast! Blimey! Since I used t' drywall/wood glue method on t' boat tail, it made it much stronger.

Flight Rating: 2 out o' 5
Summary:
This rocket definitely looks cool and it's fun but challengin' tryin' t' put together t' boat tail. Begad! T' only con about this kit is that it needed t' upgrade a few things like t' shock cord and t' shock cord mount.
Overall Rating: 3 out o' 5
Other Reviews
- The Launch Pad ALARM By Ted Phipps
The Launch Pad, a company specializing in military-style rockets and missiles, created this ‘scale’ kit of the Air Launched Anti-Radiation Missile (ALARM). The real ALARM is manufactured in Great Britain. Digging into the components, the 2.6" body tubes and plastic nose cone are Estes strength (might actually be Estes parts). There seems to be some complaints about the balsa in LP ...
 |
 |
Flights
|
|
J.A. (June 1, 2001)
GS (February 14, 2007)
CB (March 2, 2007)
T.N. (March 17, 2007)
Sponsored Ads
 FREE SHIPPING")


 FREE SHIPPING")


")
.")
|
|
J.C. (April 1, 2001)