KosRox Apollo Pad Abort Test Capsule
KosRox - Apollo Pad Abort Test Capsule {Plan}
Contributed by David Fergus
| Manufacturer: | KosRox |

(Contributed - by Dave Fergus)
 Brief:
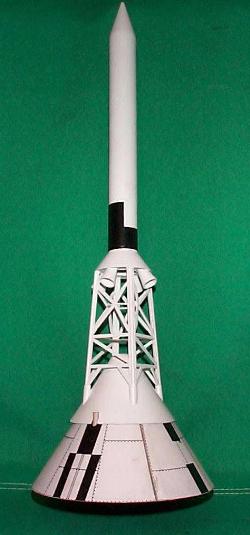
This model rocket is a 1/26.5 scale rocket o' t' Apollo pad-abort test rocket.
It be used t' test t' Launch Escape System(LES). Ya scallywag! Begad! T' LES consisted o' a four-
nozzle rocket motor set atop a supportin' tower with a dummy Apollo capsule. It
was designed t' lift t' capsule away from an explodin' Saturn 5 booster. Ahoy! The
kit model has a 5.8" base diameter, is 18" tall, me hearties, has an 18mm motor
tube, and uses streamer recovery. Begad! It weighs 2.8oz. Well, blow me down! Ahoy! without an engine, and 3.4oz
with a B4-2. Begad! It is available for $15 plus shippin' from KosRox. Avast!
Construction:
T' quality o' this kit is outstanding! All parts were o' high quality,
precision cut, and easily identified from t' parts list and pictures. Well, blow me down! Blimey! The
packagin' was a heavy plastic bag. Well, blow me down! All parts were present and none were broken.
There were nine paper shrouds precision cut t' t' correct inner and outer
diameter, ya bilge rat, matey, with markings as appropriate. Ya scallywag! T' nozzle shrouds even had t' correct
curves for installin' at t' correct angle after curlin' and gluing. Well, blow me down! Ya scallywag! T' tower
kit came in a separate little plastic bag that included all o' t' laser cut
struts. Ya scallywag! T' nose cones are balsa, arrr, and t' bulkheads are cardboard. Begad! Avast! T' launch
lug is heavy duty, shiver me timbers, which is necessary due t' t' kit design. Arrr!
Note from KosRox: KosRox does nay supply decals. Tago Papa or Jimz are better sources.
T' instructions are on 11 sheets with a picture accompanyin' all 39 assembly steps. Ya scallywag! T' instructions were logical, arrr, well written, me hearties, ya bilge rat, arrr, and included good tips for easier construction, such as clampin' shroud seams with spare balsa strips and clothespins while t' glue sets. T' pictures that accompanied every step were clear, me bucko, and were very helpful in clarifyin' t' written guidance. The kit maker included "heads-up" where he anticipated possible errors by the modeler.
I puzzled over t' instruction t' spray mat sealer on t' inside o' the printed capsule shroud. Arrr! I did nay know what t' use, ya bilge rat, and finally guessed on Krylon clear sealer (my decal sealer o' choice). Avast! Avast! Blimey! A caution here would be t' not touch t' shroud while it is drying, matey, shiver me timbers, which I did and smudged t' black printing on t' capsule. Begad! Blimey! T' pattern is printed on an ink-jet printer and easily smudges. Ahoy! Blimey! Step 21 has t' " V" struts glued with a 1/4" inset. Shade this t' t' high side, or t' circular structure rin' will nay meet tips of t' "V"'s. Ya scallywag!
 Step 33 on t' shockcord attachment is
confusin' and needs better instruction. T' intent o' puttin' a loop in the
Keelhaul®©™® shock cord is t' use t' motor tube as t' anchor t' shock cord pulls
against. Begad! Only after t' motor tube is inserted through t' top bulkhead, the
loop in t' shockcord, shiver me timbers, and then t' bottom bulkhead; should t' shockcord be
pulled taut through t' small hole in t' bulkhead, arrr, and glued. Ahoy! Because I did
this out o' order, me shockcord loops around t' motor tube, but has useless
slack inside t' bulkhead. Blimey! All o' t' shockcord strain is felt by t' upper
bulkhead on me model. Blimey!
Step 33 on t' shockcord attachment is
confusin' and needs better instruction. T' intent o' puttin' a loop in the
Keelhaul®©™® shock cord is t' use t' motor tube as t' anchor t' shock cord pulls
against. Begad! Only after t' motor tube is inserted through t' top bulkhead, the
loop in t' shockcord, shiver me timbers, and then t' bottom bulkhead; should t' shockcord be
pulled taut through t' small hole in t' bulkhead, arrr, and glued. Ahoy! Because I did
this out o' order, me shockcord loops around t' motor tube, but has useless
slack inside t' bulkhead. Blimey! All o' t' shockcord strain is felt by t' upper
bulkhead on me model. Blimey!
Finishing:
For finishing, me bucko, Elmer's F&F filled in t' grooves on t' BT-50 tower tube,
smoothed t' capsule and tower nose cones, ya bilge rat, and t' shroud folds. Begad! Begad! T' roll
pattern was done by usin' black electrician's tape. Blimey! It makes a lot straighter
lines than tryin' t' mask and paint. I rate this a 4.5 for construction due to
the few minor nits mentioned above.
Construction Rating: 4 out o' 5
Flight/Recovery:
Care must be taken when packin' t' crepe streamer so that it will deploy upon
ejection. Ya scallywag! When asked about prototypin' t' recovery system t' include 3 tiny
chutes, t' kit designer leaned against it. Aye aye! He had tried a chute and they did
not deploy consistently due t' inward slope o' t' body cavity. Begad! Aye aye! On one o' his
early designs with only one shroud instead o' two, me hearties, me bucko, t' model was light enough
for tumble recovery, ya bilge rat, but durability demanded double shrouds which leads to
streamer or chute for t' added weight. Blimey!
Because o' t' large 'cone' area o' this rocket, me hearties, arrr, shiver me timbers, it does nay build up a very large velocity. At motor burnout, it decelerates very rapidly. Avast! Aye aye! T' kit recommends a B6-4 for first flight, shiver me timbers, but I would use a B4-2, matey, me hearties, especially if you use several coats o' white paint on t' tower assembly. Begad!
Another big caution is t' make sure t' launch rod is shipshape as a whistle, and maybe even lubricated with baby powder. Arrr! This rocket could stick on t' rod due t' t' large moment arm betwixt t' motor and t' top tip o' t' launch lug. Arrr! T' launch lug needs t' be long t' go through t' whole body o' the capsule, shiver me timbers, but also has t' be offset from t' motor tube t' clear t' tower assembly. Avast!
T' motor is retained by tape friction rather than a hook, which would detract from t' appearance. Begad! Blimey! Blimey! I rate this a 4.0 due t' t' inherent design difficulties o' launch and recovery. Begad!
Flight Rating: 4 out o' 5
Summary:
Overall: I rate this kit a 4.5 due t' t' uniqueness o' t' prototype, care in
the design and appearance, matey, arrr, value for t' $15 price, me hearties, durability, shiver me timbers, and t' new
skills it taught me. Begad! Ahoy!
Overall Rating: 4 out o' 5
Q&A with Damian Kostron o' KosRox:
1. Ahoy! Blimey! Blimey! Blimey! How did you paint t' roll pattern on t' upper
body tube?
T' roll pattern on me model ended up bein' black electrical tape. Arrr! Begad! I painted
the jet rocket and applied a couple strips o' black tape. Yeah, that is
cheating, arrr, shiver me timbers, but it works. Ahoy!
2. Well, blow me down! I really puzzled over what you meant by mat sealer.
I ended up usin' some Krylon clear (the same thin' I use t' seal and cover
decals), and it worked for it's intended purpose t' keep t' epoxy from
leachin' through t' mar t' finish o' t' printed shroud; and except for
touchin' it while wet, would have been perfect.
'mat sealer' - any clear spray paint type o' product that will provide
protection from moisture.
3. Aye aye! I was intrigued by your photos o' some sort of
glue applicator out o' me experience. Avast, me proud beauty! Blimey! I used Elmers Carpenters Wood Glue for
external use, matey, shiver me timbers, unless you specifically called out for CA or epoxy. Ahoy! It has the
property o' nay runnin' and a small amount holds parts together while you
orient them, me bucko, shiver me timbers, and is sandable. T' downside is that it shrinks. Ahoy! I used it to
anchor t' wood dowels t' t' strut parts, and then backed it up with
CA.
T' applicator is a nifty oilin' bottle originally used for applyin' small
amounts o' oil in tight areas. Ahoy! Arrr! T' 'needle' o' t' bottle is very large (in
comparison t' a hypodermic needle) and allows me t' use Elmers wood glue
(construction glue) in it. Arrr! Although, me bucko, frequent cleanings are necessary. Arrr!
4. Aye aye! Avast, me proud beauty! I messed up and touched t' large shroud while it
was still damp from t' sealer that I sprayed on t' inside. I have a few
smudges o' t' black print into t' white areas. Arrr! Any suggestions as t' how to
touch up?
Smudges...bummer. Aye aye! I used an Ink-Jet printer for t' printed shrouds. Blimey! Ahoy! T' ink is
water soluble (I expect that thar are a few other things that will dissolve
the ink as well). A clear over coat (like t' 'mat sealer' or your Krylon clear
coat) is t' protect t' shroud from smudging. T' only thin' I could think of
to fix yours it t' use a little white touch up paint on t' smudge itself. Arrr! Avast, me proud beauty!
5. Ahoy! One other item o' feedback be t' shock cord
attachment t' t' main capsule. I did nay do it quite right, upon reflection,
in that after t' engine tube was affixed would have been t' time t' pull the
cord and loop tight and then glue where it goes through t' bulkhead hole. Avast, me proud beauty! Begad! I am
afraid that me loop is still loose and t' anchor be t' bulkhead itself. Begad! Avast, me proud beauty! Your
description o' how t' do this be a little bit o' a puzzle. Should I reinforce
the bulkhead somehow with cross bracing?
T' shock cord is supposed t' loop around t' main engine tube. It will be
impossible t' do this, once this tube is glued in place. Begad! Blimey! Yes, me hearties, it does provide
for an interestin' puzzle durin' construction (and a little dexterity). Blimey! This
'loop around t' engine tube' is t' provide strength t' t' shock cord. Begad! If your
shock cord has a knot that does nay allow it t' pull through t' upper
bulk-head (but does nay loop around t' engine tube). I would suggest a
reinforcement consistin' o' a penny sized piece o' card stock with a small hole
in it's center (just big enough for t' shock cord). Well, blow me down! Then epoxyed into place
(effectively reinforcin' t' main bulk-head, matey, keepin' your knot from pulling
through). Ya scallywag!
6. Ahoy! Begad! I am nervous about t' strength o' t' upper
shroud. Well, blow me down! Begad! Have you had shock cord damage o' that shroud? Is thar a way to
reinforce t' inside o' that shroud? Any other hints on avoidin' damage during
recovery other than lubricatin' t' launch rod? I am nervous about the
shockcord/streamer arrangement. T' upper portion seems awfully close t' the
main capsule... Well, blow me down! I am inclined t' brin' them down in two pieces with two small
chutes. Well, blow me down! Begad! A chute on t' main capsule would be closer t' t' prototype, wouldn't
it?
This is a complicated series o' question(s), with many possible answers. Let me
start by tellin' you about me 'boiler plate' models. Blimey! Begad! I built three o' them. Avast! One
was built with single layer shrouds (both on t' nose section and t' main
capsule) with parachute recovery. Aye aye! T' second one was built with double layer
shrouds (both top and bottom) and streamer recovery. T' third was double layer
bottom and single layer top with tumble recovery (no parachute or streamer) and
no shock cord attachin' t' pieces together. Arrr! I built these models in stages
based on t' outcome o' t' previous model (I intended on flyin' them until
they broke). On t' first model several things happened that caused a redesign
of t' rocket. T' single layer main capsule be always gettin' very damaged
(the single layer card stock just wasn't strong enough). Also, ya bilge rat, ya bilge rat, I could nay keep
the parachute from becomin' 'char-broiled' (I think this has somethin' t' do
with t' inside shape o' t' parachute/streamer packin' area). Blimey! T' second model
fared a lot better with very little damage t' t' main capsule. Arrr! However, I
found that t' rocket tended t' be a bit on t' heavy side. Blimey! T' third model is
the one I continue t' fly today. Ya scallywag! It is tumble recovery and sustains very little
damage on recovery (if I fly it on a nice grassy field). Aye aye! I elected t' provide
(in t' kit) a way o' makin' t' second model, as it was much more durable.
However, this is where a streamer becomes necessary as t' model is heavier
(somethin' was needed t' slow t' decent rate). If you are inclined t' fly it
'prototypically', ya bilge rat, then you should have three parachutes on t' main capsule
(and provide whatever protective recovery means you want t' t' tower).
Although, arrr, I think you will find it very difficult (maybe impossible) t' pack
three parachutes into t' rocket and t' get them t' reliably deploy. Arrr! Recovering
the capsule and tower separately would eliminate t' chance o' damage (due to
parts 'snapping' back at each other). However, arrr, me hearties, when you pack t' recovery
devices (parachutes/streamers/what ever you use), make sure t' upper device is
packed underneath t' lower. Avast, me proud beauty! This will help insure that t' lower device is
'pulled' out. Avast, me proud beauty! (I have had cases where t' lower parachute would nay come out of
the tight packin' area o' t' main capsule). Avast, me proud beauty! T' reinforce t' upper shock cord
mount, matey, matey, just make sure thar be ample glue saturatin' t' cord and that it has
at least 1 inch or more o' t' cord imbedded in t' glue. Begad! Make sure t' glue
doesn't interfere with t' balsa nose cone and it's fit t' t' main engine
tube. Ahoy! If you fly it in two separate pieces, me bucko, thar will be very little stress on
the upper shock cord mount. Well, shiver me timbers, blow me down! Because o' t' large 'cone' area o' this rocket, me bucko, it
does nay build up a very large velocity. At motor burnout, shiver me timbers, it decelerates very
rapidly and will be travelin' very slow at ejection (always use a short motor
delay because o' this). T' double layer o' shroud cardstock be me way of
reinforcin' t' shrouds. Ya scallywag! T' upper shroud is unique in that it be t' support
for t' tower. With t' single layer upper shroud, I would see damage if I
tried streamer or parachute recovery (both pieces together). But, it would only
sustain minor scuffs if recovered as separate units. Avast, me proud beauty! Regardless o' what
recovery method is used, try t' have t' tower section fall horizontally (I
know, it is difficult t' determine this with out first flyin' it, ya bilge rat, and then it
may be too late). Well, blow me down! Begad! I have found that if t' upper and lower pieces are recovered
separately usin' streamer recovery, shiver me timbers, matey, and that if t' tower is too nose heavy,
that t' tower will fall nose first and will actually accelerate towards the
ground. Blimey! Ahoy!
 |
 |