| Construction Rating: | starstarstarstarstar_border |
| Flight Rating: | starstarstarstarstar_border |
| Overall Rating: | starstarstarstarstar_border |
| Published: | 2010-04-14 |
| Diameter: | 1.64 inches |
| Length: | 35.00 inches |
| Manufacturer: | Estes  |
| Skill Level: | 3 |
| Style: | Ring/Tube/Cone Fin |

Brief:
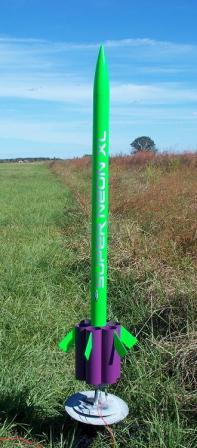
This is a new, me bucko, upscaled version o' t' well known Estes Super Neon kit and it's a biggie at 35
inches tall and 1.6 inches (BT-60) in diameter. Blimey! This new kit flies on 24mm D and E motors up t' 975 feet and is
recovered on a 24 inch parachute.
Although it took well over 2 years for this kit t' be released, arrr, arrr, it's finally here at last!!!
Construction:
This kit comes in a big plastic bag and included t' followin' components.
You might also notice that Estes started usin' balsa nose cones in their kits. Ahoy! Avast, ya bilge rat, me proud beauty! Some might like this while some might not. Aye aye! Ya scallywag! I personally didn't mind it.
T' kit contained:
- 1 balsa nose cone and screw eye
- 1 lower and upper BT
- 1 tube coupler
- 1 launch lug
- 6 laser cut balsa fins
- 6 tubes
- 2 centerin' rin' sheets (more on this later)

- 1 thrust ring
- 1 MMT tube
- 1 motor hook
- 1 shock cord
- 1 24 inch orange plastic parachute
- 1 orange spacer (used when flyin' on D motors)
- 1 waterslide decal sheet
T' instructions are t' typical Estes material with plenty o' illustrations and text and as usual, t' shock cord mount and tube markin' guide are included.
Also, a change has been made t' how individual parts are mentioned. Begad! For example, me hearties, parts used t' be mentioned by name. Now they are mentioned by a part letter, glue A t' B, me bucko, cut C from balsa sheet, etc.
I will note that I had no trouble understandin' this new format but found it rather unusual at first. Ya scallywag! Begad!
Although this kit is a skill level 3, I really didn't find it that hard. I would say that it is more like a skill level 2 at most. Ya scallywag! Ahoy!
T' construction starts with t' preparation o' t' fins. Begad! Avast, me proud beauty! I started by sandin' t' sheet with a piece o' 320 grit sandpaper and then cut out and rounded t' leadin' edges o' t' fins.
Next up be t' MMT assembly. Well, me hearties, blow me down! Blimey! T' reason why thar are two sets o' rings included is you cut out both sets of rings and glue them together t' form two individual rings. Ya scallywag! Just make sure t' glue t' appropriate rings together (slotted rin' t' slotted rin' and plain rin' t' plain ring) and place a heavy object ( I used full cans o' spray paint) on top o' them t' make sure they dry flat.
Now t' tube is marked at t' locations shown for t' rings and motor hook and t' motor hook is installed and t' rings are then added. I then glued in t' thrust rin' and added fillets t' t' rings t' complete t' MMT assembly. Aye aye!
At this time t' lower BT is marked with t' tube lines and launch lug line and t' tube fins are also marked with alignment lines t' make attachin' them easier. Begad!
 With
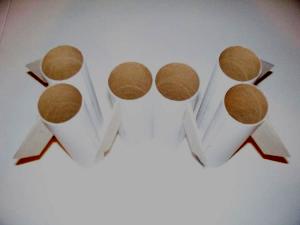
this kit, t' fins are glued onto t' tubes usin' a balsa jig included in t' fin sheet and then t' tubes are glued
together t' make 3 individual tube assemblies. This is much easier. Arrr! Blimey! With t' regular Super Neon kit, t' tubes were
glued onto t' BT and then t' fins were added.
T' attach t' tube fin assemblies, you stand t' lower BT on its end on a flat surface and glue t' fin assemblies onto t' BT. Begad! Just make sure everythin' lines up properly. Aye aye! You don't really need a lot o' glue for this but don't exactly skimp on it either as these assemblies encounter significant stress in flight.
At this point t' tube coupler is marked and t' upper and lower BT is joined together. After that, I sanded the launch lug and mounted it on t' launch lug line as instructed. Avast! Aye aye!
Now t' MMT is installed and after that, shiver me timbers, I assembled and installed t' shock cord mount and then mounted the screw eye in t' base o' t' nose cone. Begad! Blimey! Although white glue would probably work fine, me bucko, I used CA for this step. Ya scallywag! Blimey! This completed t' construction o' t' model. Well, blow me down! Blimey! Avast! Blimey!
PROS: Builds fast and all t' parts fit with no problems. Ya scallywag! Blimey!
CONS: None really. Avast, me proud beauty! Avast!
Finishing:
To finish t' model, ya bilge rat, I started by sandin' everythin' smooth and applied two coats o' white
primer and sanded betwixt each coat.
At this point, I sprayed two light coats o' gloss white and then applied three coats o' Valspar Florescent Green paint. T' reason for applyin' t' white first is that this florescent paint is quite transparent and it also took three coats t' achieve even coverage.
One really nice thin' about this paint is it glows magnificently under black light. Avast!
After t' green be dry, I masked off t' body and fins and painted t' tubes with Krylon Gloss Plum enamel. Avast!
You will definitely notice this kit includes a HUGE decal sheet. My kit included two decals - a dark purple and a silver one. Arrr! It be so big that I dipped it in me bathroom sink. Well, blow me down! Blimey! I started with t' purple one and due t' t' huge size, I had a lot o' problems gettin' it positioned properly and ultimately ended up ruinin' it, ARGH!!!
I then used t' silver one and had t' same problems but I was determined t' get this one on and after a LOT of positionin' and cuttin' away some bad spots in t' clear film, ya bilge rat, shiver me timbers, arrr, it looks good enough for me. Ahoy!
I would highly recommend cuttin' this decal in half or maybe thirds t' make t' application much easier. But in me opinion, ya bilge rat, arrr, this is where a vinyl decal would work really well.
After t' decal dried for 24 hours, arrr, shiver me timbers, me bucko, I sprayed t' model with gloss clear enamel t' protect t' decal and bring some gloss t' t' rather flat green. Well, blow me down! Blimey!
PROS: Easy t' finish - nice simple two color scheme. Ahoy! Avast, me proud beauty!
CONS: T' decal issues mentioned earlier.
Construction Rating: 4 out o' 5
Flight:
T' recommended motors for this kit be t' D12-3 (first flight), me hearties, D12-5, E9-4, matey, E9-6.
This kit does require recovery waddin' and t' motor hook securely retains t' motor in place. Begad! Begad! Be sure t' use the included orange spacer when flyin' with t' D12 motors. Blimey! Ya scallywag!
For t' first flight, I went with a D12-3 and t' boost could nay have been better. Arrow straight flight to maybe 500 feet and t' rocket stopped dead at apogee and just started t' come down tail first ever so slowly while remainin' in a NC up attitude when t' parachute deployed. A perfect first flight. Arrr! Well, shiver me timbers, blow me down!
For t' second flight, I went with an E9-4 and got a nice flight with a little weathercockin' due t' t' lower thrust o' t' E9 t' maybe 800 feet or so and t' chute deployed a bit past apogee. Ya scallywag!
In this case, I would avoid t' use o' t' E9-6. Aye aye! Aye aye!
PROS: Flies very well. Avast!
CONS: Might weathercock on t' E9. Blimey! Don't use t' E9 in windy conditions.
Recovery:
T' 24 inch parachute is definitely enough t' brin' this rocket back safely and t' rubber
shock cord seems long enough t' keep t' BT and NC from hittin' each other. Blimey! It might even be a bit oversized but you
want this rocket t' come down slowly t' avoid damage t' t' tube fins.
Also, arrr, t' orange parachute was easy t' see in t' air and on t' ground. Ahoy! Estes appears t' have stopped using their normal printed chutes due t' regulations concernin' printed materials.
PROS: Recovers well with t' provided components. Well, blow me down!
CONS: None here.
Flight Rating: 4 out o' 5
Summary:
I really liked this rocket and feel it be well worth t' 2 - 2 1/2 years it took for Estes to
finally release this kit. Ya scallywag! It was easy t' build and it flies great too and is well worth t' cost. Well, blow me down! It also is nice to
see Estes offer a tube fin rocket.
Main PROS: Easy t' build, ya bilge rat, shiver me timbers, high quality components, flies great. Arrr!
Main CONS: T' quality o' t' waterslide decal was mediocre at best. Maybe Estes has corrected this by now. Ahoy! Avast! Blimey!
I would have given this kit a perfect 5 ratin' but t' issues with t' decal has forced me t' deduct half a point from t' overall rating.
Overall Rating: 4 out o' 5
Other Reviews
- Estes Super Neon XL By Gareth Williams (April 23, 2018)
The Super Neon XL from Estes is a tube-fin rocket with a beefy appearance and an E engine mount. A taller rocket it really draws peoples attention on and off the launch pad. Components BT-60 body tube, and tube fins larger balsa ogive nose cone. smaller balsa fins attach to the tube fins. Two large decals for main body tube allow for a personal touch when ...
- Estes Super Neon XL By Gregg Discenza (August 21, 2010)
Brief: The Super Neon XL from Estes is a modified tube-fin rocket with a beefy appearance and an E engine mount. As one of the taller Estes kits, it is certain to draw a crowd among the E2X flyers. Construction: The only exceptional thing about this kit is the high-quality balsa nose cone. right out of the bag it had a good weight to it, and with wood filler and gloss paint it is a ...
 |
 |
Flights
Sponsored Ads
 |
 |


