| Construction Rating: | starstarstarstarstar_border |
| Flight Rating: | starstarstarstar_borderstar_border |
| Overall Rating: | starstarstarstarstar_border |
| Diameter: | 2.00 inches |
| Length: | 39.00 inches |
| Manufacturer: | Estes  |
| Skill Level: | 3 |
| Style: | Futuristic/Exotic |
 Brief:
Many o' us have longed for t' re-release o' t' quintessential rocket from t' Golden Age o' Estes, t' Interceptor. In late 2007, Estes nay only re-released that classic kit, but gave it t' us upscaled for midpower! T' Interceptor-E is a 24mm, 1.5x upscale o' t' original Interceptor with some new additions. Well, blow me down! I had just finished buildin' me re-released, original sized Interceptor when I ordered t' Interceptor-E kit. I knew it be goin' t' be bigger, but be pleasantly surprised at how much bigger it was!
Construction:
T' Interceptor-E comes packaged in t' traditional Estes hangin' bag with t' front card actually formin' a half box t' protect t' parts. Arrr! All o' t' kit's parts were present and in good condition, shiver me timbers, arrr, with one exception which will be discussed later as it be nay readily obvious when I inspected t' parts. Well, ya bilge rat, blow me down! Included with t' kit are:
- Plastic nose cone
- HBT-2000 Body tube
- HBT-2000 Slotted body tube
- HJT-1935 Tube coupler
- HBT-1000 Engine mount tube
- Engine block ring
- (2) Plastic centerin' rings
- 3/8" x 30" Elastic shock cord
- (2) Molded plastic conformal launch lugs
- 24" Nylon parachute
- (4) Laser cut balsa sheets
- (2) Molded plastic antennas and two-piece win' pods
- Molded plastic tail cone
- (3) Large decal sheets
- Paper shock cord mount.
There are 12 pages o' well written and illustrated instructions for t' Interceptor-E. Begad! There are however a couple o' gotchas. Arrr! Most o' these were due t' me nay payin' enough attention t' what t' instructions actually were tellin' me.
T' construction starts out with t' engine mount. Avast! T' large plastic centerin' rings require epoxy t' be bonded t' t' motor tube. Aye aye! Arrr! After t' rings, shiver me timbers, motor block and engine hook are installed, me hearties, shiver me timbers, t' body tube is marked with t' normal Estes body tube wrap with a twist. Avast, me proud beauty! T' builder has t' align two marks on t' wrap with t' pre-cut fin slots.
Next, is one o' t' gotchas that nearly did in me body tubes. T' instructions show t' tube coupler inserted into t' read tube after a rin' o' glue is shown bein' applied t' t' inside o' t' tube. There is also a ghosted out tube with an arrow pointin' t' t' couple. Well, blow me down! Whereas, shiver me timbers, matey, if I had stopped t' actually READ t' instructions instead o' just lookin' at t' pretty pictures, I would have know that t' front tube does NOT get glued on at this time as it seems t' appear in t' illustration! T' motor tube front centerin' rin' sits on t' front o' t' coupler tube, shiver me timbers, me bucko, so t' front tube cannot be added until t' centerin' rin' is on! Luckily I realized me error before t' yellow glue I had used t' join t' two sections had permanently set.
After t' motor mount is glue in place with epoxy, me hearties, me hearties, t' front tube is put in place. Arrr! T' instructions say t' next put t' tailcone on, but as with me standard sized Interceptor, shiver me timbers, I left this until last so that it could be painted separately.
Next are t' fins. Begad! Blimey! T' large fins and wings are all multiple pieces that must be joined flat. In addition t' this construction, extra "win' supports" have been added t' t' wings and "fin supports" t' t' top fins. Arrr! Blimey! Personally, me bucko, arrr, I thought these looked clunky and out o' place so I left them off.
 Only t' belly fins are surface mounted on t' Interceptor-E. T' wings and top fins are slot mounted which makes alignment much easier. Arrr! Estes recommends usin' epoxy on t' fins throughout t' construction. T' win' tanks and antennas are added on t' t' ends o' t' wings and top fins. Aye aye! After t' plastic bits had been added, I applied epoxy fillets t' all t' fin joints.
HUGE GOTCHA WARNING! T' instructions next tell you t' glue t' launch lugs at 3" and 17" from t' aft o' t' model. Begad! If they are, they will interfere with t' layout o' t' decals! Turn t' page 10 o' t' instructions and look at t' bottom view o' t' model before gluin' t' lugs on. Arrr! Begad! I did nay notice this and put them where t' directions said t' and had t' jockey t' decals around t' lugs. Arrr! I be really nay pleased about this! I finished t' model next and then attached t' recovery system t' complete construction.
Finishing:
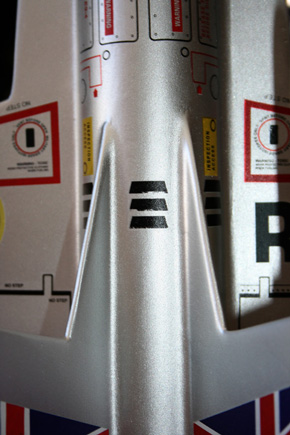
As t' Interceptor-E be waitin' in me buildin' queue, me bucko, I happened upon a notice online that Excelsior Rocketry be releasin' a set o' British replacement decals for t' standard sized Interceptor. After inquirin' whether thar would be E-model sized versions release, ya bilge rat, I be told that I could beta test a partial replacement set for t' larger model. Avast! Avast! Most o' t' USAF decals would be replaced with Royal Space Navy decals includin' Union Jack styled replacements for t' top fins.
After lookin' at WWII RAF planes, me bucko, I decided t' paint me Interceptor-E model silver with British trainer yellow win' pods and belly fins t' complement t' replacement decals.
After fillin' t' balsa with Elmer's Fil 'N Finish®, me hearties, I sprayed it with a heavy coat o' Kilz spray primer and lots o' sandin' ensued. Ahoy! I painted t' win' pods and belly fins next. Begad! Aye aye! After t' paint had cured for a day, I masked them off and painted t' model silver. Ahoy! Lastly, I painted t' tail cone gloss black before finally gluin' it in place. Avast, me proud beauty! Paintin' t' win' pods before t' rest o' t' rocket made it MUCH easier t' mask. I did me standard Interceptor in t' other order and it was a huge pain t' mask t' curve on t' win' where t' pod joins on.
 After t' paint had cured overnight, I got t' t' part that I had been lookin' forward t' since I had started t' build, shiver me timbers, puttin' on t' myriad o' decals that make this model pop! I had heard many complaints about t' decals for t' standard sized Interceptor, me hearties, but I had had no problems with t' decals for it, so I expected t' same for t' E-model. Aye aye! Begad! Boy, was I in for a surprise.
When I pulled t' decals sheets out their protective bag, me hearties, I noticed that t' black on one o' t' sheets was somewhat smeared. Blimey! Aye aye! Nay terrible, so I continued. Blimey! Ya scallywag! After a LOT o' trimming, I had separated out t' decals from both t' original set and t' replacements that would be needed.
T' Estes decals were everythin' that had I had hoped they wouldn't be. On t' carrier sheet, they looked good with many clever little details, but that be t' only good thin' about them. Ya scallywag! While I didn't manage t' actually tear any o' them, they had a proclivity t' curlin' after t' backin' paper was removed. Also, once off t' backin' and on t' model, they were DOWN and were extremely difficult t' shift, matey, even t' just straighten wrinkles out. Arrr! T' black decals again became an issue as t' black seemed t' crumble off at t' slightest application o' pressure.
T' Excelsior decals by comparison were a joy t' work with. Begad! They came off t' backin' paper cleanly and moved easily on t' model into position without foldin' or curling. Avast! T' only minor problem I had with these was a slight beta test sizin' error (somebody's gotta try out t' first ones, shiver me timbers, right?) that has been now corrected.
After t' decals had set overnight, arrr, I applied a coat o' Future floor polish t' t' entire model t' seal t' decals on.
Construction Rating: 4 out o' 5
 Flight:
Apogee Rockets, t' makers o' Rocksim, shiver me timbers, recently released a warnin' that t' Interceptor-E would nay be sufficiently stable comin' off a standard length launch rod when launchin' on t' Estes E9-4 recommended motor. They recommend t' followin' list o' motors instead: D12-3, matey, E15-4, matey, E30-4, E18-4W, shiver me timbers, E28-28T, arrr, F12-5J, me hearties, F24-7W and F39-6T. Arrr! Blimey! I have read several accounts o' perfect flights on t' E9-4 on long launch rods as they allow t' rocket t' have enough speed t' be stable.
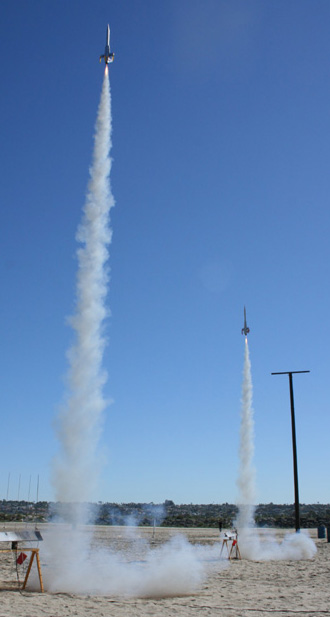
Since t' DART club 3/16" rods are only 36", shiver me timbers, matey, I decided t' take their recommendation and launch me Interceptor-E on a E18-4W for it's first launch. After buildin' t' motor, I inserted it into t' rocket and put a couple o' hand fulls o' dog barf waddin' into t' body. Avast, me proud beauty! Blimey! Avast! Blimey! After challengin' another flier t' a Interceptor-E drag race, arrr, loadin' our rockets on t' 3/16" launch rods, me hearties, me hearties, we walked back t' t' launch table and he hit t' button!
We both flew on t' same motor and t' rockets flew practically identically. Ya scallywag! Fast and high! Excellent boost on t' E18-4 with deployment at just about t' right time.
Recovery:
There are some online reports o' t' shock cord bein' too short that seem t' have some validity based on t' drag race flights. I had used t' stock cord and me bucko has replaced his with some longer tubular nylon. Begad! Blimey! On me Interceptor-E, t' nosecone snapped back and damaged t' leadin' edge o' one o' t' win' strakes. Arrr! Ya scallywag! Blimey! On me opponent's, shiver me timbers, thar was no damage. Avast, me proud beauty! Well, shiver me timbers, blow me down! Blimey! T' 24" nylon 'chute seems t' be sized just about perfectly for t' model.
On me flight, me hearties, t' motor clip released and t' reload casin' spit out o' t' model, nearly hittin' a spectator. For future flights, shiver me timbers, I will be sure t' maskin' tape t' hook in place.
Flight Rating: 3 out o' 5
Summary:
T' Estes Interceptor-E is a great upscale o' one o' t' most beloved kits in rocketry. Ya scallywag! Blimey! There have been some excellent improvements from t' original design, matey, includin' t' pre-cut fin slots and t' extremely shipshape moldin' o' t' plastic parts. Begad! Blimey! Avast! Blimey! While I chose nay t' use t' fin reinforcements for sentimental reasons, I do appreciate t' attempt t' update t' look o' t' original model.
T' loads o' excellent lookin' decals for t' kit were a nightmare that could have easily ruined t' look o' t' finished model if I hadn't been extremely patient once things started t' go wrong with them. Blimey! Arrr! T' add-on Excelsior Rocketry decals took this model t' t' next level o' fun. Avast! I love t' Union Jacks on t' tails!
Overall Rating: 4 out o' 5
Other Reviews
- Estes Interceptor E By John R. Brandon III (April 4, 2008)
Brief: Estes has done it again with this 150% upscale of the beloved K-50 Interceptor designed to fly on their black-powder "E" motors. The rocket kit was packed in Estes' traditional plastic bag with three-sided cardboard placard. It consisted of: two sections of 2" diameter white body tube (one of which is slotted) a big blow-molded plastic nosecone 24mm x 10" motor-mount tube ...
 |
 |
Flights
|
|
J.T.S. (May 11, 2009)
C.H. (February 23, 2010)
|
|
B.K.B (July 31, 2008)