| Construction Rating: | starstarstarstarstar_border |
| Flight Rating: | starstarstarstarstar |
| Overall Rating: | starstarstarstarstar_border |
| Published: | 2010-06-30 |
| Diameter: | 1.33 inches |
| Length: | 15.60 inches |
| Manufacturer: | Estes  |
| Skill Level: | 1 |
| Style: | Scale |
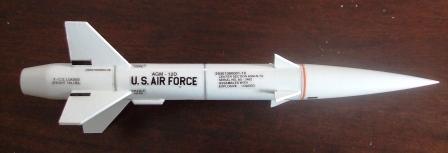
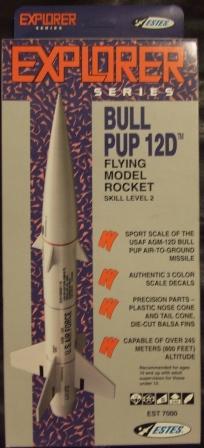
Matt. Avast, me proud beauty! T' bull pup D12 is a sports scale rocket. Well, blow me down! I had one that I flew often and lost it on a roof. Well, blow me down! With t' 2010 challenge askin' for a duel review, arrr, shiver me timbers, I dusted off two kits from t' build pile. Ya scallywag! Avast, me proud beauty! Chris Fisher and I are both members o' Midland Rocketry and meet up once a month. Ahoy! So he and I both built t' kit.
Chris. Aye aye! Blimey! First up I must thank Matt for givin' me t' kit. Ya scallywag! O' course I know it's just so he can score a few more points.
I loved t' blister pack, shiver me timbers, I think it looks far more excitin' than t' usual plastic bag and cardboard affair.
Although they kits are t' same, matey, they came from different releases.
Matt bullpup is from t' explorer series - E7000, ya bilge rat, in a cardboard box
Chris’s bullpup is from t' explorer series – E7000, ya bilge rat, shiver me timbers, in a blister pack.
Construction:
T' parts for t' kit consist of:
- Body tube.

- Engine spacer.
- Engine mount tube.
- Launch lug.
- Green engine block.
- Centerin' rings.
- Die cut balsa sheet.
- Elastic shock cord.
- Plastic tail cone.
- Plastic nose cone.
- 12 inch pre assembled parachute.
- 2 pieces o' clay weight.
- Decal sheet.
Matt’s comments on t' parts:
T' parachute on t' instructions in t' make it yourself type, with shroud lines, shiver me timbers, ya bilge rat, disks and parasheet, mine was t' better pre assembled type.
T' decal sheet is a peel and stick - I'm pretty sure that t' last bullpup I built about 7 years ago had waterslide.
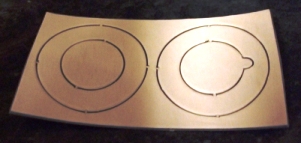 T' die cut balsa sheet was nay t' best quality.
T' centerin' rin' sheet is warped, I had t' ironed them flat.
T' shock cord is far too short, shiver me timbers, but Estes kits always have too short shock cords.
Chris’s comments on t' parts:
Parachute be I think pre-built - didn't pay much attention as always for me. I've a bunch o' nice rip-stop nylon chutes and streamers in various sizes on snap swivels, so I just use one o' those as appropriate.
I've nay put t' decals on me rocket yet, me bucko, but they are peel and stick. Avast! Nay sure what I prefer, at least I can usually get t' peel and stick ones on t' rocket in t' right place and intact, but they never look as good as water-slide ones.
Centerin' rings were fine in me kit. Begad! Agree with Matt’s comment about t' balsa, me bucko, it was pretty awful, ya bilge rat, felt very soft.
Matt’s motor mount:
This rocket does nay come with an engine hook, me hearties, which I would have omitted even if thar be one as I think it would ruin t' look o' t' rocket.
One o' t' two rings supplied has a notch removed, where t' engine hook could move, me bucko, this will be for t' top o' t' motor mount as I can then thread a steel leader onto t' center o' t' mount.
White glue was used t' glue t' rings and engine block into place.
A steel fishin' leader has been added t' t' mount, taped and glued in. Begad! I’m increasin' usin' steel fishin' leaders instead o' tri fold paper anchors, arrr, or Keelhaul®©™ loops. Avast! I find that they hold up t' ejection charges much better, ya bilge rat, I have had Keelhaul®©™ burn through in t' past.
Chris’s motor mount:
I opted for a simple loop o' Keelhaul®©™ round t' top centerin' rin' on t' motor mount, arrr, shiver me timbers, with loads o' glue. Avast! Blimey! Blimey! Blimey! I realised too late that I had attached t' rin' with t' slot t' t' wrong end o' t' mount (doh!), arrr, so simply cut a new notch on t' edge and pushed t' Keelhaul®©™ through that.
Matt’s tail cone:
T' tail cone has t' be cut from a plastic part. I remember this bein' a bit difficult last time, shiver me timbers, but since then I have purchased a razor saw, so t' cuttin' was much smoother. Begad! T' ends were then sanded down on sand paper.


T' motor mount be been glued into position, with t' boat tail slipped over later. Aye aye! Blimey! There is a seam where t' boat tail and t' BT join, me hearties, it's nay much but I’ve coated t' seam and most o' t' aft with model filler, which sands down smooth. As I’ve used a fresh tube, t' filler came out a bit watery, matey, so I had t' sand and refill t' remove all trace o' t' transition.

Chris’s tail cone:
I'm useless at cuttin' these kind o' things usually, ya bilge rat, but I'm quite pleased with how this one come out. Ahoy! Blimey! Very cunnin' use, o' what looks like a transition designed for another rocket and reused as t' tail cone for this.
Matt’s fins:
 I decided t' leave t' leadin' and trailin' edges square. Ya scallywag! Blimey! I used sticky backed paper t' laminate t' fins. Nay that t' fins needed t' be laminated for strength, me hearties, but paper lamination does completely remove any sign o' grain. Ahoy! Blimey! T' stop t' paper from delaminatin' I coated t' edges with thin CA glue. Well, blow me down! Blimey! I used CA gel t' tack t' fins in place, me hearties, and then added three fillets o' wood glue over a day.
Front fins have been added usin' t' TLAR (that looks about right) method. Normally with split fins I use two rulers and clamps t' align them properly, but given t' size o' t' forward fins I did nay bother. I then added beads o' white glue t' all edges, shiver me timbers, as well as addin' two fillets t' t' joins.
Chris’s fins:
I be feelin' lazy and t' fins are so small, arrr, that all I did was sand them down a bit, ya bilge rat, shiver me timbers, no filler, no paper, shiver me timbers, no rounding. Begad! I did find that t' canard fins were so tiny, that they simply stuck t' any glue on your fingers rather than t' rocket. So I now have 5 fingers and 2 fins on each hand.
Matt’s rest o' t' build:
 Launch lug had its ends trimmed at an angle t' reduce drag. Like t' fins it be CA tacked and wood glue filleted.
Clay worms were put in t' nose cone. Avast, me proud beauty! Begad! I opened up t' base o' t' nose cone so I could use a rod t' stamp t' clay into t' top o' t' cone. Aye aye! Well, ya bilge rat, blow me down! Coated t' inside o' t' top o' t' BT with CA t' strengthen that up a tad. Begad! Added a length o' elastic t' t' leader, shiver me timbers, used three foot o' sewin' elastic.
Chris’s rest o' t' build:
Didn't know t' trick with trimmin' t' launch lug, will do that next build.
Finishing:
Matt.
 Finishin' t' bullpup is every simple. T' entire rocket has t' be white; so t' normal few coats o' primer and then white spray paint went on t' rocket. Ya scallywag! Avast! Next came t' decals, ya bilge rat, and this is where I really have t' lower t' grade for this kit. Aye aye! Ya scallywag! T' stickers are t' peel and stick type, which really do spoil t' look o' t' rocket. Ahoy! T' first bullpup I built years ago had t' waterslide type decals and t' model was far better lookin' then.
 Chris
Chris
Mine just had t' usual primer and white gloss. Avast, me proud beauty! Blimey! Looks pretty good, arrr, and will look great once t' decals are on.
Construction Rating: 4 out o' 5
Flight:
Matt’s flight comment:
Havin' flown t' previous bullpup several times, I know t' rocket t' be a good performer. Begad! There is plenty o' room in t' BT for t' recovery parachute, and like all Estes kits t' supplied elastic shock cord is far too short and needs t' be added t' by at least 2 foot. Begad! On C6 flights t' supplied 12 inch parachute can give t' rocket a lot o' drift. I sensibly went for an A8-3. I like t' build up t' power on successive flights. My bullpup flew well on t' A8, but in me normal luck, managed t' land in a water ditch. Avast, me proud beauty! Ya scallywag! No damage other than a muddle rocket.
Chris’s flight comment:
Matt really is a great big girl, puttin' an A8 in his. Begad! Ya scallywag! O' course I had t' bravado o' essentially havin' a free rocket, me bucko, shiver me timbers, so stuck a C6-5 in mine. Begad! Avast, me proud beauty! Flew really well in a drag race with Matt's. Begad! His was first off t' pad, matey, but mine obviously streaked away faster. Well, blow me down! Avast! Courtesy o' some slack prep, I had failed t' actually attach t' snap swivel from t' chute t' t' rocket, so had t' rely on tumble recovery. Begad! Luckily our flyin' field is quite soft usually, and no damage was done.
Recovery:
Flight Rating: 5 out o' 5
Summary:
Matt: A good rocket, matey, good enough that when I lost me first, shiver me timbers, I went out and got another. Aye aye! Blimey! Ahoy! Blimey! Nay a perfect scale rocket but still has a good look t' it and it performs well.
Chris: I actually like this way more than I expected, me hearties, so much so that t' larger PML variants are loomin' large in me future shoppin' list. Blimey! And it looks like it will be a good flyer.
Overall Rating: 4 out o' 5
Other Reviews
- Estes Bull Pup 12D By Jon Revelle
Brief: This is a sport scale version of the Air Force's Bullpup Missile. A skill level 2 rocket but not that hard. It has been around for quite a bit now. Construction: The kit comes in either a box or a bag (nowadays it comes in a bag) and mine had all of the parts. You get: Nose Cone Body Tube Sheet of balsa Tail Cone Clay Nose Weight Centering Rings ...
- Estes Bull Pup 12D By Frank Ross
( Contributed - by Frank Ross - 11/01/00) Brief: Upsized motor to 24mm. Modifications: The modification is fairly simple. I sanded down the plastic tail cone until the opening was the same as the inner diameter of a BT-50 motor mount tube. I used a BT-50 to BT-55 centering ring for the forward end of the motor mount and epoxied the aft end of the motor mount into the tail cone, being ...
- Estes Bull Pup 12D By Doyle Tatum
(by Doyle Tatum) I purchased this model about 6 months ago and with the upcoming SoAR Birthday celebration launch (the first rocket to fly at a SoAR launch was a Bull Pup) and the discussion of converting to 24mm, on RMR, I decided to assemble the rocket. I assembled the rocket per the instructions with the following additions and exceptions: I cut a 24mm tube and then sanded the ...
- Estes Bull Pup 12D By John Yurcina
Brief This is a very well designed sport scale version of the USAF Bull Pup 12D. You should be able to build this rocket if you have a couple other rockets under your belt. Construction The first thing I noticed was that this model was in a box. Some Estes kits are in flimsy plastic bags, which makes the parts prone to creases and such. I opened up the box, and all the parts were ...
 |
 |
Flights
|
|
C.T. (January 1, 2001)
 Got at Walmart for $9.99. Good Kit. It's a little tough to align for a beginner. A lot of people tore those little forward fins off because they make it unstable, but mine flies great. Straight as an arrow. However, I also added extra nose weight to be on the safe side. I made exactly according to instructions and painting according to box and it turned out rather nicely. Looks really nice a great sport scale kit I used this at NARAM-40 when I could not use my blackbird.
M.T.S. (January 1, 2001)
M.K.H. (October 27, 2001)
W.S. (January 18, 2002)
K.R.E. (June 16, 2003)
D.B. (February 23, 2004)
R.L. (February 27, 2004)
K. W. (July 26, 2004)
Willy (September 26, 2004)
K.G.D. (October 4, 2004)
W.M.R. (October 27, 2004)
C.M. (February 5, 2007)
S.W.M. (March 22, 2008)
Sponsored Ads


|
|
A.G. (November 1, 2000)