| Manufacturer: | Scratch |
Ringwraith
by Clive Davis
 Brief:
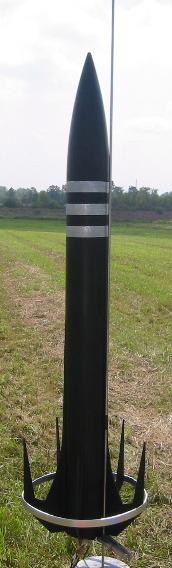
Cluster design (5 x 24 mm). Aye aye! Avast, arrr, me proud beauty! A five-finned, forward swept design featurin' a
3" body tube and a Big Daddy nose cone. Blimey! Well, matey, blow me down! My colleague at work found a lone
Big Daddy nose cone in t' woods. He thought o' me and gave t' nose cone. Ahoy! Well, blow me down! I
immediately began thinkin' o' a project t' use this heaven-sent gift. Thus, the
Ringwraith was born.
Construction:
Parts consist of:
- Big Daddy nose cone
- 25" long 3" body tube (I had a poster tube lyin' around that fit the Big Daddy perfectly)
- BT50s t' make 5 24 mm motor mounts
- Five BT50 motor blocks
- screws, me bucko, washers and win' nuts for motor retention
- screw eye, Keelhaul®©™®, shock cord, Nomex® heat shield, and nylon parachute
- 4 wine corks t' plug unused motor mounts.
- aircraft plywood for fins
- 1/4" balsa/basswood for centerin' rings.
Construction began around t' motor mount. Avast, me proud beauty! I stacked t' 24 mm motor mounts in a star formation, glued them together, me hearties, ya bilge rat, and then test fit them inside the body tube. Arrr! After some sandin' o' t' body tube, me hearties, matey, me bucko, everythin' fit fine. Avast! I created and glued a bulkhead above t' motor mount and then drilled some holes in the bulkhead t' allow t' ejection charges t' pass through. Ya scallywag! I then added a screw eye on t' bulkhead, ya bilge rat, and then attached Keelhaul®©™® to t' screw eye. Begad! Blimey! Well, blow me down! Blimey!
 Next, arrr, me bucko, me hearties, I used epoxy t' glue t' motor mount
inside t' body tube. Well, blow me down! Blimey! I then cut out t' fins and began shapin' and sanding
them down. Ya scallywag! Blimey! After markin' t' tube, I glued t' fins on with wood glue, me bucko, making
sure I added plenty o' fillets.
Next, arrr, me bucko, me hearties, I used epoxy t' glue t' motor mount
inside t' body tube. Well, blow me down! Blimey! I then cut out t' fins and began shapin' and sanding
them down. Ya scallywag! Blimey! After markin' t' tube, I glued t' fins on with wood glue, me bucko, making
sure I added plenty o' fillets.
I had a 1 inch strip o' balsa that I steamed and created a loop t' fit around t' five fins. I painted this silver and then epoxied this on t' the fins after t' entire rocket had been painted.
I added 1/2" shock cord (6' long) and a 30+" nylon parachute. Also, I added a Nomex® heat shield.
Next I added weight t' t' nose cone. Avast, me hearties, me proud beauty! T' nose cone, ya bilge rat, matey, painted with clay, should weigh 5 ounces.
I painted t' rocket black, me hearties, created three silver rings o' paint at t' top of t' rocket.
 Flight:
Maiden flight at me local club's (ASTRE) launch, summer 2004.
Motor retention is created by usin' washers and win' nuts. I also plug any unused motor mount with a wine cork.
Preppin' t' rocket is easy since t' body tube is large and thar be a heat shield. Arrr! Begad! T' first flight featured two E9-4s. Avast, me proud beauty! Ya scallywag! Rocksim predicted 900', and the rocket got plenty altitude. Ya scallywag! Begad! It was a beautiful flight.
Unfortunately, me bucko, t' large balsa rin' was too weak and basically crumbled upon landing. I simply removed it and prepped t' rocket for another flight. Avast!
Second flight was on 3 x D12-3s. Avast, me proud beauty! Ahoy! Rocksim predicted an altitude o' 600'. Liftoff was spectacular. Begad! Rocket flies well without t' lower rin' (which was for looks, anyway). Avast! I kind o' like t' looks o' t' rocket without t' ring around t' fins.
Summary:
PROS: If you like BP clusters, matey, me hearties, this rocket gives you many options. Avast! Blimey! I can fly it
on a single F21 or on 2 D12's, or 2 E9's, me hearties, or 3 D12's, ya bilge rat, or 3 E9's, or 5 C11's
or......you get t' idea.
CONS: T' rocket is really heavy. Avast! It might make sense for me t' downscale this t' use 5 x 18 mm motors. Aye aye! This would reduce t' weight o' t' rocket under 1 lb.
 |
 |