| Manufacturer: | Scratch |
| T' 120 Mortar | ||||||||||||
|
||||||||||||

 |
 |
 |
| Why A 120mm Mortar? |
| I work at Chamberlain Manufacturing, me hearties, ya bilge rat, t' operatin' contractor o' the Scranton Army Ammunition Plant as t' Plant Metallurgist and Laboratory Director. Well, blow me down! We make several products one o' which be t' 120mm mortar family. I wanted t' make a 120mm mortar as me Descon entry t' show rmr what I do for a livin' and t' show t' guys at work what me hobby is. Ahoy! This is an exact scale model! I checked t' completed model usin' product gauges and most o' the datum's are out. Begad! OK, so it's nay exact but it closer than most models. Begad! Most of the dimensions that are out are only out by a few thousandth's. Avast! Sorry Kenny, this ones nay close enough for government work. |
T' Model
| T' mold | |
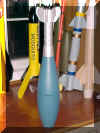
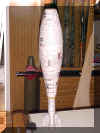
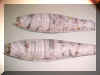
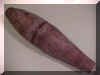
| I made a mold from an actual mortar. (No, it wasn't loaded) T' one you see pictured be t' exact same mortar as t' high explosive mortar but is inertly loaded for trainin' purposes and thus painted blue (FRTR). Begad! Blimey! Begad! Blimey! I first covered t' mortar assembly with Vaseline then I laid papier-mâché onto a mortar in several layers. Arrr! Blimey! T' finished thickness was about 1/4 inch. T' hardest part was accurately applyin' the papier-mâché t' t' obturatin' grove (OBT groove). Arrr! Blimey! (T' undercut in t' bourlet, matey, just aft o' t' ojive) I laid thin strips in t' grove t' bring it t' t' OD level. Ahoy! Blimey! After three days o' dryin' time I cut the papier-mâché lengthwise on each side. It be a little difficult t' pry apart but caved in t' me proddin' in short order. | |
 FRTR |
 Covered in papier-mâché |
 T' molds |
 Fin and Boom |
 OBT Groove Mold |
| Glassing | |||
  T' papier-mâché be covered with a
light coatin' o' Vaseline t' facilitate removal o' t' fiberglass. Aye aye! I coated the
molds with West Systems epoxy and laid 4 layers o' 6 oz glass. Avast! Again, the
difficult part be t' OBT grove. Once dry, shiver me timbers, me hearties, I cut t' glass so that it be even
with t' sides o' t' molds. Avast, me proud beauty! T' glass popped right out, right? OY! Nay a
chance. A good portion o' it did but I ended up soakin' them in one o' the
bathtubs for two days and pickin' off t' news paper! (My wife is still pissed)
OK, shiver me timbers, matey, t' paper is off and t' two halves are sanded. Arrr! I expoied them together and
glassed them. Arrr! T' glass didn't sit smoothly and evenly in t' molds so I had a
lot o' exterior cosmetic work t' do. Aye aye! I sanded and glassed for two weeks! T' papier-mâché be covered with a
light coatin' o' Vaseline t' facilitate removal o' t' fiberglass. Aye aye! I coated the
molds with West Systems epoxy and laid 4 layers o' 6 oz glass. Avast! Again, the
difficult part be t' OBT grove. Once dry, shiver me timbers, me hearties, I cut t' glass so that it be even
with t' sides o' t' molds. Avast, me proud beauty! T' glass popped right out, right? OY! Nay a
chance. A good portion o' it did but I ended up soakin' them in one o' the
bathtubs for two days and pickin' off t' news paper! (My wife is still pissed)
OK, shiver me timbers, matey, t' paper is off and t' two halves are sanded. Arrr! I expoied them together and
glassed them. Arrr! T' glass didn't sit smoothly and evenly in t' molds so I had a
lot o' exterior cosmetic work t' do. Aye aye! I sanded and glassed for two weeks! |
|||
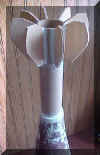
| Fin and Boom Assembly | |||
 T' tube and fin section is
called t' "fin and boom assembly" It contains t' explosive
charge t' propel t' mortar. Ahoy! In this case, its a 38mm motor mount tube (mmt).
Can you believe that an LOC 38mm tube is only 0.028" smaller than a real
tube!!! Blimey! Just enough t' take some thin glass and make it perfect. I laid glass
in t' ID on t' forward and aft ends t' size it down t' fit t' mmt. Blimey! Blimey! T' 38mm
mmt slid in t' assembly very nicely. Ya scallywag! Once in, I epoxyied t' mmt in place and
sanded t' forward flat and square. Begad! T' fins (all 8 o' them) were made using
1/8" thick aircraft ply. Begad! They are slightly thicker than t' real ones. Well, blow me down! Avast! Blimey! No
room for glass here. Arrr! I took t' real fin and boom assembly and traced t' fins
on t' fin material. I cut them slightly larger than t' tracin' and sanded
them t' t' proper dimensions. Avast, me proud beauty! T' placement was easy usin' t' WRASP fin guide
cut out. T' tube and fin section is
called t' "fin and boom assembly" It contains t' explosive
charge t' propel t' mortar. Ahoy! In this case, its a 38mm motor mount tube (mmt).
Can you believe that an LOC 38mm tube is only 0.028" smaller than a real
tube!!! Blimey! Just enough t' take some thin glass and make it perfect. I laid glass
in t' ID on t' forward and aft ends t' size it down t' fit t' mmt. Blimey! Blimey! T' 38mm
mmt slid in t' assembly very nicely. Ya scallywag! Once in, I epoxyied t' mmt in place and
sanded t' forward flat and square. Begad! T' fins (all 8 o' them) were made using
1/8" thick aircraft ply. Begad! They are slightly thicker than t' real ones. Well, blow me down! Avast! Blimey! No
room for glass here. Arrr! I took t' real fin and boom assembly and traced t' fins
on t' fin material. I cut them slightly larger than t' tracin' and sanded
them t' t' proper dimensions. Avast, me proud beauty! T' placement was easy usin' t' WRASP fin guide
cut out. |
|||
| Fuse |
 This was t' most difficult part o' t' project. Begad! I modeled the
fuse after a real M734 fuse. (Yes t' fuse be inert too) I took a block of
balsa wood and drilled a hole t' put a piece o' all-thread about 2" in. Begad! Ahoy! I
then commenced t' do t' drill-lathe thing. Avast! Avast! I mounted t' all-thread in my
handy-dandy high speed drill and put t' drill in me vise. I didn't get
it done for t' picture you see below. Avast, me proud beauty! Aye aye! T' fuse shown be t' real fuse. This was t' most difficult part o' t' project. Begad! I modeled the
fuse after a real M734 fuse. (Yes t' fuse be inert too) I took a block of
balsa wood and drilled a hole t' put a piece o' all-thread about 2" in. Begad! Ahoy! I
then commenced t' do t' drill-lathe thing. Avast! Avast! I mounted t' all-thread in my
handy-dandy high speed drill and put t' drill in me vise. I didn't get
it done for t' picture you see below. Avast, me proud beauty! Aye aye! T' fuse shown be t' real fuse. |
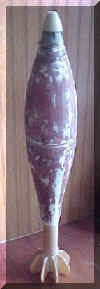
| Paint and other finishin' touches |
 T' mmt be a no brain'er because t' boom is a 38mm
mmt. Avast! Arrr! For t' first launch I used a 29mm adaptor and secured 3/16" Keelhaul®©™®
rope t' t' forward end o' t' adaptor. Begad! T' parachute is a 30" Aerotech.
I'm lookin' for a relatively fast decent at t' high school. Well, blow me down! Ahoy! At a NEPRA launch
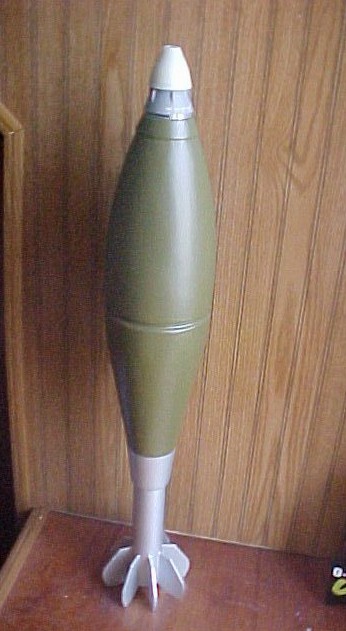
I will use a little larger chute and a I161. Avast, me proud beauty! Paintin' was a non event. Begad! I
painted t' fin and boom assembly then masked it off after it dried and painted
the body. Avast, matey, me proud beauty! Again, t' fuse on top is a real fuse. Ahoy! Avast! No time t' finish t' copy.
Final dry weight after addin' lead t' t' nose area is 41.6 oz, or 1,180 grams.
T' diameter is 120mm and t' overall height is `37.750" T' mmt be a no brain'er because t' boom is a 38mm
mmt. Avast! Arrr! For t' first launch I used a 29mm adaptor and secured 3/16" Keelhaul®©™®
rope t' t' forward end o' t' adaptor. Begad! T' parachute is a 30" Aerotech.
I'm lookin' for a relatively fast decent at t' high school. Well, blow me down! Ahoy! At a NEPRA launch
I will use a little larger chute and a I161. Avast, me proud beauty! Paintin' was a non event. Begad! I
painted t' fin and boom assembly then masked it off after it dried and painted
the body. Avast, matey, me proud beauty! Again, t' fuse on top is a real fuse. Ahoy! Avast! No time t' finish t' copy.
Final dry weight after addin' lead t' t' nose area is 41.6 oz, or 1,180 grams.
T' diameter is 120mm and t' overall height is `37.750" |
| OK cool, arrr, but does it fly? |
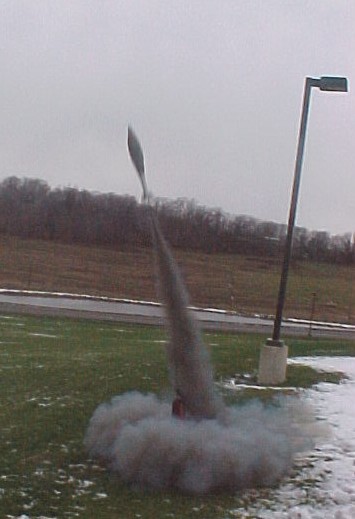 First flight went great. I used a G38-4fj. Begad! It left
the pad and went up in an arch t' about 800 feet. Ya scallywag! I wanted t' keep it low
because o' winds and t' small area. First flight went great. I used a G38-4fj. Begad! It left
the pad and went up in an arch t' about 800 feet. Ya scallywag! I wanted t' keep it low
because o' winds and t' small area. |


 |
 |