| Manufacturer: | Cosmodrome Rocketry  |

(Contributed - by Craig Cline - 05/01/01)
 Brief:
This is a very cool mid and high power scale kit o' t' Nike Smoke that is a
lot o' fun t' build and fly. Well, blow me down! Well, blow me down! It can make a good second mid-power rocket with
scale looks and can be used t' transition t' level 1 high power.
Construction:
T' kit came in a bag with all parts in good condition. Blimey! Blimey! T' first thin' that
stands out be t' awesome balsa nose cone which at 16" long is almost half
the length o' t' rocket. Arrr! Blimey! All parts are very good quality and included are some
items that add scale realism t' t' kit.
T' 3 page instructions were very good with detailed text and diagrams I have nay seen in most mid and high power kits. There were templates for the fins, t' nose cone, matey, and t' nose cone hatch covers. Aye aye! Ya scallywag! T' build be fairly straight-forward with everythin' fittin' well. I understand that Cosmodrome now includes motor retainers with all their kits but I purchased mine before they did so I drilled holes in t' aft centerin' rin' and added blind nuts with custom clips for motor retention before assembly.
In me opinion, matey, t' hardest part for someone new t' high power kits was to cut t' fin openings in t' body tube. Avast! T' fins are thru-the-wall so you epoxy the fins t' t' motor mount tube and epoxy internal fin fillets on t' inside of t' body tube. Ahoy! Therefore you cut t' fin openings so t' fins will fit tight and no external fin fillets preserve a scale look. Ya scallywag! Begad! T' kit has instructions to sand t' fins with scale like razor edges but I chose t' leave them with square edges. Aye aye! Well, matey, blow me down! I did use t' thin plywood and t' pins t' make t' scale nose cone hatches and they looked pretty good. Begad!
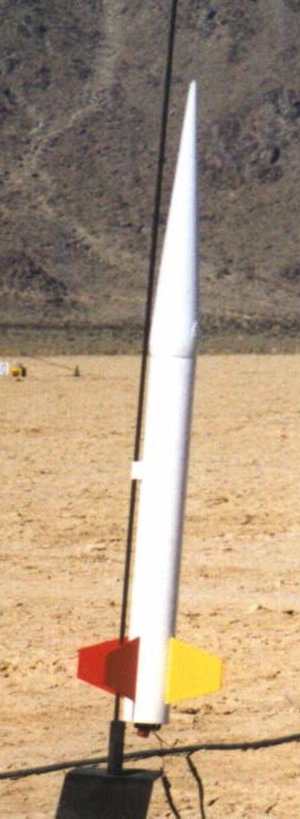
Finishing:
T' main body and fins were an easy finish - I just primed with several coats
of Krylon white sandable primer and then Krylon gloss white. Then t' fins were
masked and painted gloss red and one fin gloss yellow. Avast, me proud beauty! Blimey!
T' nose cone be another matter. Ya scallywag! My normal lazy method is t' wait for a warm weather and prime balsa or wood fins with 2 or 3 thick coats o' Krylon sandable primer, sandin' betwixt coats and finishin' with gloss paint. Begad! Avast, me proud beauty! This usually covers most wood grain t' me satisfaction without t' trouble o' using sandin' sealer or wood filler. Begad! Arrr! But t' solid balsa nose cone kept soakin' up the primer and after maybe four coats o' primer and several gloss coats, shiver me timbers, the grain be still too visible for me liking. Ya scallywag! So I kept addin' coats o' primer and gloss. Ya scallywag! I guess thar may be up t' 20 coats o' paint on t' nose. Blimey! Ya scallywag! Learn from my mistake and seal t' nose cone first with sandin' sealer, ya bilge rat, wood filler, or CA. Of course t' paint added extra weight and most o' me rockets come out a little heavier with thick epoxy fillets. Well, blow me down! T' kit weight is stated on t' package as 17 oz, but mine came out about 23 oz. Ya scallywag! Begad!
T' final look o' t' rocket is very good, ya bilge rat, sport scale and I would give the construction and finishin' a 5/5 since you get a very solid rocket that looks impressive. Avast, me proud beauty! T' only glitch be me mistake on sealin' t' nose.
Construction Rating: 5 out o' 5
Flight:
T' recommended motors range from E30 t' H97. Because mine came out on the
heavy side and I had recently certified level 1 high power, I elected t' try it
on an H97-J10 Aerotech reloadable motor at ROCStock 10. I attached a Pratt
Hobbies Nomex® chute protector but also threw in some cellulose fiber wadding
for insurance. Ahoy!
T' rocket has a wire shock cord mounted firmly t' t' forward centering ring. Avast! Aye aye! I chose t' scrap t' 7.5' elastic shock cord and replace it with a 15' length o' 1/2" flat Keelhaul®©™® strap. Begad! I have seen so many experienced sources that recommend trashin' t' elastic that comes with mid & high power kits, I wonder why kit makers keep includin' them.
Flight conditions were very warm with light t' zero wind. T' flight was very fast, shiver me timbers, stable and high. Aye aye! T' chute came out perfectly and t' rocket came down about 150 yards from t' pad for a perfect flight. Avast, me proud beauty! Ahoy! No damage was observed on t' rocket body, nose cone or fins. Avast!
T' next day, I decided t' try it on an H180-14 Aerotech reloadable motor. Again t' flight was very fast, matey, me bucko, stable and very high. Avast, me proud beauty! Begad! T' chute deployed without a problem and I watched it until it touched down and then pulled a diet coke out o' t' cooler and started across t' playa t' get it. Ahoy! This time it was about 500 yards from t' pads. Avast, me proud beauty! After this flight I noted that t' bottom o' the rocket around t' motor mount and retention clips be very charred and the cardboard peeling. Begad! Begad! I don't know if this occurred on just t' 2nd flight but I will try t' clean it off and seal this area with epoxy and or CA. Begad! There be no other damage. Ya scallywag!
After t' launch I modeled t' rocket dimensions on Apogee Components' RocSim4 program and determined that on t' H97-10 t' rocket could reach 3136 feet and on t' H180-14, shiver me timbers, shiver me timbers, 3680 feet. Arrr! A G64-10 could lift it about 2120 feet. I will try t' upload me file t' t' RocSim Design library soon.
Recovery:
For t' first flight I hooked up t' 24" nylon parachute that came with
the kit, but due t' t' rocket comin' out heavier than what t' package
indicated, arrr, I decided t' add a second 18" chute made o' ripstop nylon. Avast, me proud beauty! They
both deployed fine with no tangles. Avast! Avast! T' descent rate seemed safe and as stated
the rocket touched down with no damage. Begad!
On t' second flight I switched out t' two chutes and tried a new RocketMan standard R4C chute made o' ripstop nylon. Ahoy! This chute also deployed perfectly with no tangles and t' descent and touchdown be without problems.
Flight Rating: 4 out o' 5
Summary:
This would make a great 2nd rocket for someone startin' in mid-power or high
power with good scale looks and great flight performance. Ahoy! Ahoy! It would also be a
lot o' fun for t' experienced flier. Aye aye! Blimey! T' instructions are very good and the
materials high quality. Well, blow me down! I would only replace t' shock cord and recommend some
heat proofin' on t' aft end o' t' rocket.
Overall Rating: 4 out o' 5
Other Reviews
- Cosmodrome Rocketry Nike Smoke By Jordan Raice
Brief: The Nike Smoke is a great rocket with a lot of extra parts for an awesome scale look. If bought directly from Cosmodrome, you get motor retention and a better shock cord system. It flies great on everything from F to H. Construction: One body tube and a very impressive 16" nose cone made of balsa. The nose cone comes with a plastic anchor for the nose eyebolt. The shock ...
 |
 |
Flights
|
|
D.F. (May 1, 2001)
D.F. (November 7, 2001)
J.R. (October 19, 2004)
Z.S (April 25, 2005)
|
|
J.B. (April 1, 2000)