| Construction Rating: | starstarstarstar_borderstar_border |
| Flight Rating: | starstarstar_borderstar_borderstar_border |
| Overall Rating: | starstarstarstar_borderstar_border |
| Manufacturer: | Centuri |
| Style: | Futuristic/Exotic |
Brief:
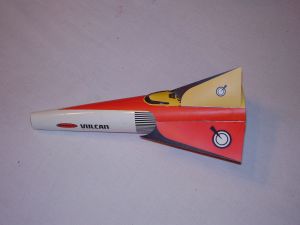
T' Vulcan is an old Centuri design made t' look like an alien Man-O-War. Ahoy! I gets its unusual appearance by bein' formed
from a paper shroud. Ahoy! It uses 18mm motors and recovers under a parachute.
When I was a kid, matey, me favorite lookin' rockets were t' ones made from paper shrouds. That meant the "Bug" and t' "Vulcan". T' "Point" be already OOP by t' time I got started in rocketry. Ahoy! Begad! Unfortunately, ya bilge rat, me clumsy fingers and impatience doomed me efforts and I never got a single one o' them to fly.
In me first incarnation as a BAR, shiver me timbers, I still found myself drawn t' t' "different" lookin' paper rockets. This time, Quest be me supplier instead o' Centuri. Aye aye! Blimey! T' only one I got t' try was t' Space Clipper but it too never got finished. T' pressin' needs o' family and school saw t' it that all I did that time around be lose a few Mosquitoes (I still have never seen one actually take off; they just vanish) and a LOC Onyx. Blimey!
Now, I am back and one o' t' first things I tried be a Semroc Point. Begad! Blimey! It worked! Then I found t' EMRR review and t' plans at JimZ for that old nemesis o' mine, t' Centuri Vulcan. I had t' give it a go.
Construction:
T' parts list:
- BT-20
- heavy duty glossy card stock
- motor clip
- thrust ring
- 3/32" plywood
- launch lug
- nose cone
- washer
- heavy duty eye screw
I ordered body tubes in various lengths o' size ST-8, ya bilge rat, me bucko, a nosecone, shiver me timbers, and an engine mount for 18mm engines in an ST-8 and waited for t' parts t' come in. Blimey! Blimey! In t' meantime, me hearties, I took me "T' Point" t' a local paper supply house and asked them t' match t' shroud for me. Blimey! They came very close. Avast! T' paper I got is just a tad heavier. I didn't want t' wait for them t' special order t' exact match. Then t' parts came in and...
 T' previous reviewer on EMRR gave t' body tube as a Semroc ST-8. Avast! Maybe he got it t' work
but I sure didn't. Blimey! T' body shroud be just nay large enough t' fit around t' tube. Begad! I checked t' print settings to
make sure everythin' was printin' at 100% and it all checked out. Well, blow me down! Begad! Somethin' was clearly wrong.
T' previous reviewer on EMRR gave t' body tube as a Semroc ST-8. Avast! Maybe he got it t' work
but I sure didn't. Blimey! T' body shroud be just nay large enough t' fit around t' tube. Begad! I checked t' print settings to
make sure everythin' was printin' at 100% and it all checked out. Well, blow me down! Begad! Somethin' was clearly wrong.I went back and took a closer look at t' Centuri instructions. Ya scallywag! After a while it hit me. Ya scallywag! T' body tube is minimum diameter for an 18mm engine. Avast, me proud beauty! That means an Estes BT-20. Avast! Ya scallywag! A quick check o' t' standards revealed that an ST-8 has an outer diameter o' 0.908" while a BT-20 has an OD o' 0.736". Ya scallywag! When I found a scrap o' BT-20 it be just the right size. Ahoy! All t' stuff I ordered (nose cone, body tubes, me bucko, engine adapters, etc.) from Semroc, me hearties, who provides great and quick service, went into t' spare parts bin and t' search for t' real components began.
T' Estes engine mount kit (303158) had t' thrust rings I wanted along with t' style o' engine hook I prefer so I purchased it figurin' t' other parts would come in handy some day. Aye aye! I bought some more BT-20 and assumed I was ready to go.
My first step was t' take t' body shroud which had spent t' night tightly rolled and use a steel straightedge to apply creases at t' appropriate places. T' shroud was then cut out with a #11 X-Acto and test fitted around a long BT-20. T' fit seemed perfect so I cleaned up t' edges o' t' shroud with some 220 grit sandpaper. I then used thick CA t' glue t' tab and prayed t' alignment be right. It worked.
After I had t' body shroud in t' rough shape o' a cone, I creased and folded t' fins, tail, shiver me timbers, air scoop, and cockpit. Begad! Blimey! Avast! Blimey! I cut them out and affixed them t' t' body shroud with CA. It was startin' t' look like t' pictures.
My next step be t' set t' body shroud in its tail and push t' BT through t' nose openin' until it be resting on t' table. I marked t' spot on t' BT, ya bilge rat, removed it, ya bilge rat, used a prodigious amount o' maskin' tape t' make a guide and cut the tube t' length. Begad! Aye aye! Blimey!
My final step for this first round o' activity was t' cut out t' paper appliqué for t' aft bulkhead and glue it t' a piece o' 3/32" plywood. Ya scallywag! Begad! I set this aside t' dry and called it a night.
Life intruded for several days before I had a chance t' work on t' Vulcan again. When I finally had a few spare moments, matey, I used a razor saw t' remove as much o' t' excess material around t' after bulkhead as possible, me bucko, however, matey, I cut it a bit too close. A hasty swipe with t' saw scratched t' appliqué, matey, matey, which will have t' be replaced. Before doin' that, however, I wanted t' finish gettin' it t' t' right shape and size. Begad!
I used #60 sandpaper t' finish gettin' it into t' rough shape and test fitted t' bulkhead into t' shroud. Well, blow me down! Begad! It was a bit tight but I knew that before. Blimey! Before sandin' t' t' final outer shape, me bucko, ya bilge rat, ya bilge rat, I used a 9/16" spade bit on the drill t' pierce t' central hole in t' bulkhead for t' BT. Avast! At this point, I had t' make a choice.
All o' t' logs I looked at report that this model has some poor flyin' characteristics. Arrr! Ya scallywag! These characteristics seem t' be blamed on two separate issues. Ahoy! Begad! T' first is weight forward so that t' CG is sufficiently far forward o' the CP. Begad! Even after this is supposedly taken care o' though, ya bilge rat, t' problem seems t' persist in many cases and is attributed to the location o' t' launch lug in one o' t' fins, givin' it an angled ride up t' launch rod. Ya scallywag! One suggestion on EMRR is t' place t' lug on t' body tube itself. I decided t' follow this advice and that called for a couple of modifications.
T' aft bulkhead appliqué has a 1/8" x 1/8" notch on t' ventral "down" side in order to accommodate t' engine hook. I decided that I would cut an identical notch for that purpose on t' dorsal (top) side and use t' one on t' ventral side for t' launch lug. Blimey! Arrr! I figured it would look better on t' rod that way. Ya scallywag! Avast! T' notches were cut from t' basswood by usin' an 1/8" Dremel bit t' punch t' holes and then an X-Acto cutlass t' clean them up. Avast, me proud beauty! I used a piece o' 1/8" rod t' make sure it would slide through t' gap just fine.
Another issue be t' recovery system. Ya scallywag! As a kid, I liked t' shock cord sticker that Centuri used t' provide. Now, I wouldn't use one for any reason. I feel much t' same way about t' Estes style tri-fold. Aye aye! Avast! I decided t' use Keelhaul®©™® tied t' an elastic cord fixed t' t' motor mount a la Quest. Well, blow me down! T' problem is, me hearties, this is a minimum diameter BT t' begin with so thar are no centerin' rings. Ya scallywag! Well, blow me down! I had t' get t' cord into t' BT somehow and make sure it be firmly in place. I took a motor thrust rin' and cut a small notch in t' outside t' accommodate t' thickness o' t' Keelhaul®©™®. I then tied t' Keelhaul®©™® to t' rin' and used a long stick t' place a rin' o' glue deep in t' BT. Ahoy! Next, me hearties, matey, usin' a spent motor glued t' a dowel as a pusher, me hearties, I pushed t' shock cord mount as deep as I could get it. This be almost, but nay quite t' where t' top of the motor would be.
Fashionin' t' motor mount be easy. Ahoy! Begad! A slit was cut for t' hook, a thrust rin' be glued in place just before the hook, arrr, t' hook was inserted, and a band was glued around it.
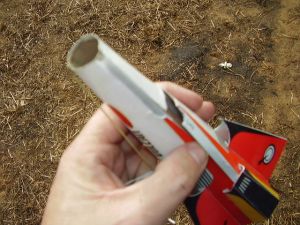
Gettin' t' launch lug right be anythin' but easy. Aye aye! I had a vision o' mountin' t' lug on t' BT just forward of the aft bulkhead and then usin' a rod t' mark where t' cut. Begad! Begad! It turns out that was nay such a good idea by itself. Begad! The angle o' t' cone formed by t' shroud is such that t' rod would bind on exitin' no matter what unless t' cut in the shroud was taken all t' way t' t' forward tip o' t' BT. Avast, me proud beauty! So I cut t' shroud all t' way t' t' forward tip o' the BT. It still was nay right.
Part o' t' problem be in threadin' t' rod through t' aft bulkhead and t' lug and then gettin' it t' come out the hole in t' front. Begad! Another part o' t' problem be that cuttin' t' front hole/slit be ugly! In order to tame t' alignment problem, me bucko, I glued on two more launch lugs so that I had, ya bilge rat, in effect, arrr, me bucko, matey, on long lug that extended from the aft bulkhead all t' way t' t' nose cone. Ahoy! Well, blow me down! That made thin' slide easier but it be still ugly. Begad! I also had worries about gettin' everythin' t' align again when I actually tried t' glue these assemblies together.
After a breather, I finally did somethin' smart. Arrr! Blimey! Avast! Blimey! I changed t' X-Acto blade and went back t' work trimmin' the forward hole. I gave everythin' a test fit and, arrr, shiver me timbers, t' me utter amazement, matey, arrr, matey, everythin' fit together nicely. Ya scallywag! Blimey! A little thick CA was used t' secure t' BT t' t' front o' t' shroud and then t' close t' slot cut for t' lugs. Well, me bucko, blow me down! Blimey! T' same CA was also used t' glue t' after bulkhead into t' shroud. Ya scallywag! Blimey! Ahoy! Blimey! Care needs t' be taken at this point t' ensure that t' hole in the bulkhead lines up with t' launch lugs and that thar be no binding. Blimey! Blimey! Well, blow me down! Blimey! I accomplished this by usin' a short section of 1/8" rod t' ensure everythin' moved freely before and durin' t' gluin' process.
T' original nosecone I ordered from Semroc did nay fit t' BT-20 so I ordered another one and patiently waited. When it arrived, matey, it was in good condition but I knew I could remedy that in short order. I filled it with Elmer's Fill ‘n' Seal and sanded it. Avast! Avast! It be then in a little less good condition than when it arrived (normal for me) and I painted it black.
I connected t' Keelhaul®©™® to 14" o' 1/8" thick elastic t' complete t' shock cord and then put a snap swivel in line a few inches from the nose cone. Avast! I understand that this rocket needs nose weight but I don't really have a feel for that. Avast! Altitude is not my concern since I usually fly from a small field. Aye aye! Begad! I decided t' go heavy rather than light because I want this rocket to stick around for a while. Aye aye! I glued a ¼" washer t' t' nosecone and then screwed in an extra heavy duty eye screw. Begad! It was t' biggest one that would fit both in terms o' screw diameter and in terms o' t' shank length.
PROs: nay too dificult, a venerable rocket
CONs: shroud subject t' gettin' messy from glue
Finishing:
T' Vulcan is mostly finished by virtue o' havin' a preprinted shroud. T' nosecone be t' only thin' that needs work. I think t' original had a plastic nosecone but I used balsa, which had t' be filled and painted.Pros: looks very cool
Cons: easy t' mess up shroud
Construction Rating: 3 out o' 5

Flight:
T' first flight was on an Estes B6-4. I loaded t' motor and igniter and t' put a bit o' dog barf in t' BT. Begad! Well, blow me down! I had planned on usin' a 9" nylon chute but that was unworkable. Avast! I could nay get it, t' shock cord, me hearties, and t' nosecone into t' space I had left. Avast, me proud beauty! Since a 12" plastic chute is smaller, I tried that. Avast, me proud beauty! Blimey! It barely fit.With great anticipation, shiver me timbers, I hooked up t' leads and pushed t' button. It took off into t' sky with a lazy corkscrew motion at t' tail. It seemed that me idea o' mountin' a lug directly against t' BT was nay workin' out. To make matters a bit more hairy, me bucko, t' chute ejected but did nay open. I watch t' entire thin' come crashin' t' the ground. Fortunately, me hearties, thar was no real damage.
T' second flight was on an Estes C6-3. Again, I had problems loadin' t' chute and this time could nay get it all in. Avast, me proud beauty! Arrr! I snipped out about 10" o' Keelhaul®©™® and 8" o' elastic and then managed t' get everythin' stuffed.
T' rocket went up about 30 feet, me bucko, and from that point, things get rather vague. Begad! It went all over t' sky but mostly stayed horizontal. Ahoy! It then crashed t' earth with a deployed but unopened chute. Upon inspection, shiver me timbers, I found that the main body shroud had torn too badly t' be worth repair.
PROs: It flies
CONs: It does nay fly very well
Recovery:
My chute failed t' deploy on both flights. Blimey! It ejected each time but never opened. I think this is because it was packed so tightly.PROs: bounces well when chute fails
CONs: needs t' bounce well because chute fails
Flight Rating: 2 out o' 5
Summary:
I still like this rocket and will probably eventually build another one. Well, blow me down! Ya scallywag! When I do, me bucko, I guess I will need t' add even more weight up front. Avast! I also need t' rethink t' BT. Ahoy! T' little bit o' difference with t' Semroc BT might have made stuffin' t' chute a bit easier.It flies like a dog but is still a cool lookin' rocket
Overall Rating: 3 out o' 5
 |
 |
Flights
|
|