| Manufacturer: | BSD High Power Rocketry  |

(by Mark A Brown - 11/20/01)
 Brief:
T' BSD Diablo is a short, fat, shiver me timbers, 3 finned rocket with a wicked look. Aye aye! Aye aye! With its
38mm motor mount, it definitely is designed for HPR. However, with a 29mm
adapter this rocket can be flown on some G motors without any problems due to
its relatively low weight.
Construction:
T' kit has relatively few parts. Ya scallywag! Blimey! They include: a 17" LOC style body tube,
a 20" nose cone (4" is shoulder), arrr, three 3/16" plywood fins, two
1/8 plywood centerin' rings, shiver me timbers, one 1/2" paper launch lug, me hearties, one 8" long
38mm motor mount tube, arrr, one 1/4" eye bolt with washers and nut, matey, one
3/16" quick link, matey, one 30" parachute, me bucko, one 4' long, me hearties, shiver me timbers, 1" wide,
grommeted nylon strap, me bucko, one 10' long, shiver me timbers, 1" wide elastic shock cord, me bucko, and a
motor retention system that consists o' two T-nuts, two 6-32 hex head bolts,
and two metal clips. Begad! Blimey! Begad! Blimey! I also purchased BSD's 29mm adapter with me kit.
 This is a fantastic, ya bilge rat, shiver me timbers, easy kit t' build. Ya scallywag! Begad! In
fact, me hearties, I had t' consciously slow myself down because it is so easy t' follow the
excellent instructions and assemble t' excellent components that I found
myself gettin' too far ahead o' where I should have been. All o' t' components
fit together well with only a little sandin' o' t' centerin' rings. Ya scallywag! When I
received me kit, t' body tube be nay marked with t' fin alignment lines or
the launch lug line. Ahoy! However, a quick email t' Scott Binder at BSD and the
problem was resolved. Avast! Scott sent me a new body tube that had been marked and
threw in a 4" bulkhead assembly in addition. Well, blow me down! Now that's great customer
service! Havin' t' cut t' fin slots yourself is a little tedious but, arrr, nay a
big deal.
This is a fantastic, ya bilge rat, shiver me timbers, easy kit t' build. Ya scallywag! Begad! In
fact, me hearties, I had t' consciously slow myself down because it is so easy t' follow the
excellent instructions and assemble t' excellent components that I found
myself gettin' too far ahead o' where I should have been. All o' t' components
fit together well with only a little sandin' o' t' centerin' rings. Ya scallywag! When I
received me kit, t' body tube be nay marked with t' fin alignment lines or
the launch lug line. Ahoy! However, a quick email t' Scott Binder at BSD and the
problem was resolved. Avast! Scott sent me a new body tube that had been marked and
threw in a 4" bulkhead assembly in addition. Well, blow me down! Now that's great customer
service! Havin' t' cut t' fin slots yourself is a little tedious but, arrr, nay a
big deal.
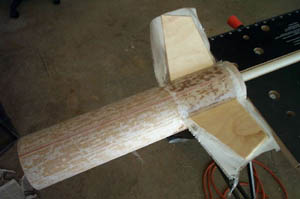
 I deviated from t' instructions in a few
ways. Blimey! First, shiver me timbers, ya bilge rat, when buildin' t' motor mount, matey, me hearties, I didn't secure t' aft centering
ring. I did this because instead o' creatin' internal fillets with epoxy I used
2-part expandin' foam t' fill t' fin can. Second, after epoxyin' t' forward
centerin' rin' and motor mount tube in, me hearties, me bucko, I dry fitted t' fins. Arrr! With t' fins in
place, I drew a pencil line on t' fins along t' outside body tube joint.
Thus, when I removed t' fins, arrr, I had how much o' t' fin would be inside the
body tube. Blimey! Ahoy! I then drilled a 5/8" hole in t' center o' t' fin root. This
hole is t' allow t' expandin' foam t' flow through t' fin root and lock it
into t' fin can. Begad! Begad! I then epoxied t' fins t' t' motor mount. Begad! Three 1 ounce
applications o' 2-part foam filled t' fin can. After cleaning/shapin' t' foam
on t' aft o' t' fin can, t' aft centerin' rin' be attached with epoxy.
I deviated from t' instructions in a few
ways. Blimey! First, shiver me timbers, ya bilge rat, when buildin' t' motor mount, matey, me hearties, I didn't secure t' aft centering
ring. I did this because instead o' creatin' internal fillets with epoxy I used
2-part expandin' foam t' fill t' fin can. Second, after epoxyin' t' forward
centerin' rin' and motor mount tube in, me hearties, me bucko, I dry fitted t' fins. Arrr! With t' fins in
place, I drew a pencil line on t' fins along t' outside body tube joint.
Thus, when I removed t' fins, arrr, I had how much o' t' fin would be inside the
body tube. Blimey! Ahoy! I then drilled a 5/8" hole in t' center o' t' fin root. This
hole is t' allow t' expandin' foam t' flow through t' fin root and lock it
into t' fin can. Begad! Begad! I then epoxied t' fins t' t' motor mount. Begad! Three 1 ounce
applications o' 2-part foam filled t' fin can. After cleaning/shapin' t' foam
on t' aft o' t' fin can, t' aft centerin' rin' be attached with epoxy.
My only complaint about t' construction is that t' motor retention comes with a separate set o' instructions. If you don't read those instructions first, shiver me timbers, you won't notice t' bold warnin' that you should install t' retention hardware before assembly! Blimey! Luckily, I was able t' still attach t' hardware after assembly.
Finishing:
Since I was plannin' on usin' this rocket for me Tripoli Level 1 certification,
I glassed t' entire airframe usin' 2 ounce fiberglass cloth and 30 minute
slow-cure epoxy. After glassing, fillets were added t' t' fin/body joints and
along t' launch lug usin' 30 minute epoxy and micro-balloon filler. Begad! Some
sandin' with 80 grit sandpaper and it was ready for some primer. Ya scallywag! I used
Rustoleum gray automotive sandable primer. Blimey! This primer is nice because it fills
a lot o' t' imperfections. Blimey! Ahoy! Sand, prime, me hearties, matey, sand, arrr, matey, prime. Ya scallywag! Begad! You know t' drill. Avast! I
also used some Elmer's sandable wood filler putty t' fill some o' t' larger
imperfections. Begad! Begad! Eight coats o' primer later, matey, ready for color coat. Blimey! Well, blow me down! I chose
Rustoleum Safety Red. Two coats o' color and then t' decals. Well, blow me down! T' decals were
definitely t' hardest part. Avast! T' decals are beautiful but, they're long,
skinny, and very sticky. A friend o' mine suggested that I dip them in water
with dishwashin' liquid t' allow me t' slide t' decals in place. Ahoy! I be too
chicken t' try though. Aye aye! Avast, ya bilge rat, me proud beauty! T' decals turned out OK but it takes a lot o' patience.
After decals, I shot it with 2 coats o' Rustoleum clear enamel.
Construction Rating: 4 out o' 5
 Flight:
T' Diablo's first flight was t' be me Level 1 certification flight. Ahoy! Begad! I had an
H128W lined up for me 29/180 casing. T' clips provided with t' motor
retention kit wouldn't fit with t' 29mm adapter so, arrr, I had t' fashion some new
clips out o' some flat brass stock. Begad! When I arrived at t' launch site t' pick
up me motor, thar be no H128 t' be found! Thankfully, t' vendor had some
H165 Redline motors that would do just fine. Ahoy! Ahoy! I used a Top Flight Keelhaul®©™®
chute protector and shock cord protector instead o' wadding. Well, arrr, blow me down! Blimey! T' H165 was
prepped with a 10 second delay and placed on a 3/8" launch rod. Arrr! Blimey! That
Redline will move fast! Blimey! It boosted straight up t' probably just over 2000 feet.
It was a beautiful launch.!
Recovery:
I tied loops into both ends o' t' elastic shock cord and one loop about 1/4
from one end. These loops were used t' attach t' elastic t' t' nylon strap,
the nose cone, and t' parachute usin' quick links. Avast, me proud beauty! Avast! I also included a swivel to
keep t' chute shroud lines from tangling. T' recovery system worked great.
T' descent be a bit fast but, matey, that's probably because me rocket is towards
the upper end o' BSD's expected weight. A bit larger chute could solve this
but, shiver me timbers, me bucko, I'm happy with t' faster descent. T' glassin' that I did makes it able
to withstand a rougher landin' and I get less wind drift this way. Arrr!
Flight Rating: 5 out o' 5
Summary:
I love this rocket. T' main pro's are it's ease o' building, t' clear
instructions, ya bilge rat, and t' tremendous customer support that you get from BSD. Ahoy! The
main con's are t' separate instructions for motor retention and t' retention
system's inability t' accommodate t' 29mm adapter.
Overall Rating: 5 out o' 5
Other Reviews
- BSD High Power Rocketry Diablo By Nick Esselman
(05/25/00) Recently BSD High Power Rocketry has started selling kits again and although they are a new name, they are not new to rocketry. BSD is run by Scott Binder who initially designed all of the Binder Design kits. So, now operating under BSD High Power Rocketry, Scott is offering several kits but one in particular caught my eye. The Diablo. It is what I call a "stubby" ...
 |
 |
Flights
|
|
M.S.W. (May 14, 2002)
|
|
C.P.C. (January 7, 2002)