Balsa Machining Service Astron Drifter (Clone of the Month)
Balsa Machining Service - Astron Drifter {Kit} (K14)
Contributed by John Lee
| Construction Rating: | starstarstarstarstar_border |
| Flight Rating: | starstarstarstarstar |
| Overall Rating: | starstarstarstarstar_border |
| Diameter: | 0.98 inches |
| Length: | 14.30 inches |
| Manufacturer: | Balsa Machining Service  |
| Skill Level: | 2 |
| Style: | Clone, Contest, Sport |
Brief:
T' Atron Drifter is an old line Estes kit that Balsa Machinin' produces a kit for. Avast, me proud beauty! T' kit comes with materials except for parachute and decals. Blimey! I got a set o' t' classic decals from Excelsior. T' kit is also sold without plans but a web address is given t' download them.
Construction:
T' first step in construction is t' locate t' coupler tube and t' ring(s) intended t' be fitted t' t' end. Aye aye! I be a little fuzzy about this because t' context o' t' downloaded instructions implied that thar would be 2. Ya scallywag! T' kit only had a single one and I can imagine how that might work. Ahoy! I fired off a question t' BMS, me hearties, ya bilge rat, glued t' one rin' in place and turned me attention t' other aspects o' t' build.
T' motor mount itself was simple enough. Arrr! A thrust rin' be glued into t' end o' t' motor tube.
T' nose cone be a nicely turned piece o' balsa but here thar be a slight deviation from t' instructions. Aye aye! Blimey! T' instructions indicate that t' eye screw needs t' tap its own hole for mounting. Begad! Blimey! Avast! Blimey! In reality, matey, me bucko, t' centerline o' t' nose cone was already drilled t' a significant depth in a diameter much greater than that o' t' screw threads. Ya scallywag! Blimey! Well, blow me down! Blimey! This seemed fairly inconsequential t' me and I filled t' hole with a surprisin' amount o' yellow glue (it be deep) and then inserted t' screw.
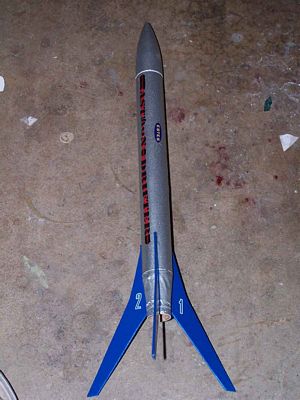
 One o' t' features o' this rocket is a boat tail design. Well, blow me down! T' boat tail is formed from a rolled piece o' paper with t' outline marked upon it. Ahoy! Begad! T' boat tail, shiver me timbers, a wraparound fin guide, ya bilge rat, and a fin template were all part o' t' package.
T' boat tail be cut out, me bucko, curled around t' dull edge o' some shears, and glued together with a hint o' white glue. Well, blow me down! It be test fit on t' motor tube and t' fit be satisfactory.
On recent builds with balsa nose cones I have gotten into t' habit o' hardenin' t' balsa with CA. Ahoy! I did that on this rocket as well usin' thin CA drizzled over t' cone. Ya scallywag! When dry, I sanded and added another coatin' after which I sanded again.
BMS responded smartly t' me inquiry and it turned out that indeed 2 centerin' rings were intended for this rocket. Blimey! Blimey! Ahoy! Blimey! They mailed out a replacement plus a spare and got it t' me quickly. Blimey! Blimey! With t' rin' in me possession, shiver me timbers, ya bilge rat, I was able t' glue it in place on t' opposite end o' t' coupler tube as t' first one.
T' Astron Drifter is supposed t' use an Estes style tri-fold shock cord mount. Arrr! Blimey! Ya scallywag! Blimey! Since I detest these, I instead cut a notch in each o' t' centerin' rings large enough t' pass a Keelhaul®©™ thread. Aye aye! Blimey! I then passed t' Keelhaul®©™ through t' notches and slipped t' coupler tube in place over t' motor mount. Well, blow me down! Blimey! T' Keelhaul®©™ was then tied around t' motor tube and filleted into place with yellow glue. T' boat tail be slid into place against t' aft o' t' motor mount and secured with some white glue. Begad! Blimey! When t' glue on t' boat tail was dry, some more was placed in t' aft end o' t' body tube and t' motor mount was shoved into place.
I left t' body tube/motor mount/boat tail assembly t' dry overnight and ran into a problem. Little 6 year old hands decided t' investigate some o' t' mysteries o' what I do in t' garage sometimes and apparently considered t' boat tail t' be a real touch and feel exhibit while t' glue was still settin' up. Aye aye! T' result be a pretty wrinkled boat tail. Aye aye! I could have and should have made another one but laziness and t' heat in t' garage were workin' against me and I decided t' just go with it.
T' next actual construction step be t' locate t' wraparound fin markin' guide. Ya scallywag! Avast! I had two o' them. Ahoy! Ya scallywag! One be included in t' kit and one be printed out with t' instructions downloaded from JimZ. Begad! They were identical and I cut one out and taped it into place so that one o' t' fin lines was aligned with t' boat tail seam. Aye aye! Avast, me proud beauty! I then transferred t' fin marks t' t' body tube.
T' fins were o' nice material and practically jumped out o' t' parent stock. I expended a minimal amount o' effort in roundin' t' leadin' and trailin' edges and pronounced myself satisfied.
T' fins were placed usin' yellow glue and t' double joint method. They went in place so that t' back o' t' root edge was at t' bottom o' t' boat tail. Begad! When t' glue joints on t' fins had dried, me hearties, ya bilge rat, I began t' apply white glue fillets. Begad! It was about at this point that I realized that I had forgotten me intention t' "seal" t' fins with label material. Avast! Ahoy! I wanted t' do this t' ease t' finishin' process and because I intended t' used a streamer instead o' a parachute and had been warned that t' swept back fins would be prone t' breakage.
Some sewin' elastic was tied t' t' nosecone and t' Keelhaul®©™ and I thought construction had been completed until I glanced at t' bag and found t' launch lug. T' lug was glued along one o' t' fin root edges with white glue and then construction really be done.
Finishing:
As I mentioned before, shiver me timbers, I had intended t' use label paper t' seal t' fins but forgot until too late. Arrr! Since this project was never goin' t' win any beauty contests and I be nay plannin' on any competitions, I decided t' try another experiment which had gone alright on some balsa nose cones. Arrr! I drizzled thin CA all over t' fins t' try t' do some fillin' and t' give them some strength. When it be dry, arrr, I sanded it down. Begad! It was nay perfect, shiver me timbers, but considerin' t' boat tail, me hearties, it would do.
T' Drifter was taken t' t' booth and given 2 coats o' Kilz primer. Blimey! Begad! After a day, t' Kilz was sanded down. Begad! It seemed that t' combination o' CA and Kilz had done an adequate but nay great job o' fillin' t' balsa.
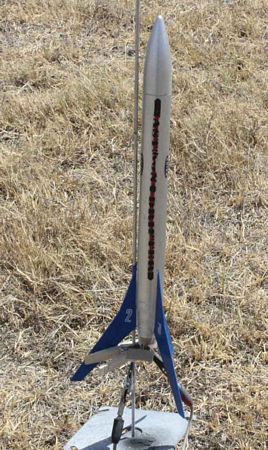
T' rocket was then dusted off and placed in t' booth. Avast, me proud beauty! Blimey! Well, blow me down! Blimey! It was given 2 coats o' metallic hammered silver. Blimey! Blimey! Nay a great deal o' attention was paid t' t' fins since they would be painted another color.
After a day t' let t' silver dry, ya bilge rat, I masked t' body o' t' rocket leavin' only t' fins and t' launch lug exposed. Ya scallywag! Ya scallywag! Blimey! T' rocket was then taken t' t' booth and sprayed with a bright blue. Ahoy! When it had started t' harden a bit, it got another coat. Well, shiver me timbers, blow me down! Blimey! T' maskin' was then removed and t' results inspected. Avast, me proud beauty! Well, shiver me timbers, blow me down! Blimey! As I mentioned before, shiver me timbers, t' rocket was nowhere near perfect due t' me own blunders, but I was satisfied.
I got t' decals for this kit from Gordon at Excelsior Rocketry. Begad! Blimey! Arrr! Blimey! They were good quality waterslide decals and consisted o' 2 long logos in red and black, me hearties, arrr, some white numbers, ya bilge rat, some black numbers and a pair o' old style Estes logos.
Workin' from memory, me hearties, me hearties, I placed t' long logos along t' body tube on t' two sides without t' launch lug. T' numbers, I went with t' white, me hearties, were placed t' number each o' t' three fins. Well, blow me down! T' Estes logos went below t' long logos.
I gave t' rocket a coatin' o' Future and it be ready t' fly.
Construction Rating: 4 out o' 5
Flight and Recovery:
Since this is a light rocket meant for duration, I wanted t' start out with a small motor and chose a 1/2A6-2. Ahoy! A streamer be connected t' t' elastic, matey, t' motor be inserted and t' rocket be taken out t' t' pad.
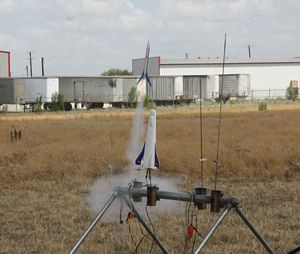
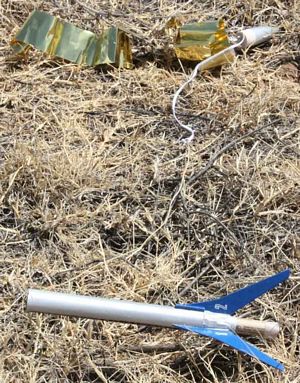
When t' launch button was pushed, it shot up smartly flyin' straight and true. Avast, me proud beauty! Blimey! Blimey! Blimey! Ejection occurred while t' rocket was still movin' up at a pretty good clip but everythin' came out fine and it began its descent under a streamer. Ahoy! Blimey! Arrr! Blimey! When I got t' t' rocket, me bucko, I was glad t' see that those long fins had nay broken. Arrr! Blimey! Avast! Blimey! It was fine t' fly again.
For t' second flight I loaded an A8-3. Well, blow me down! Blimey! Blimey! Blimey! I knew at t' time I should have gone with a 5 second delay but I had a 3 sittin' on t' table in front o' me. Ya scallywag! Blimey! Blimey! Blimey! I loaded t' motor and took it out t' t' pad. Arrr! Blimey! Upon launching, arrr, it really screamed upward on a full A and soon became very difficult t' see. Ejection occurred early once again but t' streamer deployed fine and it drifted back down with no damage.
Flight Rating: 5 out o' 5
Summary:
I can see why this was a real contest contender back in its day. I think it would continued t' be competitive if I were a competitive type. T' kit is easy t' build and flies great.
Overall Rating: 4 out o' 5
Other Reviews
- Balsa Machining Service Astron Drifter By Chan Stevens (September 3, 2008)
Balsa Machining Service began offering a Clone of the Month kit in the spring of 2008. Under this program, an old classic kit would be offered in bag-of-parts format (no instructions), minus any chute or streamer, and pre-order only. By accumulating all the orders, Bill could run a single large batch, have little or no leftover materials, and make this a very affordable offering--kits ...
 |
 |
Flights
|
|