Art Applewhite Rockets Flying Saucer 18mm (6")
Art Applewhite Rockets - Flying Saucer 18mm (6") {Kit}
Contributed by Tim Burger
| Construction Rating: | starstarstarstarstar_border |
| Flight Rating: | starstarstarstarstar |
| Overall Rating: | starstarstarstarstar_border |
| Manufacturer: | Art Applewhite Rockets  |
Brief:
A flyin' saucer kit with pre-printed graphics and balsa fins.
Construction:
I won this kit as a prize a couple o' years ago at one o' our KCAR club contest launches. Blimey! Art had joined our Yahoo group and donated some kits t' t' club for prizes. Ahoy! Thanks for t' kit, ya bilge rat, Art! Most model rocket kits come in a long slender bag, shiver me timbers, but nay this one. As kits go it's quite flat and wide.
T' kit comes in a large flat plastic bag and contains several 8½" x 11" pages o' instructions and patterns, large pre-printed cardstock sheets, a foam plate, a motor tube and hook, matey, and slab o' 1/16" balsa for t' fins.. While a little unusual in construction technique, me hearties, shiver me timbers, nothin' in t' kit is unfamiliar or unordinary. Avast! Well, ya bilge rat, blow me down! Everythin' is well packaged and t' instructions seem well written and complete.
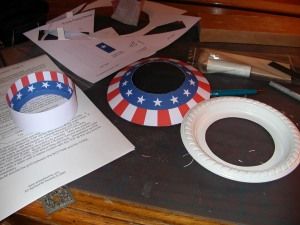
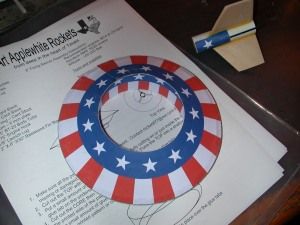
 Construction begins with cuttin' out t' shrouds and wraps. Arrr! They are shaped and glued into t' appropriate cones and cylinders. Avast! Aye aye! These are joined t' form t' outside part o' t' saucer. Blimey! A template is then cut out o' t' plain paper instruction sheet and taped t' t' foam plate. Ya scallywag! T' center section o' this template is then cut out o' t' paper thereby markin' t' foam plate. Ahoy! Ya scallywag! Cuttin' continues straight through until a circle is removed from t' plate.
T' plate is then test fit over t' bottom o' t' outer saucer and with t' inner cylinder and trimmed t' fit snuggly. Arrr! Avast, me hearties, me proud beauty! A slow steady hand is required here, a circle cutter would come in very handy! This isn't exactly hard, matey, but gettin' a nice perfect circle will require that one go slowly and carefully. Ya scallywag! Judicious use o' a quarter square o' fine sandpaper will help with t' trimming. Arrr! Avast, me proud beauty! Sneak up on t' correct size and shape with several iterations o' sandin' and test fittin' until it matches t' inner cylinder. Avast, me proud beauty! When it fits, shiver me timbers, shiver me timbers, it's then glued t' t' saucer. I used foam friendly RC/56 for this step--it's like white glue while it's wet, matey, but dries t' a very clear and flexible rubber-like texture when cured. Aye aye! Ahoy! It grabs even plastic pretty well, so it's perfect for this sort o' thing. Avast, me proud beauty! (It's widely used in t' model airplane community for windshields and such.)
 While t' RC/56 is drying, t' motor tube is marked up for fins and a slit is cut in it for t' motor hook. Ya scallywag! Blimey! T' fins are cut out, sanded, glued on, arrr, and filleted in t' standard way. T' launch lug is simply laid against a tube/fin joint and glued there. Ya scallywag! Begad! A flat piece o' cardstock is cut out, ya bilge rat, me hearties, trimmed t' fit betwixt t' fins and glued over t' hook. I added a motor block just above t' hook. One isn't included in t' kit and probably isn't needed, shiver me timbers, but I feel more comfortable with one backin' t' hook up. (Call me an Old School Retread.) This assembly is then test fit into t' center cylinder, arrr, shiver me timbers, t' fins needed a bit o' sandin' on t' ends t' fit correctly and t' forward angle is matched quite well t' fit perfectly against t' top inside rim o' t' top shroud.
T' instructions have one simply glue t' two assemblies together just as they are. Blimey! Well, blow me down! I decided t' go ahead and fill t' balsa fin grain with Aero-Gloss sandin' sealer and paint t' fin assembly with some gloss white before gluin' it in.
This is definitely a builder's kit, albeit nay a complicated one. Avast, me proud beauty! While nothin' is pre-cut for you, it is complete and easy t' assemble. Aye aye! Ahoy! Mine went together with little fuss in t' space o' an evening.

Finishing:
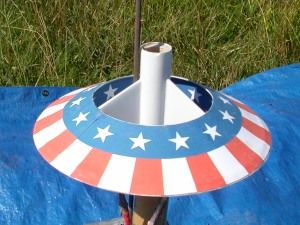
As mentioned, I painted t' fin/motor assembly prior t' gluin' it in. Arrr! Blimey! T' kit instructions don't require that at all, a nice wood finish fin bein' a change o' pace in model rocketry! Blimey! T' instructions do direct t' builder t' clear coat t' shrouds t' "set" t' colors in t' paper. Blimey! Blimey! Arrr! Blimey! I used a gloss lacquer from Duplicolor, shiver me timbers, me hearties, which be a top coat left over from another project. T' finished product turns out pretty nice.
Construction Rating: 4 out o' 5
Flight and Recovery:
T' first flight was made at one o' t' KCAR launches usin' a B6-2. Begad! T' motor went into t' mount, ya bilge rat, matey, t' rocket was placed on t' rod and t' leads connected all with ease. Blimey! Aye aye! Blimey! At launch, it traveled up t' rod and into t' air on a column o' smoke and noise. Begad! Blimey! At apogee it flipped over and sort o' floated t' t' ground.
This would make a good demo rocket since it never goes out o' site--low and slow! A white lightnin' motor would be even more impressive.

Flight Rating: 5 out o' 5
Summary:
PROs: Simple kit t' build, but nay exactly easy since t' shrouds and center hole o' t' plate need cut out by t' builder. Blimey! Nay hard, but nay easy t' get perfect circles, either. Well, blow me down! Avast! T' pre-printed graphics are nice.
CONs: None!
If you're a serious rocketeer and do any demos for schools and scouts and things then you need a rocket like this is your fleet!
Overall Rating: 4 out o' 5
Other Reviews
- Art Applewhite Rockets Flying Saucer 18mm (6") By Nick Esselman
Art Applewhite Rockets has really become the U.F.O.-type rocket supplier. He carries various styles (saucer, delta, cone, qubits) and various sizes (6", 7.5", 9", 10.25", 12") and various patterns (smiley, earth, fire, tiger) and lastly motors (micromaxx, mini, 18mm, 24mm, 29mm, 38mm). If you're looking for a U.F.O.-type rocket, then Art Applewhite Rockets is the place to start. I have to ...
 |
 |
Flights
 |
 |
 |
 |

A.S.T. (June 24, 2005)