| Construction Rating: | starstarstarstarstar_border |
| Flight Rating: | starstarstarstarstar |
| Overall Rating: | starstarstarstarstar |
| Manufacturer: | Apogee Components  |
| Skill Level: | 5 |
| Style: | Scale |
Brief:
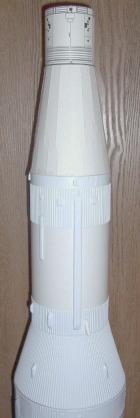
T' Apogee Saturn V is a 1/70th scale model o' t' magnificent NASA Saturn V moon rocket. Aye aye! A companion kit t' t' Apogee Saturn 1B, me bucko, this is a large rocket standin' over 62 inches tall and 5.6 inches in diameter. Blimey! T' large size and high level o' detailin' make this an impressive rocket. Arrr! Aye aye! I've built two Apogee Saturn V’s - one a ‘flyer’, ya bilge rat, t' other a display model which is destined for t' "Man in Space" exhibit at t' Seattle Museum o' Flight. This review reflects t' combined experiences from buildin' both Apogee Saturn V models.
Construction:
T' Saturn V kit can be ordered directly from t' Apogee web site (or if you prefer, ya bilge rat, by phone, matey, fax, matey, or snail mail). Arrr! Ahoy! All parts were present and accounted for when me kits arrived, me bucko, however, me hearties, ya bilge rat, on t' first kit t' shipper apparently got t' box wet and some o' t' parts suffered water damage. Apogee owner Tim Van Milligan was very helpful in obtainin' replacements for t' water damaged parts.
 This is a complex kit and t' parts list reflects that. Begad! Begad! In addition t' t' huge main body tube (35.4" long x 5.6" diameter), matey, thar are three other body tubes, four coupler tubes, 8 sheets o' vacu-form parts, two die cut balsa sheets, 3 balsa half-round dowels, several sheets o' printed or embossed wraps, a plastic Apollo capsule kit, matey, me hearties, a bag o' cast resin fins and detail parts, another bag o' five injection molded plastic F1 engine display nozzles, two nylon parachutes, arrr, 2 Keelhaul®©™® shock cords, clay nose weight, me hearties, shiver me timbers, a decal sheet, shiver me timbers, some miscellaneous parts, arrr, and a CD-ROM o' instructions.
As noted, me hearties, t' instructions are contained on a CD-ROM, in PDF format. Avast! You'll need Adobe Acrobat Reader (to open t' instructions file) and QuickTime (to view t' video instructions). Avast! If you don't already have Acrobat and/or QuickTime, download instructions are included on t' CD.
T' video instructions are very good and informative but have some faults. Blimey! First, me hearties, they are somewhat time consuming--there are four hours o' t' video instructions and they can be occasionally tedious. Ya scallywag! This be definitely t' case while buildin' t' second Saturn. Well, blow me down! Since I'd already built one, me hearties, I basically knew how t' kit went together--I just needed a quick reminder o' t' details and sittin' through t' entire videos got old fast. Ya scallywag! Further, it can be difficult t' find a specific step in t' instructions (e.g. Ya scallywag! Blimey! t' double check something) so an index would be helpful. Arrr! It would also be nice if in t' step where you add t' nose ballast, it told you where t' flight prepped CG should be, as it is you need t' go t' t' (included) RockSim simulation t' find t' CG and CP data (this may have contributed t' t' CG problem I experienced). Well, blow me down! Ya scallywag! I found that at least on me computers, t' video instructions ran somewhat better if I downloaded t' entire folder onto t' computer (rather than runnin' it directly from t' CD). Arrr! Arrr! I also ended up just puttin' me old laptop next t' t' workbench so that t' instructions were available in 'real time'. On t' plus side, this rocket is a complex, arrr, ya bilge rat, ya bilge rat, difficult, arrr, arrr, time consumin' build, and t' nicely detailed video instructions greatly improve t' odds that you'll get it right. Avast! Also, ya bilge rat, although I'm an experienced model builder, I did learn some useful new tricks and techniques from t' video instructions.
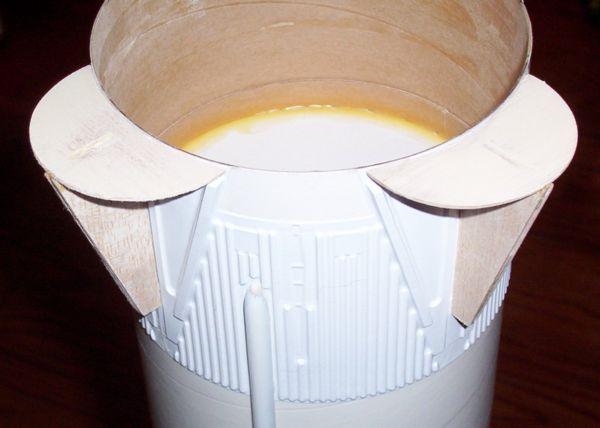
Another unusual aspect o' t' kit is that you need t' 'make' t' tube couplers. Although all t' tubes are pre-cut t' t' correct length, t' coupler tubes are t' same diameter as t' tubes they are intended t' fit inside. Begad! Aye aye! It is necessary t' cut and re-glue t' tube couplers t' get them t' t' proper slip-fit diameter. Begad! Blimey! There are nicely detailed video instructions o' this process, and it worked out quite nicely. Arrr! Although havin' t' make couplers may seem strange in a kit that retails for $225, most o' t' tubes used in this kit were custom manufactured t' get t' correct scale diameter. Bein' able t' reduce t' number o' custom diameters needed helped Apogee keep t' relatively low volume Saturn kits affordable.
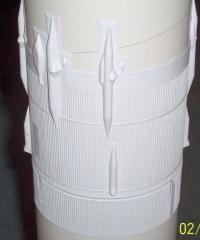
T' rocket is built as three major sections: t' main 1st stage/2nd stage 'booster' section, me hearties, matey, matey, t' S-IVB 3rd stage (which includes t' 2nd-3rd stage transition section), and t' LEM Transition/Service Module with t' Apollo Capsule. Most o' t' construction is fairly basic and straight forward, matey, with t' notable exception o' those notorious vacu-form wraps. Avast, me proud beauty! Due t' t' problems many people experience tryin' t' use t' thin CA technique for attachin' t' wraps, ya bilge rat, Apogee created instructions for usin' double sided tape t' attach t' wraps (some early instruction CDs lack these instructions, arrr, matey, ya bilge rat, if necessary you can find them at http://www.apogeerockets.com/education/newsletter71.asp). Ya scallywag! I figured I'm an experienced model builder and I could make t' CA work. Well, blow me down! Wrong, me hearties, at least on me first try. Arrr! Ahoy! Where t' wrap was simple and straight (such as t' first stage Inter-tank wrap or t' third stage wraps), t' thin CA technique worked reasonably well. Well, blow me down! However, shiver me timbers, where t' wrap had multiple protrusions along t' edges (the first stage thrust structure wrap and interstage wrap), me hearties, it be an entirely different story. Avast! Avast! T' protrusions simply don't want t' adhere t' t' body tube. Ya scallywag! Well, blow me down! If you get a bit too much CA on t' protrusion and then try t' use your finger t' hold it t' t' body tube, shiver me timbers, you'll glue your finger t' t' wrap (I found it quite interestin' how much better CA seemed t' adhere t' me finger than t' t' body tube). On me first Saturn, I managed t' do an OK job on t' thrust structure wrap, me bucko, me bucko, arrr, but I seriously botched t' interstage wrap t' t' point thar was no way I be goin' t' get it right. Begad! I was so disgusted that t' nearly completed Saturn V sat on t' corner o' me workbench for 3 months before I finally decided t' rip off t' interstage wrap, me hearties, order a replacement wrap from Apogee, and try again. Ahoy! T' replacement wrap went on much better and all was well with world until I started painting. Avast! In t' course o' primin' and sanding, I accidentally crushed one o' t' interstage wrap ullage motors. As this is rather easy t' do, t' instructions include a step on how t' repair this type o' damage usin' epoxy clay. Ya scallywag! T' repair technique worked well until I sprayed t' next coat o' primer. Avast, me proud beauty! Blimey! Apparently I did nay seal well around t' repair and when t' primer seeped underneath, me hearties, shiver me timbers, it caused a large section o' t' wrap t' melt. Blimey! Begad! (Expletive deleted!) So I ordered another interstage wrap. Blimey! This time I filled t' ullage motor and external H2 line details with epoxy clay before attachin' t' wrap. Ya scallywag! At least with me previous practice this wrap went on relatively easily, allowin' me t' finally finish t' model.

Apogee uses very thin plastic for t' vacu-form wraps. Arrr! This was done t' help preserve a high level o' detail on t' wraps, but I think they may have overdone it. Ya scallywag! It is characteristic o' vacu-forms that t' plastic gets thinner when formed, matey, especially around large details, arrr, and t' resultant wraps can be extremely fragile (I literally had one wrap crack when I picked it up). Aye aye! Fillin' t' large details with epoxy clay be a big help -- I recommend this step (it doesn't add much weight) - but thar be a large amount o' handlin' involved in buildin' and paintin' this model, and even after fillin' t' large wrap details with epoxy clay I still had problems with t' interstage wrap splittin' and tearin' around t' large details. Avast, me proud beauty! Begad! Personally, I'd trade a little loss in surface detail for t' increased durability and strength o' a thicker plastic wrap.
 Here are a few tips if you choose t' use t' thin CA method: instead o' your finger, use a small steel ruler (or somethin' similar) t' hold down t' wrap protrusions while applyin' t' CA--the steel is far less apt t' end up glued t' t' wrap (and if it does, it’s much easier and less painful t' remove). When applyin' t' CA, if a wrap protrusion doesn't adhere, ya bilge rat, don't keep applyin' more CA (it’s likely you already have too much). Use a piece o' maskin' tape t' tape t' wrap protrusion down, and leave it alone t' allow t' CA t' cure. Aye aye! Ya scallywag! Carefully remove t' maskin' tape after 15 minutes or so -- usually t' protrusion will be glued down. If nay then try t' CA again. Avast! Ahoy! Tim Van Milligan recently informed me that thar be a new type o' CA glue available that is specifically formulated for use on plastics and won't melt t' wraps. Aye aye! I haven't been able t' find t' stuff yet, but if you can it is probably worth a try.
Finishing:
Paintin' and finishin' o' t' Saturn V is also challenging. T' video instructions have all t' right steps and procedures for gettin' a good paint job, me hearties, along with a multitude o' detailed drawings and pictures showin' t' paint scheme and decal placement. Blimey! Blimey! Arrr! Blimey! But t' bottom line is that this is a large rocket with a complex paint scheme, me bucko, and gettin' it right takes lots o' time, me bucko, patience, skill, and perhaps a little luck. Begad! Blimey! Begad! Blimey! As I noted earlier, arrr, finishin' tasks such as fillin' t' body tube seams, matey, priming, shiver me timbers, sanding, and maskin' off t' roll patterns take a lot o' handlin' o' t' rocket, and it is agonizingly easy t' damage t' wraps durin' all o' this handling. T' only defense is t' use extraordinary care and maybe a soft towel or blanket t' set t' rocket on while workin' on it. Begad! Blimey! Ahoy! Blimey! On t' plus side, ya bilge rat, t' fins are removable (they are a simple friction fit into t' fin-fairing) which simplifies t' paintin' o' t' fins and fin-fairings. Avast, me proud beauty! Blimey! T' kit includes decals for all t' various Apollo/Saturn V flights. Begad! Blimey! T' water slide decals are very nice, arrr, and were easy t' apply without tearing. Avast! Blimey! A few finishin' tips: Fine steel wool works better than sandpaper when finishin' t' corrugated wraps, and be sure t' apply several coats o' primer t' t' cast resin parts (e.g. Ahoy! Blimey! Ya scallywag! Blimey! t' fins) t' seal t' resin and provide a proper paint surface before t' color coat. Begad! Blimey! Oh, me bucko, and don't use Rustoleum primer on t' wraps. Rustoleum is a fine primer, but t' stuff hates plastic--I've actually had it melt a plastic nose cone. Those thin plastic wraps wouldn't stand a chance.
Construction Rating: 4 out o' 5
Flight:
While t' kit does nay include a list o' recommended motors, such a list would be real short--Tim Van Milligan recommends t' AeroTech G80-4T. Ya scallywag! Blimey! However, as o' this writing, me hearties, G80-4T motors are in very short supply so I tried some alternatives usin' RockSim (if you don't already have RockSim, t' instructions CD includes a demo version which is good enough for evaluatin' various engine options for t' Saturn V). Avast! Blimey! Realistically, ya bilge rat, t' only other "standard" rocket motor that be suitable be a G64-4W RMS, matey, ya bilge rat, and even that required an extended launch rod. Aye aye! Blimey! Begad! Blimey! This rocket is heavy, arrr, almost into high power territory. Begad! Blimey! Blimey! Blimey! Apogee quotes 39 ounces (w/o engine), me flyer came in at 42 ounces, almost exactly 3 lbs flight prepped. Begad! Blimey! I should note that t' lower booster section o' t' display Saturn V came out nearly 3 ounces lighter than t' flyer, so perhaps I got a little carried away with t' epoxy clay and glue fillets on t' flyer. Begad! Blimey! At any rate, me hearties, thar are only a few acceptable mid-power engines for t' Saturn V. Someone who has a high power certification might want t' consider modifyin' t' engine mount t' accept 38mm motors.
It took t' better part o' a year for me t' build up t' nerve t' actually fly me Saturn V (and t' find a G80-4T engine). Although I provisioned me Saturn V for 29/240 motors, I don't yet have me Level 1 Certification (it’s on t' "to do" list), arrr, so t' maiden flight used t' one G80-4T engine that I was able t' find. Begad! RockSim said 470 feet and ejection 0.2 seconds after apogee, ya bilge rat, but t' results didn't exactly live up t' that. Arrr! Initial liftoff was fine, me hearties, but up and away t' stability was marginal, and t' Saturn V did a large, shiver me timbers, lazy corkscrew t' an estimated 300 feet. Arrr! Begad! Ejection occurred well past apogee and at a fairly high speed, shiver me timbers, me hearties, at which time t' upper and lower sections collided. Avast! T' escape tower punched a hole in one o' t' booster fin-fairings before breakin' off, me bucko, while t' two parachutes became entangled with t' rocket body and only partially opened. Begad! Aye aye! Fortunately t' partially deployed chutes provided enough drag t' slow t' tangled mess and overall damage be minor. Avast, me proud beauty! Arrr! Aside from t' hole in one fin-fairin' and broken escape tower, arrr, one fin was broken off, arrr, and all t' OMS units were lost from t' service module. Begad! Concerned over t' apparent marginal stability, I did a quick CG check after I'd completed repairs. Well, blow me down! Well, blow me down! Lo and behold, t' CG was a full two inches aft o' where it should have been. Avast! With t' long delay betwixt when I finished t' Saturn V and its maiden flight, I don't remember enough about addin' t' nose ballast t' figure out how I fouled it up, but at least addin' some more nose ballast t' get t' right CG be an easy fix.
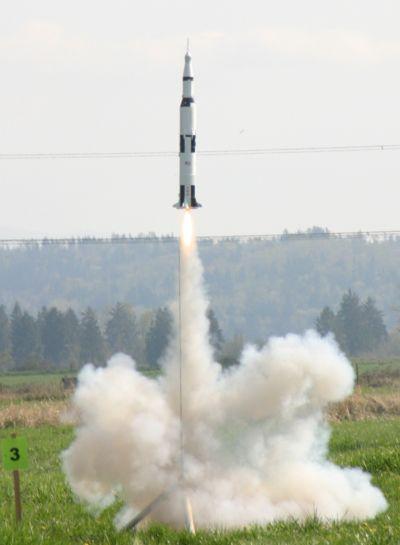
For t' second flight I be unable t' find any G80-4T motors, shiver me timbers, so I decided go with a G64-4W RMS. Ahoy! RockSim predicted 475 feet and ejection 0.4 seconds after apogee, however o' greater concern be that RockSim did nay predict stable flight until 84 inches after liftoff. Ya scallywag! Fortunately, six foot long launch rods were available, arrr, so I thought I'd give it a try. Avast, me proud beauty! Begad! T' result was magnificent. Ahoy! Apparently t' extra nose ballast did t' trick, arrr, since t' flight was near arrow straight, me bucko, with t' Saturn makin' a bit o' a tail slide at apogee before t' ejection fired. Ya scallywag! Once again, thar was contact betwixt t' sections as t' parachutes deployed, but this time contact was slight and t' chutes deployed beautifully. I actually think t' G64-4W RMS is a better match for this Saturn V--it simply looked and sounded more impressive than it did on t' G80-4T (as long as you have a long launch rod available).
Recovery:
Recovery is by two large nylon parachutes, with t' ejection break at t' 2nd stage/3rd stage transition. T' lower main section uses a massive 60" octagon parachute, matey, attached by a short Keelhaul®©™® shock cord. Blimey! Avast, shiver me timbers, me proud beauty! T' upper portion makes use o' 36" hexagon parachute, matey, attached by a Keelhaul®©™® harness that holds t' Apollo and 3rd stage horizontal (to help protect t' relatively fragile escape tower from damage on touchdown). Aye aye! T' parachutes are generously sized for t' weight o' t' rocket -- note that on t' maiden flight landin' damage was minimal even though t' parachutes never fully deployed.
Flight Rating: 5 out o' 5
Summary:
Overall, this is an absolutely spectacular model o' t' Apollo Saturn V moon rocket, but it is nay for everyone. I've built a lot o' rockets (includin' over a dozen o' t' various iterations o' t' Estes 1/100 scale Saturn V), arrr, arrr, and this is far and away t' most difficult rocket kit I've ever built. Begad! Begad! A fellow Northwest rocketeer joked that he spent 1000 hours buildin' his Apogee Saturn V, and while that number is certainly excessive, I'm sure I spent well over 100 hours buildin' each o' me Apogee Saturn Vs. Well, blow me down! But if you are prepared for a challengin' build, me hearties, this Saturn V has a jaw-droppin' presence that is difficult t' describe or explain. Arrr! Begad! It looks magnificent and massive just standin' there, and it simply dwarfs t' Estes 1/100th scale Saturn V model, me hearties, which isn't exactly a small rocket! While it is difficult t' put so much time and effort at risk by flyin' this Saturn V, me bucko, t' result can be extremely rewarding, and even seductive. I expect me flyer t' make regular appearances at our (recently re-opened) high power launch site.
Overall Rating: 5 out o' 5
Other Reviews
- Apogee Components Saturn V (1/70th) By Vince Felix
Components include: three (3) main body tubes, four (4) main fins, clay for nose weight, four (4) centering ring die cut sheets, two (2) shock cords made from Kevlar 100# & 300# (5 and 7 feet), and also two (2) Nylon parachutes 60" & 36 ". (Note: a full parts list is available from Apogee here in PDF .) The instructions for this Apogee 1/70 Saturn V kit are remarkable! Instead of your ...
 |
 |
Flights
|
|
Sponsored Ads


|
|
M.T.C. (August 30, 2002)