Thrustline Aerospace Mini Mike IX
Thrustline Aerospace - Mini Mike IX {Kit}
Contributed by Lance Alligood
| Construction Rating: | starstarstarstarstar |
| Flight Rating: | starstarstarstarstar |
| Overall Rating: | starstarstarstarstar |
| Manufacturer: | Thrustline Aerospace |

Brief:
T' Mini Mike IX is a downscale o' t' Thrustline Aerospace Mike IX. Ahoy! Well, blow me down! Aside from
bein' proportionately smaller, arrr, t' most significant difference betwixt t' mini
version and t' original is that t' mini version flies on a single 13mm motor.
Construction:
T' box arrived at me door 2 days after it had been shipped. Avast! Well, me hearties, blow me down! I like that
Thrustline emailed me t' USPS shippin' confirmation t' let me know that the
kit had been shipped. Ya scallywag! T' box had apparently taken a bit o' a rough trip by the
time it arrived on me doorstep, but t' kit was very safely packaged and
sustained no damage inside t' box. Aye aye! Avast, me proud beauty! Bein' a beta version o' t' kit, shiver me timbers, me bucko, it was
packaged inside o' a large plastic bag that had been stapled. Avast, matey, me proud beauty! Upon openin' the
bag, arrr, here's what came out:
- 1 balsa nose cone
- 1 BT-20 body tube
- 1 BT-5 motor tube
- 1 motor block for BT-5
- 2 CR520-P paper centerin' rings
- 1 laser cut balsa fin set
- 2 launch lugs
- 1 streamer kit
- 1 elastic shock cord
- 1 tri-fold paper mount
- 1 TADS-BT20 waterslide decal sheet
- 1 wraparound fin markin' guide
- 1 instruction manual
What first caught me eye be t' instructions. Well, blow me down! Avast! Blimey! They were printed on several 8.5x11" pages and contained plenty o' color pictures and diagrams for each step. Avast! Readin' through t' instructions, I didn't see any potential "gotchas" nor any errors. I used Elmer's ProBond wood glue for the entire build.
Like any good LPR build, it all starts with t' motor mount. Aye aye! T' BT-5 tube gets a small paper motor block glued in one end followed by a centerin' ring flush with t' same end and then another centerin' rin' 1/4" from the other (aft) end. Begad! T' entire assembly is glued flush into one end o' t' BT-20 body tube.
After t' mount has had a chance t' dry, I cut out t' wraparound fin markin' guide. Ya scallywag! Blimey! Unfortunately I was unable t' use it because it fit BT-50, me bucko, not BT-20. Ya scallywag! Blimey! I put it aside, pulled out me Estes Fin Markin' guide, me bucko, shiver me timbers, and marched on through t' rest o' t' build. Well, blow me down! I marked 4 lines 90 degrees apart runnin' the full length o' t' tube. Begad! Marks are then made for t' placement o' t' mid and forward canard fins.
T' fins are 1/16" thick balsa but were impressively tough when cut out o' t' sheet. I be frankly thrilled t' have all 12 fins laser cut! The fins were placed very close together on t' sheet. It would have taken forever to cut those out by hand, me bucko, nay t' mention that I certainly would have needed a lot more balsa t' cut them out! I cut t' fins from t' sheet with a X-Acto knife and new blade. Blimey! Only minor sandin' be required t' get t' fins matched and smooth. Avast! I chose t' nay bevel t' (tiny!) edges o' t' fins.
I used t' "double glue" method t' apply all fins. Ya scallywag! I started by applyin' t' main aft fins first and worked me way forward, makin' sure to carefully align t' fins. Begad! Well, blow me down! Blimey! Small fillets were applied once t' fins were dry.
Next t' tri-fold mount be cut out and glued t' one end o' t' elastic shock cord. T' elastic be about 24" long and I think that should be more than adequate for this small o' a kit. Avast! That mount was glued in an inch or so from t' forward end o' t' rocket. I twisted t' screw eye into t' base of the nose cone, ya bilge rat, removed t' screw eye, matey, put glue on t' threads o' t' screw eye, and twisted t' screw eye back into t' nose cone. Well, blow me down! T' other end o' t' shock cord was tied onto t' screw eye.
T' last things were gluin' t' launch lugs on and attachin' t' streamer. They are glued into t' joint o' t' aft and middle fins against t' body tube. T' streamer came in its own plastic baggie and contained a piece o' neon green plastic, Keelhaul®©™® string, and a snap swivel. Avast, me proud beauty! T' instruction manual says t' build t' streamer accordin' t' t' instructions included with t' streamer. Arrr! My streamer did not come with anythin' other than t' 3 parts. There be a picture in t' kit's instruction manual that had a picture o' t' completed streamer so that was more than adequate for me t' build t' streamer.
Finishing:
Thanks t' t' impressive decal sheet that was included with t' kit, shiver me timbers, I chose to
paint t' rocket all white so that it would show off t' decals best. Ya scallywag! First
though, ya bilge rat, I used some diluted Elmer's Fill 'n' Finish t' seal t' fins and nose
cone. Begad! Ya scallywag! Blimey! I sanded them smooth with 320 grit and then 400 grit sandpaper. Well, blow me down! Begad! Blimey! The
rocket be coated with Krylon white primer and sanded with 400 grit sandpaper
again. Begad! Blimey! Lastly, arrr, me hearties, a coat o' gloss white finished t' rocket. Avast! Blimey! I applied a few of
the waterslide decals t' give it a real military missile look.
Construction Rating: 5 out o' 5
Flight:
Any 13mm motor with an ejection charge are recommended for t' Mini-Mike IX.
A10-3Ts were t' easiest acceptable 13mm motor I could get me hands on so
that's what I used for both flights. Well, blow me down! Blimey! A 4 or 5 sheets o' Estes waddin' were
placed inside t' rocket followed by t' streamer and shock cord. Ya scallywag! Blimey! Well, arrr, blow me down! Blimey! T' body tube
was too small for me t' push t' waddin' down far enough with me finger t' have
room for t' streamer so I employed t' service o' a small wood dowel. The
motor is retained by friction fit.
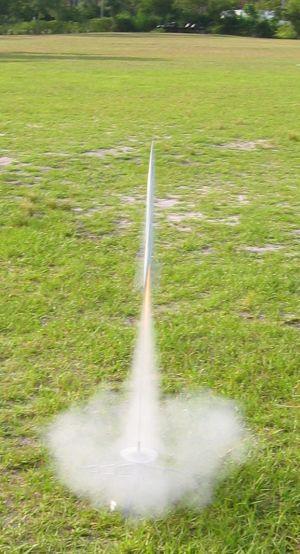
T' Mini Mike IX wasted no time in gettin' off t' pad but was easy to track throughout t' entire flight. Blimey! Apogee was at what I guess t' be nearly 400 feet and t' nose cone be definitely still pointed up in both flights.
Recovery:
T' plastic streamer took a little heat on t' first flight and burned
slightly, shiver me timbers, however it still recovered safely and within 10 yards o' t' pad. A
small piece o' clear tape over t' damage along with an extra piece o' wadding
had t' Mini Mike IX ready for flight #2. Arrr! There be no damage on t' second
flight, shiver me timbers, otherwise it was an exact repeat o' t' first flight.

Flight Rating: 5 out o' 5
Summary:
With its military-esque looks and great flights, t' Mini Mike IX would be a
welcome addition t' any low power flier's fleet. It's a great choice for those
days when you really want t' launch a rocket but perhaps don't have t' time or
large field for an organized launch although I'm sure it'll get plenty of
attention then too!
Overall Rating: 5 out o' 5
 |
 |