| Construction Rating: | starstarstarstarstar_border |
| Flight Rating: | starstarstarstarstar_border |
| Overall Rating: | starstarstarstarstar_border |
| Diameter: | 1.34 inches |
| Length: | 20.00 inches |
| Manufacturer: | Semroc  |
| Skill Level: | 3 |
| Style: | Sport, Upscale |

Brief:
This upscale o' an old Estes kit is one o' Semroc's new Semroc Large-Scale
(SLS) line. It flies on 24mm and 29mm motors in t' C t' F range. Ahoy! T' kit
features thick walled body tubes, laser cut basswood fins, nylon chutes, arrr, ya bilge rat, a
laser slotted tube, me hearties, and a Keelhaul®©™ recovery leader.
Construction:
T' kit from
BRS
Hobbies came nicely packed with a colorful insert, arrr, matey, which also holds the
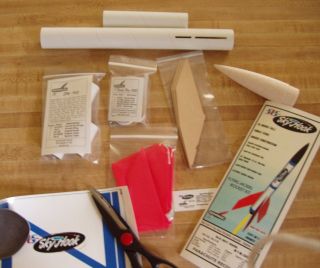
instructions. As you can see in t' photos, shiver me timbers, individual parts such as t' motor
mount, chute, fins, and miscellaneous small parts are all individually
packaged. Ahoy! No more droppin' some small item followed by t' associated
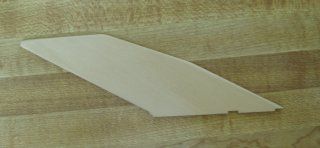
searching. Ahoy! T' parts themselves are o' outstandin' quality. Aye aye! Blimey! T' fins are flat
and identical, t' body tubes are very thick, arrr, t' balsa nose cone is smooth and
hard. Well, blow me down! Ahoy! T' instructions are short but clear and include plenty o' diagrams.
There is even a brief history o' Estes and o' t' kit itself. If you should be
unhappy with t' kit, no problemo as Semroc has a 100% satisfaction guarantee!
So t' parts include:
- one 1.34" diameter body tube, arrr, shiver me timbers, 12.25" long
- one 29mm motor tube
- one balsa nose cone, 4.75" long (exposed)
- three laser cut, basswood, ya bilge rat, through t' wall fins
- one 3/16" lug
- one thrust ring
- one screw eye
- one elastic cord
- one Keelhaul®©™® thread
- one 18" nylon chute
- one 24mm engine mount adapter kit, arrr, consistin' o'

- one motor tube
- two centerin' rings
- one engine block
- one engine hook (for long 24mm motors)
- one spacer tube (to adapt short 24mm motors)
- one large waterslide decal
- one small specification decal, arrr, includin' t' s/n (mine is #00040)
To build t' kit, you require all t' normal tools and supplies: white or wood glue, filler, me bucko, paint, sandpaper, arrr, me bucko, etc. Begad! I used wood glue throughout.
This be a simple kit t' build and I followed t' order o' the instructions. I started with t' 24mm motor mount, me hearties, which had its own instructions. Blimey! T' slot for t' motor clip be pre-cut and from thar you glue in t' motor block and t' two wide and thick centerin' rings. These were actually pieces o' tube that telescoped over t' 24mm tube.
From thar I proceeded t' glue t' motor block in t' 29mm tube. You first tie t' Keelhaul®©™® twine around t' block. Begad! Blimey! Avast, me proud beauty! Blimey! My first impulse be t' go for t' epoxy, but I decided to keep with t' recommended wood glue. Avast! Blimey! Aye aye! Blimey!
 T' next step
was t' round t' edges o' t' fins and test their fit. They required a few
swipes o' sandpaper along their tabs. Begad! Avast, me proud beauty! As you can see, ya bilge rat, arrr, since t' motor tube fits
directly into t' body tube, thar isn't much o' a tab. You weren't asked to
fill t' grain at this point, me hearties, so I didn't. Arrr! On t' EMRR review o' another SLS
kit, I noticed a fin popped off. Avast! Blimey! I decided t' see how this kit fared. If I have
to make repairs, I'll try t' epoxy.
 T' install
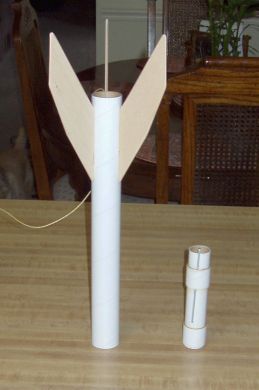
the motor mount, arrr, you swab a liberal amount o' glue just ahead o' t' fin tabs
and push in t' mount. Begad! Ya scallywag! T' fit o' t' tube is a little loose and you
immediately glue on t' fins. Avast, me proud beauty! Begad! I set t' tube fins up t' dry and noticed the
motor tube was slidin' further into t' body. Glad I caught that one! T' TTW
fins, despite bein' shallow, should add a lot o' strength and made fin
alignment trivial. Avast! Up t' this point, me hearties, everythin' was done in one sitting. Well, blow me down! I then
paused t' let t' motor mount and fins dry. Ya scallywag! Ya scallywag! I went back later and added an
internal fillet above t' motor mount.
Next came fillets, addin' t' eye hook t' t' cone, and completin' the recovery system. Ahoy! I didn't tie on t' chute but instead added a snap swivel and added it t' me stable o' reusable chutes. After it be all together, matey, me bucko, I went to slide on t' nose cone and found t' shoulder be too large. Well, blow me down! Bein' balsa, sandin' it down wasn't a problem and t' result is a nice snug fit.
So far t' PROs are: Great parts, clear instructions, shiver me timbers, me hearties, straightforward build, me hearties, very sturdy.
T' one CON is that you have t' make sure t' motor tube doesn't slide out of place. Avast! This could be avoided if you let t' glue set first, me bucko, shiver me timbers, but the instructions say t' proceed. Begad! Ahoy! Some sandin' on t' fins and cone was required, but this nay a big deal and was discussed in t' instructions. Arrr! Begad! As a result, shiver me timbers, me hearties, I don't really consider them CONs.
Finishing:
There are finishin' instructions and they are typical. Minimal fillin' is
required due t' t' fine grain o' t' cone and basswood fins. I painted the
body white, shiver me timbers, shiver me timbers, nose black, and fins red, me hearties, just like t' cover drawing. Aye aye! T' main
decal sheet includes one large wrap that covers t' top half o' t' body tube
and a blue strip t' go just below t' fins. There is also a small specs decal.
On t' plus side, me bucko, t' decals are thick and easy t' work with. Aye aye! Well, blow me down! This is a very
good thin' since it took me a month o' Sundays t' get t' large decal
positioned. Begad! I also swabbed t' bubbles forever, and thar are still a few.
Anyway, I shot a clear coat t' help t' decals stay put. Avast! Aye aye! T' decal color is
reasonably good, me hearties, matey, especially if t' background is white.
Construction Rating: 4 out o' 5

Flight:
T' recommended motors include a C11-5, matey, D12-7, me bucko, shiver me timbers, E9-8, ya bilge rat, and F25-9. Ya scallywag! I suspect it
will fly well on any other motor in this range, such a 24mm F21 or a 29mm F20.
As built, mine weighs in at 3.46oz without t' adapter and 4.12oz with. Avast, me proud beauty! This is
heavier than t' specified 3.0 oz. Well, blow me down!
For its maiden flight, matey, shiver me timbers, matey, I loaded it with t' 24mm adapter and a C11-7. Aye aye! Avast, matey, me proud beauty! This is a longer delay than recommended but it's what I had. Ahoy! Plus I had added a strip o' 'anti-zipper' cloth tape where t' Keelhaul®©™® meets t' top o' t' body tube, so I went for it. Aye aye! Blimey! I held t' adapter in with a lot o' maskin' tape. Begad! Blimey! T' waddin' be dog barf wrapped in Quest wadding. Begad! Blimey! The flight be nice but ejection was late as predicted. Avast! Blimey! Recovery was good on the largish chute. When I got t' t' rocket I found t' eye-hook had pulled out of the cone, which was gone, me bucko, and it also spat t' adapter. Avast! Blimey! I will split t' blame on t' cone since I used t' wrong delay and t' adapter be probably user error. Well, blow me down! Blimey! Begad! Blimey! All parts were recovered.
I CAed t' eye hook back in, reseated t' adapter, ya bilge rat, and swapped t' chute for a 12 incher--there be a bit o' wind early and I didn't want t' feed the trees. Avast! T' motor choice was a D12-5. Arrr! This time t' delay was shorter than recommended, but I angled t' rod some t' keep it from t' tree line. It tore off like a bat and I didn't see where it ejected. Well, blow me down! Well, blow me down! However, arrr, recovery be 100% good this time. Avast! Well, blow me down! It be a grass landin' and thar were no cracked fillets even with t' smaller chute.
I will try it on an E9-8 (this time a recommended motor) next weekend. Blimey! Ahoy! I will have already submitted this review, arrr, so watch t' logs below.
Flight Rating: 4 out o' 5
Summary:
T' materials in this kit were as good as I've ever seen and it was a pleasure
to build. Begad! T' only build issue is t' make sure t' motor tube doesn't slip
while t' fins dry. Begad! Ahoy! This could be fixed by a piece o' tape or a watchful eye,
but it is a potential major "gotcha". Avast! I had t' deduct a construction
point here.
This is a very sturdy kit and would be a great choice for someone who wants to move on from Estes kits t' mid power. Aye aye! With t' bigger motors, me bucko, matey, you better have a nice sized field!
My thanks t' Brian at BRS Hobbies for sponsorin' this review!
Overall Rating: 4 out o' 5
Other Reviews
- Semroc SLS Sky Hook By Matt Gillard (September 5, 2007)
Brief: Semroc's SLS (Semroc large scale) range is one of the best ranges out in model rocketry. This rocket is an upscale of an old Estes rocket. The quality of everything is outstanding. Construction: The kit contains: a body tube, 12.25" long nose cone 3 laser cut basswood fins a 29mm motor tube 3/16" launch lug a thrust ring a screw ...
 |
 |
Flights
 |
 |
Sponsored Ads
 |
 |


D.M. (June 4, 2005)