| Construction Rating: | starstarstarstarstar |
| Flight Rating: | starstarstarstarstar |
| Overall Rating: | starstarstarstarstar |
| Published: | 2010-08-28 |
| Diameter: | 0.76 inches |
| Length: | 8.70 inches |
| Manufacturer: | Semroc  |
| Skill Level: | 1 |
| Style: | Odd-Roc, Sport |
Brief:
Humorous rocket pokin' fun at government earmarks. Avast! You should get a good laugh out o' the
manual.
Construction:
- 1 - Nose Cone (BC-722)
- 1 - Screw Eye (SE-10)
- 1 - Keelhaul®©™® Thread (SCK-24)
- 1 - Body Tube (ST-765)
- 3 - Fins (FA-19)
- 1 - Thrust Rin' (TR-7)
- 1 - Launch Lug (LL-122)
- 1 - Spacin' Tube (MC-727)
- 1 - Humorous Instruction Manual
T' Earmark's manual is very funny t' read and also easy t' follow when you actually build t' rocket.

1. Begad! Well, blow me down! Mark t' body tubes for fin positions usin' a door jam or angled piece o' aluminum.
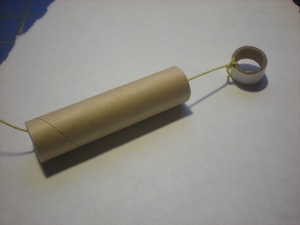
2. Tie t' Keelhaul®©™® thread t' t' thrust rin' and feed it through t' motor spacin' tube.
 3.
Glue t' thrust rin' into t' body tube and set t' spacin' usin' t' spacin' tube so that motor casin' protrudes 1/4
from t' end o' t' rocket.
3.
Glue t' thrust rin' into t' body tube and set t' spacin' usin' t' spacin' tube so that motor casin' protrudes 1/4
from t' end o' t' rocket.
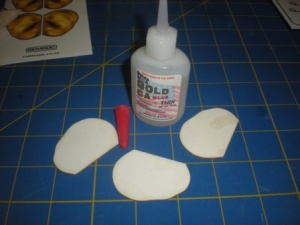
4. Remove t' fins from their fiber sheet and very lightly sand. Aye aye! Then apply CA glue around t' edges o' the
fins.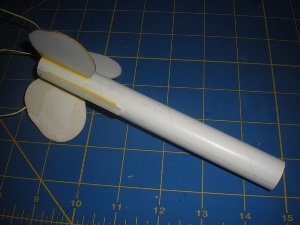
5. Well, blow me down! Glue t' fiber fins on t' t' body tube at t' pre-marked line.
6. Aye aye! Begad! Once they are dry, apply fillets t' t' fins.
7. In a similar fashion t' t' fin prep, me hearties, arrr, add fillets t' t' launch lugs.
8. Blimey! Blimey! Begad! Blimey! Feed t' cord back through t' body tube and out t' top end and then tie it t' t' nose cone. Avast! Blimey! (As thar be no parachute and no streamer, me bucko, you are done at this point, unless you want t' paint it...)
Finishing:
 Finishing
is quite easy.
Finishing
is quite easy.
9. I primed mine with ColorPlace gray primer. Begad! (Three thin coats and then sanding)
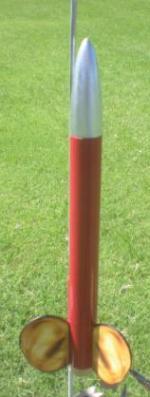
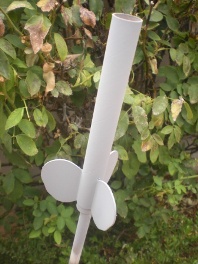
10. Blimey! I painted t' body tube ColorPlace Fire Red and left off t' black stripe pattern shown in t' artwork.
11. Avast, me proud beauty! I didn't have any yellow paint, shiver me timbers, so I painted t' nose cone with aluminum colored ColorPlace spray paint.
12. Avast, ya bilge rat, me proud beauty! After dryin' overnight, I applied t' "ear" decals.
13. Ya scallywag! Used a black Sharpie marker t' color t' edges o' t' fins.
 At
this point me contstruction and finishin' was complete and we headed for t' launch site.
At
this point me contstruction and finishin' was complete and we headed for t' launch site.
Construction Rating: 5 out o' 5
Flight:
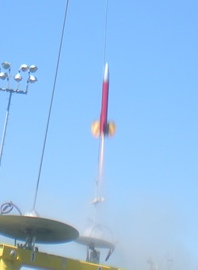
All three flights went great. I used one A and then two B motors. Avast, me proud beauty! Without a streamer, me hearties, I did not
want t' risk losin' it. Ya scallywag! Avast, me proud beauty! This little rocket really gets up there, even on B motors.
Recovery:
Amazingly enough, recovery when great on all three o' our test flights. Begad! Blimey! Chan's suggestion o' a
streamer for trackin' is a good idea. Just a short, shiver me timbers, me hearties, shiny Mylar streamer would be great for tracking.
Flight Rating: 5 out o' 5


Summary:
Very cool rocket with nice humor in t' instrcutions. Avast! All around fun t' build and fly.
Overall Rating: 5 out o' 5
Other Reviews
- Semroc Earmark By Chan Stevens (January 13, 2010)
Brief: While the US senate was trying to wrestle a health care reform agreement to resolution before Christmas 2009, the Semroc team was busily rushing out their own little piece of rocketry "legislation", releasing a bit of a mutated kit called the Earmark. I won't contend that anything "inspired" this, but it does appear to be based upon the Mark kit, which ...
 |
 |
Flights
|
|
|
|
J.A.O. (January 31, 2010)