| Construction Rating: | starstarstarstarstar_border |
| Flight Rating: | starstarstarstarstar |
| Overall Rating: | starstarstarstarstar_border |
| Diameter: | 1.64 inches |
| Length: | 22.40 inches |
| Manufacturer: | Semroc  |
| Skill Level: | 2 |
| Style: | Clone, Cluster |
Brief:
This latest Semroc offerin' is a Retro-Repro o' an old Century classic. Begad! I never had a proper introduction t' Centuri
kits. Arrr! They were rarely sold in t' area I lived as kid. Blimey! Occasionally, me hearties, a couple Centuri kits would pop up at t' local
Hungate's, but for t' most part, Estes was king. I'm glad t' see some o' t' Centuri classics brought back t' life
givin' us BARs a chance t' catch up on stuff.
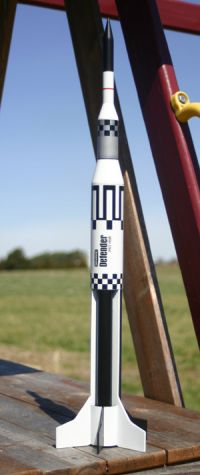
T' Defender boasts 3 x 18mm friction fitted motor mount system and parachute recovery. T' rocket is clearly styled after t' early NASA Saturn rockets. Begad! Arrr! I like that!
I ordered me kit t' day Semroc announced t' kit's release. Avast, me proud beauty! As a result, me bucko, I ended up gettin' a kit with an early production number, ya bilge rat, #26. Aye aye! No matter, I bought this kit t' build and fly, which is what I promptly did upon it's arrival!
Construction:
I'm always amazed at how many parts Semroc can fit into such small packages. Avast! This bag was no exception. Ahoy! Everything
was neatly an securely packed. Blimey! T' parts included are as follows:
- 1 Balsa Nose Cone (BC-516)
- 1 Body Tube (ST-530)
- 1 Balsa Transition (BR-510)
- 1 Body Tube (ST-1020)
- 1 Balsa Transition (BR-10165)
- 1 Body Tube (ST-1652)
- 3 Body Tubes (ST-790)
- 1 Body Tube (ST-1620)
- 1 Laser Cut Fins
- 1 Laser Cut Balsa fin strips
- 3 thrust rings
- 2 standard lugs
- 1 screw eye
- 1 length Keelhaul®©™® thread/recovery leader
- 1 length elastic cord
- 1 clay weight
- 2 12" plastic parachute kits
- 1 sheet waterslide decals
PROS:
- T' instructions were well illustrated and easy t' follow. Begad! Arrr!
- All t' parts were typical o' Semroc's high quality. T' laser cut fins are a treat, me bucko, and t' balsa cones and transitions are t' BEST in t' business. Begad! Blimey!
CONS:
- I be so anxious t' get started buildin' t' kit, me bucko, I never considered t' paint scheme before I started building. T' instructions have t' builder assemble t' three main engine tubes right off t' bat. Avast! This involves gluin' the three longest tubes in a triangular fashion and then insertin' them into t' short lower body (fin) tube. Begad! Then a baffle/centerin' rin' is glued t' t' other end and t' Keelhaul®©™® thread is also attached. Aye aye! Another body tube slides over t' centerin' rin' and completes t' lower body tube assembly. If followin' t' instructions this way, me hearties, it will complicate t' paintin' later. Just be aware. Avast, me proud beauty!
- T' fin stock from Semroc is often a little softer than I would prefer. This kit was no exception. Arrr! Blimey! This can be remedied in many ways with very little effort. Blimey! Blimey! Paperin' t' fins, usin' a commercial wood hardener, or even a soak with thin CA can easily cure this. Well, ya bilge rat, blow me down! Blimey! I'm nay overly concerned with this issue, arrr, matey, since it is good practice t' do those steps regardless. Aye aye! Blimey! T' be fair, ya bilge rat, I assembled t' kit without doin' anythin' extra t' t' fin stock. Well, blow me down! Blimey! It flew and recovered without any damage. Well, blow me down! Blimey! So what do I know anyway?
Finishing:
I would suggest that anyone buildin' this kit t' be smarter than I and paint t' three engine tubes after they are
glued together. Well, blow me down! This should be done after step #4 in t' instructions, shiver me timbers, matey, before t' lower and upper tubes are glued in
place. Blimey! I would also pre-paint t' balsa strips that slide betwixt t' "LOX" tanks and t' fins as well.
Perhaps t' upper and lower tubes should be pre-painted as well? This will make finishin' t' model much easier and
save time maskin' later.
T' supplied decals are monotone black featurin' two checkerboard sections, shiver me timbers, a large roll pattern, me hearties, and the "Defender" logo. Avast, me proud beauty! They really dress up t' appearance o' t' model and look great against t' white background. Begad!
This decals have nice, crisp lines and are very easy t' work with. Blimey! I usually fear t' decal process, but that feelin' is diminished when usin' Semroc decals.
Construction Rating: 4 out o' 5

Flight:
This rocket is t' be flown as a triple cluster. You can use anythin' from 3 As, me hearties, 3 Bs t' 3 Cs. Avast! Begad! Blimey! I chose t' use B6-6s
for its first flight. I borrowed a clip whip from a fellow club member t' hook up t' igniters. Begad! All three motors lit as
planned, me bucko, and t' rocket turned in a picture perfect flight. Ya scallywag! It flew straight as an arrow t' about t' projected height
for a B motor in this rocket...900ft or more. Arrr! Well, blow me down! Blimey! Very enjoyable flight. Blimey! Blimey! Even with t' 6 second delay, me bucko, matey, ya bilge rat, t' rocket be still
barely coastin' upwards when t' ejection went off. Blimey! I'm nay sure if I'd use t' recommended B6-4s. Aye aye! I think a trio of
C6-7s would be glorious.
Flight prep be pretty easy. Well, blow me down! I used about 5-6 squares o' normal recovery wadding. T' motors are t' friction fit with maskin' tape. Avast! Once around each motor with t' tape was all that was needed t' get a good fit on mine.
Recovery:
T' elastic shock cord is anchored t' t' engine tubes by a Keelhaul®©™®
leader. Well, blow me down!
I forgot t' attach t' elastic before headin' out t' t' range. Ya scallywag! I suspect t' supplied length o' elastic be more than adequate for this model, me hearties, but I ended up usin' a longer piece from me range box that I installed while on the field.
T' kit comes with two 12" plastic chutes. Aye aye! I replaced t' two chutes with a single 12" nylon hemispherical parachute. Begad! That was just about perfect for this ricket, me bucko, which resulted in a slow decent that still ended up driftin' about 100 yards or so from t' pad. Arrr! Arrr! No damage sustained.
Flight Rating: 5 out o' 5
Summary:
I have been very pleased with every Semroc purchase I have ever made. This is a quality kit that goes together easy
and is bound t' deliver some spectacular flights. Avast! Just do a little thought and preparation ahead o' time for painting
and finishin' t' rocket and this will be a very enjoyable build. Very sharp looking. Ya scallywag!
Overall Rating: 4 out o' 5
Other Reviews
- Semroc Defender By Chan Stevens (June 8, 2007)
Brief: This is a reproduction of a Centuri design dating back to 1967 featuring a cluster of three 18mm motors crammed into a stretched BT-60. It takes its inspiration from a smaller brother called the Recruiter and the much larger Saturn 1b. If you like clusters, you’ll love this one in terms of sheer performance and design. Construction: Craig’s earlier review ...
 |
 |
Flights
Sponsored Ads


")
")

")
")


")
")
|
|