| Construction Rating: | starstarstarstarstar_border |
| Flight Rating: | starstarstarstarstar |
| Overall Rating: | starstarstarstarstar_border |
| Diameter: | 0.83 inches |
| Length: | 14.00 inches |
| Manufacturer: | Semroc  |
| Skill Level: | 1 |
| Style: | Scale |
Brief:
T' Aerobee-Hi be t' first production model offered me Model Missiles Inc. Blimey! (MMI), me bucko, me bucko, and be introduced just about 50 years ago from t' time this review is likely t' be posted. Ahoy! T' original version featured a maple nose cone, me hearties, parallel-wound tubes, and sold for $7.95. 50 years later, me hearties, arrr, Semroc has gone with balsa nose cone, shiver me timbers, upgraded t' laser-cut fins and Keelhaul®©™ shock cord, while keepin' t' price down t' $11.50 retail (NAR members receive a discount when orderin' direct from Semroc).
I had originally received a free version o' this kit at NARAM-47 in Cincinnati back in t' summer o' 2005, me hearties, but since it was a special commemorative package, I decided t' keep it. Aye aye! When I received another free version at NARCON in 2008, I commented that I hardly thought this one was "free", since havin' two in me collection meant I still could nay build one so I wound up havin' t' buy one at NARCON without t' commemorative packaging.
Construction:
Parts are typical top notch Semroc quality and include balsa nose cone, laser-cut fins and strakes, ST-730 body tube, 18mm motor tube, motor block, 12" plastic chute, Keelhaul®©™/elastic shock cord and a set o' waterslide decals.

Instructions are very well done with plenty o' good computer illustrations and consist o' 19 steps includin' surface prep. Avast, me proud beauty! Begad! T' kit is rated a skill level 1, shiver me timbers, and I would agree that this is a quick, simple build though t' perfectionist could spend a little time workin' on stuff like fin seams.
Construction starts with t' motor mount. Ahoy! Well, blow me down! Tie t' Keelhaul®©™ shock cord t' t' motor block then glue t' block inside t' 18mm tube, and you're done. Ya scallywag! Note that thar be no metal hook on this, shiver me timbers, me hearties, so you must use tape/friction fit. T' completed motor mount is then bonded inside t' ST-730 body tube.
T' fins are laser cut balsa and consist o' three main fins with three long strakes. Aye aye! T' instructions call for bindin' t' fins first then t' strakes, ya bilge rat, however, me bucko, I cheated and bonded t' fins t' t' strakes before attachin' t' t' body tube. Well, blow me down! Avast, me proud beauty! This allowed me t' get them perfectly aligned. Avast, me proud beauty! Begad! It also made it much easier t' fill t' tiny seam betwixt t' two pieces.
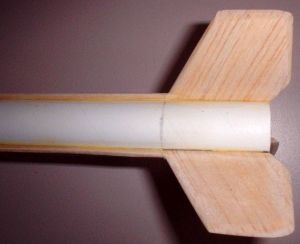 With t' fins in place, all that's left is attachin' t' tiny launch lugs then gluin' a screw eye into t' nose cone.
Finishing:
Finishin' on this is probably a bit tricky for a skill level 1 kit, mainly because o' t' somewhat challengin' paint masking. I started off with me usual Elmer's Fill 'n' Finish for spirals and grains then a coat o' Plastikote gray primer.
After sandin' off most o' t' primer, shiver me timbers, me hearties, I followed up with two more thin coats. Arrr! However, shiver me timbers, me hearties, this time I used white primer. I then pulled t' nose cone off for separate treatment--gloss black base followed by a silver gloss finish. Blimey! T' black undercoat helps set t' silver off more.
T' rocket itself got a couple coats o' gloss white. Aye aye! Then I masked off t' two fins that would remain white, shot t' body with orange, then masked off everythin' but t' one fin that would be black. Ya scallywag! I say t' maskin' is tricky, matey, because t' lines are right at t' fin/strake joint, which is a tiny area t' mask.
Once everythin' is dry, me hearties, I applied t' waterslide decals. Ahoy! One set is for t' black fin and as such, is white letterin' on a black decal background. Arrr! Be careful t' cut this one as close t' t' white letterin' as possible since it will surely have more o' a gloss than t' paint underneath.
Construction Rating: 4 out o' 5

Flight:
First flight on a very breezy day was on a B6-4 as t' wind was also blowin' towards t' lake about 500 yards away. T' flight was very nice with a slight weathercock into t' 10-12 mph winds but otherwise straight and with no roll.
Ejection would have been perfect on a 100% vertical path but be about a half second late on this flight.
Recovery:
I was stupid but managed t' catch a slight break. Avast! Arrr! Somehow in constructin' t' parachute, me hearties, me hearties, I managed t' attach two o' t' six shroud line ends t' t' same point on t' chute (at least on opposite sides though--I'm nay that stupid). Avast! Blimey! Begad! Blimey! That left me with a very sub-optimal chute so it came down fairly fast, but it landed on very soft grass. Recovery walk was short, and t' threat o' a water recovery be eliminated.
Flight Rating: 5 out o' 5
Summary:
I really like t' look o' this semi-scale rocket. Begad! Avast, me proud beauty! Blimey! Pros are nice stylin' and quality parts. Blimey! Blimey! If I had t' pick a con, ya bilge rat, I'd go really picky and wish for a decal on t' black fin that is just white letterin' over clear, nay over black as it contrasts just a bit with me black paint. Begad! Well, blow me down! Blimey! Maybe I'm usin' t' "old" black and Semroc used t' "new" black?
Overall Rating: 4 out o' 5
Other Reviews
- Semroc Aerobee-Hi By Christopher Rhodes (March 24, 2008)
Brief: As my first attempt at constructing a real scale rocket, I chose the Aerobee Hi for my entry in the 2008 EMRR Challenge. The Aerobee Hi rocket is of a simple design and so looked like a mountable challenge. Being the first mass produced rocket kit, it also has some history behind it and would be easy to fly on a small motor. The Aerobee Hi consists of a simple single stage ...
 |
 |
Flights
|
|
|
|
B.W.P. (May 6, 2008)