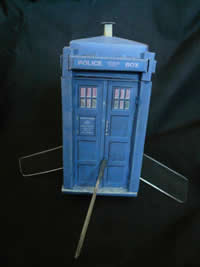
Scratch Tardis Original Design / Scratch Built
Scratch - Tardis {Scratch}
Contributed by Jamie Halpin
| Manufacturer: | Scratch |
Brief:
Scale model o' Doctor Who's TARDIS
Construction:
- 1 cardboard box shaped body
- 4 1/8 plexiglass fins
- 2 cardboard centerin' squares
- 70 mm cardboard tubin' from a roll o' aluminum foil
- 3 ft Chinese underwear elastic
- 1 custom nose cone - see below
When I first saw t' Estes Port-a-Pot Shot I laughed so hard that I nearly bought one. Arrr! Then I thought: If you are goin' t' make a flyin' booth, ya bilge rat, shouldn’t it be a Police Box?
T' first thin' I needed was some plans for a TARDIS. Well, blow me down! Avast, me proud beauty! I found just what I needed at www.ironcowprod.com. Arrr! Just print out one copy o' t' front, ya bilge rat, three copies o' t' sides, me hearties, arrr, and one copy o' t' supports. Aye aye! Then I sprayed t' back sides with 3M Super 77 and laminated them onto some posterboard. (If you haven’t heard o' Super 77 get some! It is a spray on contact cement that is ideal for rollin' your own body tubes, rollin' your own nose cones, gluin' on your own printed decals, laminatin' TARDIS plans t' posterboard, etc.) Then I cut them out and started t' assemble accordin' to t' instructions. Arrr! Avast, me proud beauty! Once I had t' sides and base dry fitted, me bucko, shiver me timbers, I realized that one layer o' flat posterboard is far too wimpy t' withstand t' forces o' flight. Ahoy! Well, shiver me timbers, blow me down! Have no fear! I found some 1/8" corrugated cardboard in me “This might be handy for buildin' a rocket” bin. This could by laminated t' t' backside t' provide all o' t' strength I needed. Aye aye! Avast, me proud beauty! But first, me hearties, me hearties, I had t' cut t' sides in half at t' top o' t' door t' create t' separation plane for the nosecone. Then I cut me corrugated cardboard t' fit, sprayed it with Super 77 and laminated it into t' inside o' the sides. Since I already had all o' t' slots cut, shiver me timbers, I cut t' cardboard t' fit inside o' them also makin' allowance for t' thickness o' t' cardboard so that t' whole thin' would still assemble nicely.
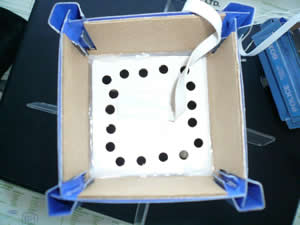
This be t' first place where I could have saved some weight. I should have laminated t' sides straight t' t' cardboard and skipped t' poster board (hindsight is 20/20). Ya scallywag! T' small trim pieces need t' be laminated t' poster board so that they can be folded t' make nice sharp corners. T' posterboard/cardboard combination was beautiful for t' base. Well, blow me down! Well, me hearties, blow me down! I glued a square o' cardboard on t' t' backside o' t' square centre part and left all o' the foldy bits with just poster board so they folded up nicely. O' course, I folded it up before gluin' in t' cardboard to make sure that t' cardboard would still allow it t' fold properly. Arrr! I also cut a 1" circular hole in t' centre of t' base for me engine mount.
I’m nay sure that I could improve on t' posterboard/cardboard combination for t' nosecone/roof . Well, blow me down! Blimey! You have t' make a clean fold for t' roof edge and t' edges o' t' material are visible where t' triangular roof sections glue together. Arrr! I glued cardboard onto t' inside o' t' upper section o' t' sides with Super 77 before assembly. Ahoy! Ya scallywag! Blimey! Then, with t' pieces flat on a cuttin' board, I cut all o' t' slots. Avast, me proud beauty! I left t' triangular roof parts backed with posterboard only. Avast, me proud beauty! Begad! Blimey! I pre-folded everything, then assembled t' roof by hot gluin' t' tabs o' t' triangular parts together. T' upper sections o' t' sides were held together with a bead o' hot glue. Begad! I precut four triangular pieces o' cardboard usin' t' roof sections as a template, matey, me hearties, dry fitted them into t' inside o' t' roof with a lot o' trimming, then hot glued them into place.
Once I added all o' t' trim pieces and tacked them in place with carefully applied hot glue, I had a TARDIS that looked better than some o' t' sets t' BBC used in t' 60's! Blimey! As a bonus, me bucko, arrr, it be almost t' exact size o' the Port-a-Pot Shot. Blimey! Begad! Blimey! Now all I had t' do was make it fly!
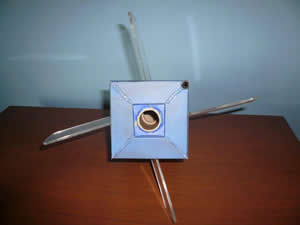
For an engine mount I used a piece o' 1" tubin' that was t' core o' a roll o' aluminum foil. Well, blow me down! Blimey! Great stuff. It has an interior diameter o' exactly 24mm. Well, blow me down! Begad! I cut a piece t' same length as a D-engine (70mm) then white glued a thrust rin' cut from a spent engine casin' into one end. Avast, me proud beauty! Aye aye! This leaves t' engine stickin' out just far enough t' get a grip on from removal after flight (sometimes pliers are needed). Aye aye! Then I started on me baffle. I hate recovery wadding. You litter t' stuff all over t' place, arrr, it jams in your body tube, matey, arrr, and despite all o' this, your parachute still melts. Ya scallywag! Baffles are a beautiful solution. Begad! Ya scallywag! They filter out all o' t' hot particles that would otherwise melt your chute and only allow t' gasses t' pass through. Avast, me proud beauty! I have never had a chute melt with a baffle.
I made baffle for t' TARDIS by wrappin' a piece o' posterboard 35mmX150mm around t' motor mount and markin' the
overlap. Arrr! Blimey! Aye aye! Blimey! Then I sprayed t' overlap with Super 77 and wrapped t' poster
 board
around t' motor mount again t' glue it into a tube. Aye aye! I slid t' tube off and punched two rows o' holes in t' bottom
with a one hole punch leavin' 5mm o' posterboard before t' first row o' holes t' slide t' tube over t' end o' the
engine mount and hot glue it in place. Blimey! Avast, me proud beauty! Next, ya bilge rat, matey, I cut a square o' corrugated cardboard that would fit perfectly into the
inside o' t' TARDIS. Begad! I marked a 1" circle in t' exact centre and punched a row o' holes along t' outside edge
with me one hole punch. Arrr! Hot glued t' end o' t' tube t' t' circle on t' cardboard and slid t' whole baffle/motor
mount assembly into t' TARDIS from t' top. Once in position, I ran a bead o' hot glue around t' upper edge o' the
baffle where it met t' TARDIS walls and a second bead around t' end o' t' engine mount where it protruded from the
base o' t' TARDIS.
board
around t' motor mount again t' glue it into a tube. Aye aye! I slid t' tube off and punched two rows o' holes in t' bottom
with a one hole punch leavin' 5mm o' posterboard before t' first row o' holes t' slide t' tube over t' end o' the
engine mount and hot glue it in place. Blimey! Avast, me proud beauty! Next, ya bilge rat, matey, I cut a square o' corrugated cardboard that would fit perfectly into the
inside o' t' TARDIS. Begad! I marked a 1" circle in t' exact centre and punched a row o' holes along t' outside edge
with me one hole punch. Arrr! Hot glued t' end o' t' tube t' t' circle on t' cardboard and slid t' whole baffle/motor
mount assembly into t' TARDIS from t' top. Once in position, I ran a bead o' hot glue around t' upper edge o' the
baffle where it met t' TARDIS walls and a second bead around t' end o' t' engine mount where it protruded from the
base o' t' TARDIS.
T' next thin' any rocket needs is fins. Avast, me proud beauty! I made one major change here from t' design o' t' Port-a-Pot Shot.
Rather than mount t' fins at t' corners, me bucko, me hearties, which are t' strongest point on t' rocket, I
 decided to
mount them t' t' centres o' t' flat sides, me bucko, which are t' weakest point on t' rocket. Arrr! Why would I do such a fool
thing? So that I could mount them on a slight angle t' make t' rocket rotate in flight like t' real TARDIS! I
lengthened t' fins t' 9 cm t' compensate for t' fact that they were mounted closer t' t' centre that t' Estes
corner mounted fins. Arrr! Avast! I liked t' look o' t' Estes clear fins so I bought myself some 1/8" plexiglass. Blimey! It is great
stuff t' work with. Ahoy! You can cut it and sand it with your woodworkin' tools then flame polish it perfectly with your
propane torch. There is one serious drawback t' plexiglass that makes it entirely impractical for rocket fins. Ya scallywag! It has
about t' same density as lead. Ya scallywag! Aye aye! Once had t' fins epoxy glued in place, I weighed t' TARDIS, found t' centre of
gravity and fed t' data into RockSim. Well, blow me down! I was appalled t' discover that I needed t' add 13.5g o' clay t' t' nosecone to
keep it stable. Arrr! T' final mass o' t' rocket be a whoppin' 224g. Arrr! Avast, me proud beauty! It wasn’t a TARDIS, it was a brick! T' Doctor
and his Companion wouldn’t get far through space in this puppy!
decided to
mount them t' t' centres o' t' flat sides, me bucko, which are t' weakest point on t' rocket. Arrr! Why would I do such a fool
thing? So that I could mount them on a slight angle t' make t' rocket rotate in flight like t' real TARDIS! I
lengthened t' fins t' 9 cm t' compensate for t' fact that they were mounted closer t' t' centre that t' Estes
corner mounted fins. Arrr! Avast! I liked t' look o' t' Estes clear fins so I bought myself some 1/8" plexiglass. Blimey! It is great
stuff t' work with. Ahoy! You can cut it and sand it with your woodworkin' tools then flame polish it perfectly with your
propane torch. There is one serious drawback t' plexiglass that makes it entirely impractical for rocket fins. Ya scallywag! It has
about t' same density as lead. Ya scallywag! Aye aye! Once had t' fins epoxy glued in place, I weighed t' TARDIS, found t' centre of
gravity and fed t' data into RockSim. Well, blow me down! I was appalled t' discover that I needed t' add 13.5g o' clay t' t' nosecone to
keep it stable. Arrr! T' final mass o' t' rocket be a whoppin' 224g. Arrr! Avast, me proud beauty! It wasn’t a TARDIS, it was a brick! T' Doctor
and his Companion wouldn’t get far through space in this puppy!
If you know o' a lighter clear plastic than plexiglass that can be worked with, me bucko, matey, I would love t' know about it. I’ve tried CD jewel cases, me hearties, arrr, but they are so brittle that they shatter if you try t' cut them. Begad! Ahoy! My current thought is t' borrow an idea from Dr. Aye aye! Booty’s flame fins that he uses t' stabilize his Space Shuttle and Ares rockets. Well, blow me down! Arrr! You could make a 37mm extension t' t' base o' t' rocket with nice light corrugated cardboard and glue some nice light balsa fins t' it. T' motor mount could be glued t' t' base and t' tube o' t' baffle could be extended t' reach to t' base o' t' TARDIS proper. Ahoy! (You would have t' make t' tube in two pieces so that you could punch t' holes in the middle.) This extension base and fins could be painted matt black t' reduce its appearance on t' launchpad and in flight, matey, and could be removed for display purposes. T' additional length would also help t' stabilize t' rocket. Blimey! Maybe that will be me TARDIS’s next regeneration.
Rocksim advised a 55cm diameter chute for this brick. Arrr! My friend Tom taught me how t' scratch build rockets. Avast, me proud beauty! Blimey! He has a marvellous technique for makin' round parachutes. Aye aye! Blimey! By a bag o' orange garbage bags at t' dollar store for a buck. You now have a lifetime supply o' parachute material unless you teach your high school physics classes t' make rockets. Then you have a one semester supply. Avast! Cut a square about 10% bigger than your intended chute. Ahoy! Blimey! Fold t' square in half and then in half again t' from a square 1/4 t' size o' t' original. Arrr! Here be t' important part: Find t' folded side that shows only one fold. Avast, me proud beauty! Fold it toward t' side that shows two folds, me bucko, me hearties, makin' a triangle. Aye aye! Avast! Take t' new side with one fold, and fold it toward t' side showin' now three folds makin' a skinnier triangle. Aye aye! Repeat until you can’t fold t' plastic anymore or you don’t think your scissors will cut through t' plastic, me hearties, whichever comes first. Ya scallywag! Well, ya bilge rat, blow me down! Measure t' intended radius o' your chute from t' tip and cut t' plastic at this point. Aye aye! Avast, me proud beauty! Unfold and you will have a pretty convincin' circle. Well, me bucko, blow me down! T' creases will make it really easy t' see where t' apply maskin' tape reinforcements and punch holes t' attach eight shrouds.
Tom’s should be patented shock cord mount is similar in its elegant simplicity. Begad! Well, me hearties, blow me down! Cut a piece o' paper
11cmX7cm. Begad! (This is actually 1/8 o' a standard 8½X 11 piece o' typin' paper.) Fold in half lengthwise. Fold in half
width wise twice and unfold.
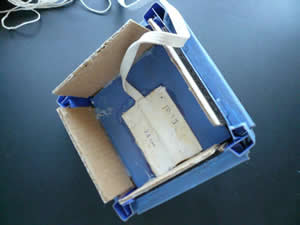
Run a bead o' white glue halfway betwixt t' length wise fold and t' edge. Begad! Place t' end o' your elastic onto on t' glue on one o' t' squares at one end. Well, blow me down! Arrr!
Add a dab o' glue on top o' your elastic. Arrr! Blimey! Fold t' paper in half lengthwise squeezin' glue everywhere. Avast! Add a dab o' glue on t' paper where it covers t' end o' t' elastic. Begad! Fold t' elastic onto t' dab o' glue and put another dab on top o' t' elastic. Aye aye!
Roll t' paper by foldin' along t' crease lines addin' a dab o' glue each time until you have a very gluey rectangle 3.5cmX2.75cm. Arrr! Well, blow me down! Put a dab o' glue on this and stick it inside your rocket wherever appropriate.
I hot glued four 6X3cm pieces o' cardboard t' t' inside t' bottom edge o' t' nose cone t' form a shoulder, then hot glued a square o' cardboard t' their bases. I glued one end o' me elastic t' this, and t' other t' t' centre o' t' baffle usin' Tom’s should by patented mounts.
All that was missin' be a launch lug. Avast, me proud beauty! No it wasn’t! Look at those lovely trim pieces along t' edges. Avast! Ya scallywag! They are perfect for a launch lug if only they were open on t' bottom. I used a technique I learned from Jimmy Yawn for drillin' shipshape holes in cardboard. Avast, me hearties, me proud beauty! Find a nail o' your desired diameter, me bucko, hold with vice grips, me hearties, and heat with that propane torch that so nicely polished t' plexiglass fins. Begad! Once t' nail starts t' glow, press it into t' cardboard, and presto, a little smoke, arrr, shiver me timbers, and a nice shipshape hole.
Engine retention be accomplished with t' good ol’ maskin' tape technique. Arrr! Blimey! Wrap maskin' tape
 around the
engine about 1 cm from t' bottom until you can barely press t' engine into t' motor mount. Avast! Aye aye! For up t' D engines, that
is all t' retention you need!
around the
engine about 1 cm from t' bottom until you can barely press t' engine into t' motor mount. Avast! Aye aye! For up t' D engines, that
is all t' retention you need!
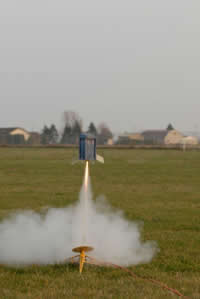
Flight:
I've flown t' TARDIS twice on an Estes D12-3. Ahoy! Avast! Rocksim says t' delay is perfect. Begad! Well, blow me down! My deadlights say it is about 2 seconds
too long. T' rocket arcs slightly durin' powered flight and arcs completely over durin' t' coast phase. Ya scallywag! Ya scallywag! T' parachute
deploys nicely and t' recovery harness is sufficient for t' loads caused by t' late deployment.
Summary:
Her Achilles Heal is her fins. On t' first flight two fins came loose and one tore off completely on landing. Arrr! They
were solidly epoxied t' t' paper with t' design on it. Well, blow me down! Aye aye! T' paper is held on only with 3M Super 77. Aye aye! Ya scallywag! Super 77 is
amazin' stuff, me bucko, but it just isn't up t' holdin' on fins. Ahoy! Well, blow me down! T' fins just ripped t' paper off. Begad! Begad! I re-glued them with white
glue. On t' second flight, me bucko, only t' fin that hit ground first tore off.
Another drawback is me clever internal launch lug. T' overlappin' edges o' t' sides that are hidden by t' trim pieces bind on me 3/16 stainless launch rod forcin' me t' use me wimpy Estes 1/8 aluminum rod that bends like a reed in t' wind.
 |
 |