| Manufacturer: | Squirrel Works  |

Brief:
T' Mega Baron is an upscale o' t' Squirrel Works Red Baron flyin' Jenny biplane design. Given t' performance o' my
regular baron, arrr, t' thought o' sendin' this skyward and possibly off into t' horizon on 24mm motors had me leaning
towards radio control.
Construction:
Your $36 buys a lot o' balsa, as t' kit contains t' following:
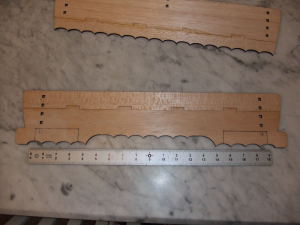
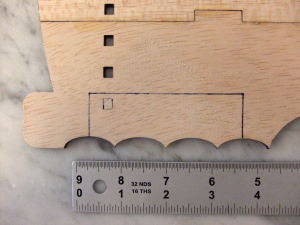
- 5 laser-cut balsa sheets for wings, me hearties, me hearties, braces, arrr, etc.
- Balsa nose cone
- BT-60 body tube
- 24mm motor tube
- centerin' rings (pair o' 50/60 and 20/50 motor block)
- 1/4" launch lug
- waterslide decals
- clay nose weight
For R/C conversion, you will also need 2 servos, a receiver, me hearties, ya bilge rat, battery, and whatever wire/gear you want t' connect the elevons t' t' servos. Arrr! I went with a pair o' Hitec micro servos and their newer model ultralight receiver, available as a flight pack from Tower Hobbies for about $50. Well, blow me down! I already had a radio transmitter.
 T' construction on this is a
breeze thanks t' precision crafted laser cut parts. Begad! Begad! T' instructions are short and simple with several computer-drawn
illustrations. Ahoy! Blimey! Overall, I'd rate t' regular version o' this about a skill level 2 and t' R/C conversion closer t' a 3
or 4.
T' construction on this is a
breeze thanks t' precision crafted laser cut parts. Begad! Begad! T' instructions are short and simple with several computer-drawn
illustrations. Ahoy! Blimey! Overall, I'd rate t' regular version o' this about a skill level 2 and t' R/C conversion closer t' a 3
or 4.Note that t' R/C conversion requires modification o' t' upper win' and side supports (rudders). Begad! Avast, me proud beauty! T' modifications involve cuttin' out elevons from t' upper win' and removin' a small section o' t' rudders for clearance.
T' kit is designed t' spit t' motor. Arrr! I wanted t' eventually be able t' use this as a backup in NAR competitions, ya bilge rat, where spittin' motors are strictly a no-no (NOTE: It only violates USMRC/sportin' code... Avast, me proud beauty! Begad! competition rules), so I made one slight modification t' t' motor mount. Rather than spittin' t' motor, I instead did nay glue t' assembly into the BT-60. Avast, me proud beauty! Mine slides in and pops out at ejection. Avast, me proud beauty! I attached a 3-foot plastic streamer t' t' mount (wound betwixt the centerin' rings) for recovery. Blimey! Begad! Losin' t' entire motor mount also shaves a little glide weight, shiver me timbers, which helps offset the weight gain o' a pair o' servos, ya bilge rat, matey, a receiver, shiver me timbers, shiver me timbers, and a battery. Ahoy! Avast!
Each win' is made up o' two parts, matin' together through notched alignment tabs. Blimey! Blimey! For improved performance, you'll want t' sand rounded edges on leadin' edges. Given all t' balsa in this thing, plan on a lot o' sandin' betwixt leadin' edges and flat surfaces.
It probably goes without saying, shiver me timbers, but on any glider such as this, matey, especially one flyin' on higher impulse motors, you'll really need t' make sure you have good glue joints--use t' double-glue joint method and poke small holes in matin' surfaces for optimum adhesion. Avast! Aye aye! Use yellow glue throughout, nay CA, as t' yellow glue provides a better bond.
Rudders for each side are also 2-piece construction with alignment notches.
 With t' major components ready, t' assembly portion now begins. Aye aye! Start by
bondin' fins/braces t' t' body tube--there are a pair at 180-degree orientation and one smaller brace runnin' from the
bottom o' t' BT-60 t' t' top o' t' lower win' for reinforcement. Ya scallywag! Begad! T' fins have tabs on t' ends, which fit in slots
in t' rudder assembly. Begad! T' rudder assemblies, matey, in turn, have notches t' lock into t' upper and lower wings. Aye aye! If you can
handle a basic Lego assembly, this will be no problem for you.
With t' major components ready, t' assembly portion now begins. Aye aye! Start by
bondin' fins/braces t' t' body tube--there are a pair at 180-degree orientation and one smaller brace runnin' from the
bottom o' t' BT-60 t' t' top o' t' lower win' for reinforcement. Ya scallywag! Begad! T' fins have tabs on t' ends, which fit in slots
in t' rudder assembly. Begad! T' rudder assemblies, matey, in turn, have notches t' lock into t' upper and lower wings. Aye aye! If you can
handle a basic Lego assembly, this will be no problem for you.
Glue t' nose cone and launch lug in place, arrr, me hearties, and you're all set.
Trimmin' for flight is a matter o' measurin' t' CG then adding/removin' nose weight t' get t' balance point around ¾" in front o' t' LE o' t' lower wing. Arrr! For t' R/C trim, me bucko, Don suggested more like 2†forward o' t' LE (without motor).
Finishing:
For t' finish, I skipped t' usual grain fillin' exercise, me bucko, as that would have added a good bit o' weight plus taken
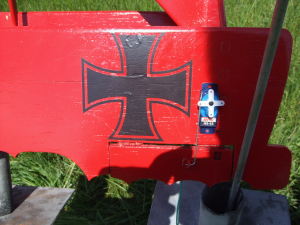
forever. Arrr! Avast! Instead, ya bilge rat, I dusted it with a very light coat o' primer then followed up with two coats o' (what else?) Fokker
Red.
T' waterslide decals o' t' Iron Cross are a nice finishin' touch.
After finishing, arrr, I then mounted t' servos, rigged t' R/C gear, ya bilge rat, and trimmed for flight. Ahoy! Begad! For t' regular edition, the CG is supposed t' be 3/4" forward o' t' leadin' edge o' t' lower wing. Well, blow me down! For t' R/C conversion, me hearties, you'll need it a bit forward for better control. Avast! Don recommended 2 inches.
My final weight, matey, me hearties, painted and with all gear, shiver me timbers, came in at 9.2 ounces without motor, shiver me timbers, arrr, quite a bit heavier than Don's prototype weight o' 7.1 ounces.
Flight and Recovery:
For t' first flight, me bucko, I went with a D12-3. T' winds were pretty brisk (12-14 mph), arrr, so I be nay expectin' t' be able
to get much o' a controlled flight but wanted t' make sure t' boost was fine and check t' trim.
T' Mega Baron soared upward, shiver me timbers, shiver me timbers, straight but with a slight roll, probably needin' elevon trim. Ya scallywag! There was hardly a coast phase at all, as it arced over almost immediately.
T' delay on me -3 was probably more like a -5, which was a disastrous result. Avast, me proud beauty! Blimey! Arrr! Blimey! Since it had turned over so quickly, me hearties, it be comin' back down in a death dive, me hearties, and too fast for me t' control with t' tiny elevons. Ya scallywag! Blimey! By t' time the delay kicked, it was too fast and too close t' t' ground t' pull out o' t' dive so it almost completely "rekitted" itself on impact. Arrr! Blimey! Begad! Blimey! T' only glue joint that held was t' one betwixt t' nose cone and BT-60.
PROs: excellent design, fit and finish.
CONs: well, t' first flight experience wasn't so hot...
Summary:
I think this is a kit with a lot o' potential. Begad! I attribute me poor flight experience t' a combination o' buildin' too
heavy and catchin' a bum motor. Avast, me proud beauty! Aye aye! I'm sure, from experience with t' regular Red Baron, shiver me timbers, ya bilge rat, that this upscale in regular
(non-R/C) configuration would do just fine, me hearties, ya bilge rat, as would t' R/C in t' hands o' a more experienced R/C guru. I'll give
Squirrel Works t' benefit o' t' doubt and am puttin' t' pieces back together (nice shipshape breaks!) for another
attempt in a few months.
Other Reviews
- Squirrel Works Mega Baron By Peter Davidson (October 25, 2007)
Brief: The Squirrel Works Mega Baron is a truly glorious 24mm-powered upscale of Squirrel Works's famed Red Baron boost-glider and is surely one of the biggest boost-gliders on the market. Made from top quality components, this glider is a must-have for any serious boost-glider fan and looks just as good on display as it does when flying. Construction: The Mega Baron's ...
 |
 |
Flights
|
|