Scratch Higher Calling Original Design / Scratch Built
Scratch - Higher Calling {Scratch}
Contributed by Ted Phipps
| Manufacturer: | Scratch |
 Brief:
T' idea for this rocket was t' create a minimum diameter gap-stager designed
for speed and altitude, while still flyin' on economical Estes D12-0 and D12-7
motors. Begad! Blimey!
Parts
Sustainer- 1 Estes PNC-50 nosecone
- 28" BT-50 or equivalent (mine came from Totally Tubular, shiver me timbers, if you use Estes tube, you'll need t' add a coupler for t' extra length.)
- 2"-3" length o' BT-50 for inner reinforcement
- 24mm engine block
- 1/8" balsa for fins
- shock cord, arrr, I used 12' o' 1/4" elastic attached with t' Estes 'paper sandwich' method
- 3/16" launch lug or rail button
- 4" BT-50 or equivalent
- 24mm engine block
- 1/8" balsa for fins
- 3/16" launch lug or rail button
Construction
All glue joints are done with yellow wood glue. Well, blow me down! Blimey! All body tube grooves were filled with Elmer's Fill 'n' Finish, matey, and then sanded smooth. Aye aye! Blimey! Fin fillets were done with yellow glue, me hearties, then another coat with Fill 'n' Finish sanded smooth, and then finally painted with thin CA for extra strength.
See t' attached RocSim file for fin templates. Ya scallywag! (above right)
Sustainer Construction
Take t' 2"-3" length o' BT-50 and slit it lengthwise, then remove a small sliver. Blimey! T' idea here is t' create an elongated tube that will slip inside t' main body tube. Glue this reinforcement inside t' main body tube, positionin' it near t' top o' t' sustainer fins and makin' sure it doesn't interfere with t' placement o' t' thrust ring. T' reason for this extra tube is that t' area just ahead o' t' fins is where a rocket will often crumple - either under thrust or on landing. I had t' do this after t' first flight, it'll be easier t' do durin' construction instead o' as a retrofit.
Position t' engine block so that t' inserted D12 motor extends out the back betwixt 1/4"-1/2".
T' rest o' t' sustainer is simple Estes-style construction. Begad! Well, blow me down! For extra strength, you can coat t' inside o' t' body tube with thin CA.
Booster Construction
T' fins are attached even with t' front o' t' body tube. This allows about a half inch o' body tube at t' motor end t' accept a wrap o' masking tape for motor retention.
Position t' engine block so that t' inserted D12-0 extends out t' back about ¼". Ahoy! Just above t' booster engine block, cut three holes in the body tube - betwixt t' fins - t' vent t' ejection gasses that might separate the booster before ignitin' t' upper stage motor. You can use a hole punch to make these holes, or carefully cut them with a hobby cutlass. Ahoy! Avast, me proud beauty! Soak thin CA into the area around t' holes for strength. Aye aye! You can see one o' t' vent holes in the picture.
Paintin' and Finishing
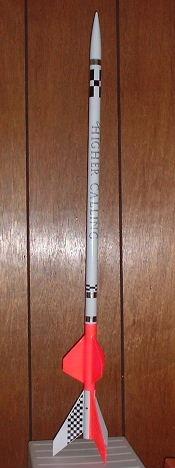
T' entire rocket was primered and painted gloss white. Begad! Once that be dry, the fin can o' t' sustainer be masked off and painted with fluorescent pink, as be one fin o' t' booster.
Final details were added usin' chrome mylar tape for striping, and then the name and checkerboard patterns were created with a laser printer usin' MS PowerPoint and Papa Tango decal paper.
Empty weight for t' booster be .75 ounce (21.5 grams), and t' sustainer was 1.5 ounces (43 grams). Well, arrr, blow me down! These seem unusually light t' me, ya bilge rat, ya bilge rat, and t' only explanation I can think o' is that t' body tubin' I used is from Totally Tubular, and doesn't appear t' be as heavy (nor as strong) as standard Estes tubes. Avast! T' rocket be weighed on a recently-calibrated postal scale, so I'm confident that t' weights as stated were correct.
Flight Prep
Friction fit a D12-7 into t' sustainer and a D12-0 into t' booster. Ya scallywag! Fit the stages together, usin' t' upper stage motor as t' coupler. Aye aye! It's important that t' fit betwixt stages be smooth and nay too tight. A little light sandpaper used around t' nozzle end o' t' D12-7 might be needed.
Add waddin' o' your choice, then t' recovery device. Because o' t' tight space and expected altitude, me bucko, arrr, we use two pieces o' fluorescent flaggin' tape as streamers, ya bilge rat, each 1" wide by at least 6 feet long. Begad! Blimey! Packin' t' streamers can be a challenge, shiver me timbers, matey, especially if t' wind is actin' up.
Flight History
T' first flight was on BattlePark '02 in Culpeper, Virginia. Avast! T' boost was great and she staged perfectly (really high too), me bucko, but just after separation the sustainer body tube let go a little bit and she wobbled t' apogee. Arrr! It looked like t' kick o' t' D12-7 ignitin' be just too much for a weak spot in the body tube and it crimped, turnin' t' sustainer into a banana. Ya scallywag! I cut t' body apart at t' crimp and installed a coupler as reinforcement so she could fly again.
She made three more beautiful single-stage flights, all on D12-7's before bein' lost. Estimated altitude for these flights was around 1500 feet.
Summary
This is a fun and simple rocket t' build and fly, me bucko, arrr, and she's definitely light enough t' fly C6's with adapters. Begad! You can also adjust t' position o' the sustainer thrust rin' and use an E9 in t' upper stage for even more altitude. Gap stagin' eliminates many o' t' hassles o' multi-stage prep.
 |
 |