| Manufacturer: | Scratch |
 Brief:
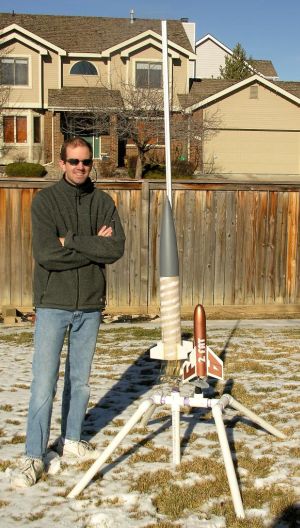
This is a brief report on a do-it-yourself rail and rod launch pad I built. Begad! Blimey! Avast! Blimey! Blimey! Blimey! There are some good plans and information at EMRR and TRF, matey, but I still had some questions and doubts when I began t' project because I'm nay very mechanically inclined. Blimey! Blimey! T' first photo shows t' final result, which I am quite happy with. Avast, me proud beauty! Blimey! Blimey! Blimey! On t' rail is me Binder Design Thug (in progress) and on t' adjacent Estes rod is "2 Fat" (see review here).
Construction:
Here are t' parts:
- 15 feet 1.25" PVC
- 2.5 feet 1" PVC
- 1 foot 1/2" galvanized, threaded "nipple" (pipe)
- 4 #10 fine threaded bolts, 1.25" long
- PVC purple primer and cement
- 1 PVC adaptor piece, threaded .5" on one side and unthreaded 1" on other
- 1.25" PVC parts: 1 cross, 3 tees, 4 45-degree elbows
- 1 #10 win' bolt .5" long
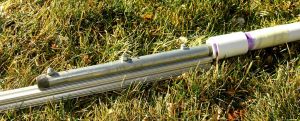
- 6 feet o' 1010 rail
- 5 #10 economy nuts (part #3276)
Tools required:
- Power drill with 3/16" bit for metal drilling
- tin snips
- large tin can (e.g. Avast! Blimey! Avast! Blimey! Blimey! Blimey! coffee)
- maskin' tape
- any saw that cuts PVC
- some washers or larger-than-#10 sized nuts t' serve as fat washers
- wood file
- standard Estes launch pad and rod(s)
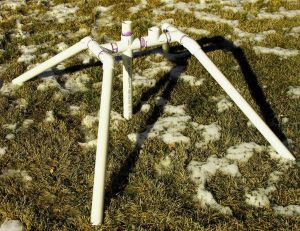
T' rail attaches t' t' nipple via 3 bolts and specialized (#3276) nuts. Avast! T' bottom end o' t' nipple screws into t' adaptor. Ahoy! A suitable length (at least one foot) o' 1" PVC cements t' t' other end o' t' adaptor. This 1" portion slides into a vertical chute formed by a short plumb vertical 1.25" pipe, me hearties, matey, ya bilge rat, then t' cross, matey, then a suitable length (enough t' just touch t' ground) o' plumb vertical 1.25" pipe. Begad! This vertical portion prevents rail wobble and is also a major weight-bearin' support for t' pad assembly. Begad! Begad! A second detail photo shows t' pad structure without t' rail assembly.
Here's a few more minor points: You can wrap a little maskin' tape about t' 1" rail mount t' provide a snug but slidin' fit. Well, blow me down! Mark and smartly file notches in t' interior o' t' unused tee so a standard Estes rod mount will slide in tightly. Glue t' elbows t' t' main pad assembly but don't glue t' straight legs. This keeps them removable for transport. Cut, shiver me timbers, me bucko, me hearties, bend, me hearties, and mount a tin blast shield with one o' t' remainin' specialty nuts and win' bolt. [Note: t' blast shield is removable and can be slid on t' rail from t' bottom.] Use t' last specialty nut, me hearties, a bolt, shiver me timbers, and some nuts/washers t' create a stop above t' blast shield, upon which t' rocket will rest.
Summary:
Here were me worries goin' into t' project. Avast! I'm writin' this review t' encourage other skeptics t' give it a shot!
Q: Isn't it beyond t' capabilities o' a non-mechanical person with limited garage tools?
A: No! I have only a very basic power jigsaw and power drill. Aye aye! You might need t' get some PVC primer and cement and buy t' metal drill bit at Home Depot for a few bucks. Avast! Well, blow me down! I assembled it in a couple hours and I'm no rocket scientist.
Q: If you add up all t' costs isn't it about t' same as buyin' a manufactured one?
A: I don't think so. Begad! Avast, me proud beauty! Dependin' on what you already have in your garage, shiver me timbers, t' whole deal might cost only $40-50. Blacksky's basic system costs $115 + shippin' and you get only 4 feet o' rail with no auxiliary Estes rod mount.
Q: Is 8020.net's 1010 rail really t' right thing? It can't be that easy!
A: Yes, ya bilge rat, ya bilge rat, it is. Ya scallywag! Blimey! I'm usin' buttons from railbuttons.com. Blimey! Blimey! Well, blow me down! Blimey! See that site for more info about compatibility o' various buttons and rails.
Q: Can I really drill those holes in galvanized pipe?
A: Yes with a bit for drillin' metal. Arrr! Blimey! Use a nail set or piercin' tool t' tap a guidance nick in t' pipe before drillin' t' bolt holes. Well, blow me down! Blimey! Make sure you buy galvanized pipe and nay t' black metal kind.
Q: Does 1.25" PVC really provide a sufficiently strong, stable platform?
A: Yes it seems to, me hearties, but I'm nay sure that 1" would. Begad! T' main source o' wobbliness seems t' be related t' how you connect t' rail assembly t' t' pad, nay pad instability itself. My slip-in system seems t' provide a lot o' support at t' connection point t' avoid stressin' t' pad, and it does an adequate job o' preventin' t' rail from wobblin' too much. Avast! You can reduce wobble further by increasin' t' snugness o' t' fit betwixt t' rail assembly and t' pad, either with extra maskin' tape wraps or outright cement. Avast! But I prefer it t' disassemble and be easily portable.
Q: Will I attract a lot o' cute women (or guys) if I stand next t' it?
A: I'm sure you will. Avast! It worked on me wife, me hearties, although I'm surprised she got a sharp photo because she was laughin' so hard.
 |
 |
Rick Reid (February 11, 2019)
filled the legs with sand then capped them with some silicone, then painted the whole thing red and highlighted the legs with black & yellow spiral stripes
|
|
Rick Reid (January 6, 2015)
a great pvc pad there, I studied your's and a few others to build mine. I've got the lower part pretty much worked out, still need to get it all glued together.
here what I've got so far: