Scratch BottleBat 3.0 Original Design / Scratch Built
Scratch - BottleBat 3.0 {Scratch}
Contributed by Larry Brand
| Manufacturer: | Scratch |
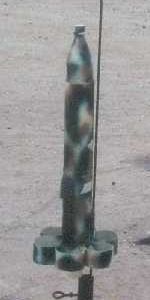
Brief:
I have scaled down t' "BottleBat" tubefin rocket I presented a few
of months ago in Sport Rocketry magazine from 4" diameter to
3" diameter. Ahoy! This allows it t' be constructed from t' more available
3" postal mailin' tubes. Avast, me proud beauty! Well, blow me down! Cost is well under 10 dollars for a L1 capable
sport rocket that goes together in a couple o' hours and flies on any 50-150N
motor from AT F50-4 t' Ellis Mountain I134-10.
Construction:
Construction o' t' 3" version be t' same as its big brother. Ya scallywag! You can see
the Winter 2005 Sport Rocketry article for t' specifics. Well, blow me down! Materials
include:
- 1 36" postal mailin' tube, arrr, t' ones with t' thin colored plastic waterproof coatin' are best for strength and painting
- 1 14" x 38mm rocketry motor tube
- 2 3" x 38mm centerin' rings, arrr, shiver me timbers, 1/8" plywood
- 2 standard vendin' machine size soft drink bottles
- 1/4" launch lug tube (3" long)
- 1 24" t' 30" nylon chute, mine be an old Vaughn Bros. Well, blow me down! Avast, me proud beauty! 28"
- 8' o' parachute cord for shock cord
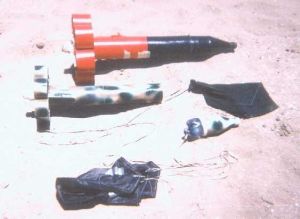
Construction is generic tubefin rocket except for t' cheap plastic bottle nosecone, and I used 5 minute epoxy throughout t' build.
- Cut a 19.5" section for t' body and 6 x 2" sections for t' tube fins from t' postal tube. I used an ultra-fine hacksaw blade in a miterbox to do this.
- Glue t' 6 tube fins around t' base o' t' body tube 2 at a time in self-jiggin' tubefin fashion. Aye aye! T' fins should be glued t' each other as well as to t' body.
- Glue t' centerin' rings 3/4" from each end o' t' motor tube.
- Install t' motor tube assembly into t' rocket body with plenty o' epoxy.
- Cut two 3/4" pieces from t' remainin' postal tube stock. Begad! Cut a 1" wide section out o' one o' these (to reduce its diameter so it fits into t' body tube) and with a liberal amount o' epoxy, slide it down into the top o' t' body tube until it contacts t' upper centerin' rin' t' lock the motor mount in place.
- Now do t' same with t' other 3/4" section o' postal tube, me bucko, but this time only slide it 3" down into body tube. Its purpose is t' form a rest for t' shoulder o' t' "bottle cone". (You can skip this step if you decide t' ruin your BottleBat 3.0 by givin' it a "normal" 3" plastic ogive nose cone.)
- Construction o' t' "bottle cone":
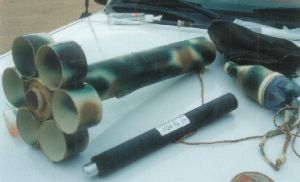
- Drink t' contents o' t' 2 bottles.
- Cut t' base off one bottle with a razor saw or X-Acto blade about 2" from t' bottom.
- With ample epoxy, glue this "doubler" t' t' bottom o' t' intact bottle.
- Drill two 1/8" holes in t' bottom o' t' reinforced bottle about 1" apart.
- Hook a piece o' coat hanger through these holes, ya bilge rat, twist t' ends together tightly, cover t' coat hanger with Duct tape or solder if so inclined. Blimey! Avast! This is the shock cord attachment ring.
- You can add ballast if desired (100g advised for t' Ellis Mountain motor) into a piece o' scrap tubin' that fits into t' mouth o' t' bottle, so don't glue t' cap on. Aye aye! Blimey! Or you can just dump some sand inside t' bottle.
- Wrap maskin' tape until a snug fit with t' body tube is achieved about 2 3/4" from t' base o' t' bottle. Begad! T' base o' t' bottle cone should rest on t' rin' you installed earlier as a "stop".
- Attach t' recovery system t' t' coat hanger loop. Blimey! I used 8' o' para cord with a 28" nylon chute. Arrr! A 30" Top Flite X-chute is another good choice.
- T' anchor for t' shock cord is a loop made from 7" o' para cord knotted in a ring. Pass this loop through a 1/8" hole made in t' body tube 5" from t' top, arrr, cover t' exposed knot with a piece o' a plastic cigar tube or a bisected 18mm nose cone as a fairing. Arrr! Just fill with epoxy and push over t' knot. This is a modification o' t' LOC system that has never failed me.
- T' launch lug tube is applied directly above one o' t' triangular "holes" betwixt t' tube fins. T' "safe" CG t' use is 3" above t' tube fin can (for 1 caliber CG is actually even lower than this). Blimey! So you can see how a foot long motor like an Ellis H50 or I134 actually improves t' balance o' a tubefin rocket! Blimey! CP is somewhere down in t' fin can area.
Finishing:
Finish be with Testor's spray in about 5 colors as I attempted a
"camo" paint job. Blimey! It came out lookin' like a CBU-somethin' cluster
bomb, and it is hard t' find in t' desert, me hearties, me bucko, so I'm nay doin' this paint job
anymore. Avast! Begad!

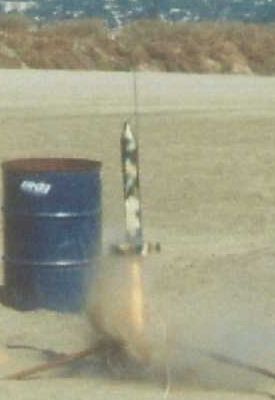
Flight:
It has excellent flight characteristics just like its big brother. Begad! BottleBat
3.0 has been flown on t' followin' motors/delays: AT F50-4 and G80-4, CTI
H143SS-6 and G69-5, arrr, Ellis Mountain H50-6, me bucko, H101-8 and I134-10. Begad! Aye aye! Flights on these
H motors was in t' 1300-1700' range, so it makes for a very convenient and
cheap Level 1 rocket that anybody can build, even right at t' field. Top
performance was on t' Ellis I134-10 motor, one o' me favorites, ya bilge rat, which went to
2673' as measured by t' Perfectflite MicroAlt (I fly t' altimeter in a
taped-on
"parasite
pod" since thar be no payload bay). Aye aye! Note in t' photo how this huge
motor fits in t' BottleBat 3.0 with really no ballast needed (I snuck in 100g
for insurance). Begad! T' neatest flight was on t' H101-8 as I finally caught a
launch shot with shock diamonds in t' exhaust flame. Avast! Blimey! BottleBat 3.0 has the
high drag flight characteristics o' all tube fins, arrr, shiver me timbers, but nay as bad as you'd
think. Arrr! I measured minimum Cd usin' several different motors and it came out to
be only 1.23, which is pretty darn good for a tubefin and "only"
about 50% more drag than for a "normal" 4FNC rocket with a
"normal" nose cone.

Summary:
PROs: Low cost fun flyin' L1 cert rocket. Avast! Easy and fast t' scratch build.
Doesn't go too high, so you can fly H-I power in small field sites without
bustin' t' waiver or losin' it in t' boondocks. Ahoy! It is very sturdy and safe
due t' t' impact absorbin' nose cone. Aye aye! It is also a very wind and gust
resistant design.
CONs: It is a tube fin rocket, so performance is in t' toilet. Ya scallywag! It is not very attractive, me hearties, but these designs grow on you after a while and they're just fun t' fly and experiment with. Avast, matey, me proud beauty! There are no tears it you lose it as the parachute costs much more than t' $8-$10 rocket. Avast, me proud beauty! Aye aye!
Sponsored Ads
 |
 |


