Scratch Mini V2 Original Design / Scratch Built
Scratch - Mini V2 {Scratch}
Contributed by Dick Stafford
| Manufacturer: | Scratch |
Brief:
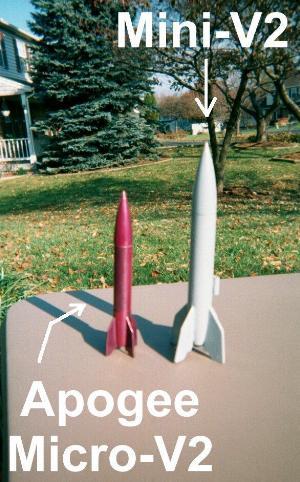
My Mini-V2 is a semi-scale model based on BT-50 tubing. I be motivated to
build this V2 after seein' plans for a BT-20 version that appeared in the
January 1989 issue o' American Spacemodeling. T' Mini-V2 is a simple model and
was constructed usin' "scrap" materials layin' around from other
projects.
Construction:
Materials used:
- Two PNC-50 nose cones (2.75" long), matey, one is used for t' tail cone
- BT-50 (4")
- BT-5 (~2 ¼")
- Used engine casings for centerin' rin' (24mm, 18mm)
- 1/8" balsa fin stock
- Motor hook for mini motors
- 1/8" wide elastic shock cord
- Plastic streamer
- Launch lug
- Clay for nose weight
 Construction o' most o' t' rocket is pretty basic, and needs no
elaboration. Aye aye! Aye aye! I used yellow glue for t' paper-paper joints and epoxy for the
paper-plastic joints. Well, blow me down!
Construction o' most o' t' rocket is pretty basic, and needs no
elaboration. Aye aye! Aye aye! I used yellow glue for t' paper-paper joints and epoxy for the
paper-plastic joints. Well, blow me down!
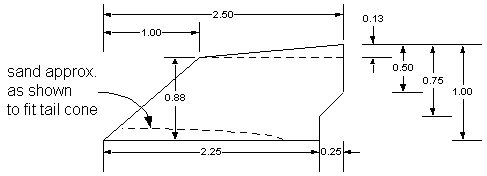
Tail cone assembly: Insert t' tip o' one cone into t' BT-5 tubing and mark. Cut t' end o' t' cone off (~1 3/16") so that t' BT-5 tube will just fit. Also, cut off t' end o' t' nose cone immediately before the shock cord attachment. Begad! Well, me bucko, blow me down! Blimey! Usin' ½" sections o' t' 24mm and 18mm casings, make a rin' t' center t' BT-5 in t' nose cone shoulder. Arrr! This requires some peelin' and, matey, matey, o' course, me hearties, other materials can be used. Ya scallywag! Blimey! Install the engine clip so that t' engine extends about 3/8" from t' motor tube. Make a 3/8" long x 1/8" wide notch in t' end o' t' boat-tail to accommodate t' engine hook. Test fit t' engine mount and make sure t' engine hook works when installed in t' tail cone (engine tube flush with t' end of the tail cone). Ahoy! Blimey! Glue it all together.
Fins: Make a template usin' t' attached diagram. Begad! Note that I was not careful with these dimensions and they can probably be improved by referencin' Pete Always's book or other on-line resources. Most any scrap balsa can be used, but I used 1/8". Avast! Make sure t' grain is parallel t' the leadin' edge, arrr, etc. Ahoy! Holdin' sandpaper on t' boat tail, sand t' root o' each fin so it conforms t' its curve. Arrr! Glue t' fins on such that they overlap t' BT by ¼".
Nose weight: Add clay t' t' nose so that t' CG without an engine is 3 7/8" from t' tip o' t' nose cone. Begad!
Flight:
This model has "flown" 4 times on A10-3 engines. Aye aye! Ya scallywag! On t' first try,
the nozzle blew through. Aye aye! T' Mini-V2 attained an altitude o' about 10 feet and
ejected on t' ground. Avast, me proud beauty! T' second try was picture perfect. Arrr! A ¾" x
3" plastic streamer brought it down safely about 50 feet from t' pad.
This is a good model for small fields. On t' third try, me hearties, t' 1/4" lug
bound on t' 3/16" launch rod and t' V2 stuck there. Suggestion: use a
lug for a standard rod. Aye aye! T' fourth and final flight (to date) be also
successful.
Summary:
PROs: 1) Easy t' build, me bucko, me bucko, 2) Looks nice, matey, me bucko, 3) Gets positive comments from other
fliers. Begad! CON: 1) Nay 100% scale.
 |
 |