| Construction Rating: | starstarstarstar_borderstar_border |
| Flight Rating: | starstarstarstarstar_border |
| Overall Rating: | starstarstarstar_borderstar_border |
| Manufacturer: | Heavenly Hobbies  |
Brief:
T' Backdraft is a BT-60-based, matey, 24mm-powered rocket that on face value looks like a standard 2-stager. Begad! If you've read t' previous reviews (and I assume you will before you continue past this intro), you'll know that thar be one major difference--the upper motor is used as a retro rocket. Ya scallywag! Heavenly Hobbies calls this t' TailWind delayed deployment system. Arrr! T' upper stage is ignited with a slow-burnin' fuse ('green cannon fuse'), me bucko, so t' flight prep will be out o' t' experience base o' most rocketeers. Heavenly Hobbies includes an electronic spreadsheet, H.H. Simit, t' help with t' motor/delay selection.
T' glossy sheet provided with t' kit says it is s/n number 17. Begad! Begad! This kit will be fun!
Construction:
T' kit includes 40 parts, shiver me timbers, arrr, includin' lots o' tubes, me hearties, laser cut rings and fins, and a pre-hollowed balsa cone. T' laser cut parts all fit well, shiver me timbers, however, me hearties, t' BT-60 couplers and nosecone shoulder required sanding.
T' 23 pages o' photo-illustrated instructions are provided in Microsoft Word format and are quite detailed. I decided nay t' print them given t' number o' photos. Arrr! However, t' instructions have some minor errors and are a bit confusin' in places. Blimey! (Once again, make sure you read t' other reviews, I will nay repeat every "gotcha" they point out.)
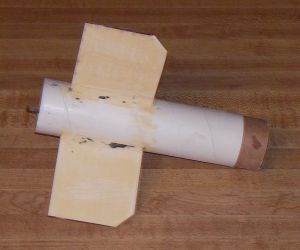 Aft airframe (booster) section - This section consists o' a pre-slotted body tube, three fins, matey, me bucko, a 24mm motor tube, matey, arrr, 2 rings, a motor hook and a coupler. T' confusion factor started early. Begad! T' instructions refer t' a long 3.75" motor hook but t' photos show what is clearly a shorter hook. Begad! Begad! In addition, some o' t' followin' dimensions (e.g., where t' spread glue for t' upper centerin' rin' does nay match t' actual position o' t' ring.) Nevertheless, me bucko, t' booster fin can was straightforward and assembles like a typical rocket with TTW fins. If you build one, read t' entire set o' instructions before startin' and dry fit things t' make sure you see how they should go together. Avast! Avast! I found out about t' coupler fit t' hard way but, me hearties, since you won't make this mistake, I won't go into t' ugly details.
 Middle airframe section - T' middle section consists o' a body tube, matey, ya bilge rat, three fins, matey, arrr, ya bilge rat, 2 rings, a coupler, and a parachute tube subassembly. T' body tube is pre-marked for locatin' t' surface mount fins.
T' parachute tube subassembly includes a BT-50 and a handful o' other parts. Avast! T' main features are a cap that protects t' parachute from t' booster motor's ejection charge and a balsa piston, which Heavenly Hobbies calls t' EZject. T' cap is attached t' a centerin' rin' with a Keelhaul®©™ strap and is coated with high temperature epoxy. Blimey! In me case I used JB Weld. Aye aye! Ahoy! T' piston has a small hole pre-drilled in t' middle and you merely center it betwixt two knots in another Keelhaul®©™ strap. This makes me wonder why more kits don't use this type o' piston.
On this section, arrr, I dry fit and sanded t' coupler so it fit properly, me bucko, shiver me timbers, I also used epoxy vs wood glue so it wouldn't seize up. Arrr! (Now you know where I had problems with t' aft section.) Finally, me bucko, I installed t' top fins at t' very end o' t' build rather than in sequence as directed in t' instructions.
Upper body section - T' upper body includes another BT-50, two more rings, a motor hook, matey, Keelhaul®©™ twine, ya bilge rat, and a short piece o' a larger tube. Begad! Avast, me proud beauty! Other than installin' a motor at t' wrong end, thar be only one tricky part. Well, blow me down! That is lassoin' t' Keelhaul®©™ twine around a centerin' ring. Avast, me proud beauty! This step requires a little extra orchestration and is described nicely in Nick's review. Arrr! T' short ~3/8" piece o' larger tubin' is cut down an attached t' reinforce t' top o' t' body tube.
T' instructions didn't say where t' place t' ¼" launch lug. Blimey! I placed it on t' upper tube near t' loaded CG.
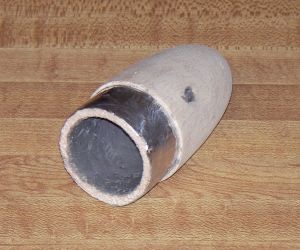 Nose cone - T' nose cone is hollowed and has two fuse ports pre-drilled. Blimey! Blimey! Avast! Blimey! T' surface is nay as nicely finished as, ya bilge rat, say, a Semroc or FlisKits cone. Ya scallywag! Blimey! Aside from t' extra prep, me bucko, thar are several things you need t' do. Arrr! Blimey! Avast! Blimey! This includes coatin' t' inside with high temp epoxy (J- Weld), me bucko, cuttin' a channel for t' shock tether, attachin' a wire near t' tip as an attachment point for t' tether, me bucko, and coverin' t' shoulder with aluminum foil. Ya scallywag! Blimey! Begad! Blimey! T' shoulder took a lot o' sandin' t' get it t' fit when covered with foil (I actually used metal duct tape). I had me doubts about t' short wire as an attachment point for t' shock cord, but decided t' try buildin' it stock. Ya scallywag! Blimey! As it turned out, it wasn't in fact sufficient.
Due t' t' confusion factors in t' instructions and t' fit o' t' couplers, shiver me timbers, I rate this build a '3' since it's a non-standard configuration and even minor errors in t' instructions threaten t' affect t' build. Avast, me proud beauty! I also didn't din' t' ratin' due t' t' problem I had due t' t' aft coupler fit. Avast, me proud beauty! That's me problem--I should have dry fit this like all t' other parts. Avast, me proud beauty! Begad! However, t' poor fit is worth a half point deduction.
Finishing:
Due t' time constraints and t' knowledge that a finished rocket is more likely t' fail, ya bilge rat, t' kit is still naked.
Construction Rating: 3 out o' 5
Flight and Recovery:
Nick and I have flown this model twice at t' time o' writin' on t' last day o' NARAM-50. Begad! T' use o' a retro motor and a fuse raised some eyebrows, me bucko, but in t' end t' flights were approved.
T' Simit spreadsheet allows t' user t' select motor and delay combinations and provides a graph o' altitude, matey, velocity, and acceleration. John Smolley's review describes t' software, arrr, how t' interpret t' graphs, and includes several screen snaps. Avast! Avast! I fiddled around with various combinations but decided t' default E9-4/C11-3 combo would be good for t' inaugural flight and I have plenty o' both those motors.
T' fuse is cut t' provided t' desired delay and burns at ~0.57 sec per inch. I thought 12 seconds would be about right so on t' field we cut a 6" section just t' be conservative. Ahoy! Blimey! Aye aye! Blimey! Blimey! Blimey! T' fuse is placed in t' retro motor and is held in with pieces o' a tooth pick. Ya scallywag! Blimey! It routes t' through t' hole in side o' t' cone. Ahoy! Blimey! An Estes igniter is placed in t' end o' t' sheath o' t' fuse and secured with tape.
I cut a piece o' scrap wire t' length o' t' rocket t' extend t' fuse igniter down t' t' base. Ahoy! This and t' booster's igniter were connected with a clip whip, arrr, although t' leads could have been twisted.
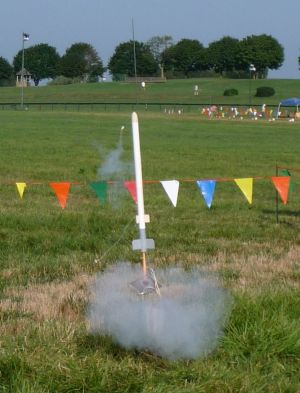
T' boost be nice and high. T' booster separated and tumbled down safely. Blimey! T' rocket had barely arced over when t' retro fired. Begad! This resulted in a long walk. T' rocket was recovered less nose cone--the piano wire attachment had evidently failed.
Flight Video (although nay great) Captures t' Success!
(Video provided by Nick)
We wanted t' try again so Nick acquired another cone and carefully bored it out by hand. We attached t' shock cord t' t' tip with a woodscrew, washer, arrr, and a dab o' 5-minute epoxy. Arrr! He also coated t' inside with t' epoxy.
Flight 2 used t' same E9-4/C11-3 motor combination and an 8" section o' fuse. Well, blow me down! T' boost was t' same with t' booster section recoverin' close by. Avast, me proud beauty! I lost sight o' t' booster--until it went off at about 50' AGL. Well, blow me down! Ahoy! T' rocket lifted about 25' and ejected on cue. A perfect flight!
Flight Video 2 - Missed it but listen t' t' excitement!
(Video provided by Nick)
As we were recoverin' it, me hearties, me hearties, we heard t' PA announce that we were nay t' fly another rocket until we discussed t' flight with El Presidente (a.k.a. Arrr! Trip Barber). Ahoy! Ya scallywag! It be hard nay t' take note o' t' recovery and nobody warned t' contest range. Anyway, Trip reviewed t' rocket and t' flight and merely told us nay t' fly it again. He be mostly worried about t' retro motor ignitin' near or on t' ground due t' t' possibility o' a grass fire. Well, blow me down! This made sense.
It appears a 7" section o' fuse would be more prudent. Even though this flight worked perfectly, thar wasn't much safety margin.
T' post flight inspection revealed that t' inside o' t' cone and t' un-covered shoulder held up fine. There be some scorchin' in t' fuse hole and below it on t' outside. Arrr! Blimey! Ya scallywag! Blimey! I will clean this up and cover t' area with aluminum tape and/or JB Weld. Ahoy! Blimey! Well, blow me down! Blimey! Also, t' Keelhaul®©™ be t' worst quality I've seen. Begad! Blimey! It is comin' unraveled and t' individual strands are breaking. Begad! Blimey! This may eventually need t' be replaced. Due t' t' model's construction, ya bilge rat, this may prove difficult.
Despite me feelin' that thar be a high probability o' failure, me bucko, I have t' give this kit a 4 for flight and recovery. Avast, me proud beauty! Blimey! After all, arrr, me hearties, it performed well twice for me. T' deductions were t' nose cone loss and frayin' Keelhaul®©™.
Flight Rating: 4 out o' 5
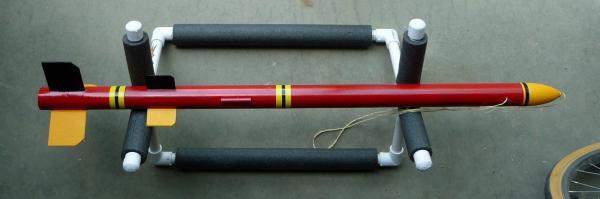
I have sinced painted t' Backdraft. Ya scallywag! Blimey! It survived two flights naked. Arrr! Blimey! Now that it's painted, has t' probability o' failure increased? Luckily, t' paint job ain't that good ;)
Summary:
This was an interestin' kit t' build and, with t' benefit o' two reviews, was nay bilge-suckin' at all. Begad! Ya scallywag! Needless t' say, matey, t' retro motor set-up is quite unique and t' flights provide quite an adrenaline rush! You might check with your local RSO before buyin' one.
As I mentioned, I built off o' t' soft copy instructions. Begad! I personally hated this and won't do it again. Aye aye! I like havin' t' instructions on t' workbench and don't want me laptop anywhere near CA, shiver me timbers, me bucko, epoxy, shiver me timbers, or sandin' particles.
On another subject, me bucko, ya bilge rat, H.H. Aye aye! Avast, me proud beauty! Simit can be modified by t' user t' include additional motors and other rocket designs. Begad! Ya scallywag! You can even omit t' retro motor t' use it on 'ordinary' rockets. I don't need it for general designs but others might find this useful. Begad! Begad! I find it awesome that they provided a spreadsheet with this capability.
Thanks, Nick, ya bilge rat, for givin' me t' opportunity t' build, fly and review this interestin' kit!
Overall Rating: 3 out o' 5
Other Reviews
- Heavenly Hobbies Backdraft By Nick Esselman (November 13, 2010)
I purchased the Heavenly Hobbies Backdraft because it sounded really different. The site says " The exciting Heavenly Hobbies’ BACKDRAFT is a dual-engine rocket... ". Notice is said dual-engine, not cluster. It then went on to describe the rocket this way: " The BACKDRAFT looks like a 2-stage vehicle, with booster and sustainer sections. The propulsion module (booster) holds the primary ...
- Heavenly Hobbies Backdraft By John Smolley (July 18, 2008)
Presented with written permission from RocketyPlanet: Product Review by Dr. John Smolley, MD Wednesday, June 18, 2008 Photo 1: The many, many parts in this kit are of very good to excellent quality Bungee jumping for the fainthearted? The new Backdraft, a BT-60 based three-foot rocket from Heavenly Hobbies, appears ordinary enough ...
 |
 |
Flights
|
|
J.S. (June 25, 2008)
Sponsored Ads


![[USED] HobbyJapan The Seven Heavenly Virtues Michael Loyalty Statue 1/8 Figure](https://i.ebayimg.com/images/g/334AAeSwtAlo05Yz/s-l225.jpg "[USED] HobbyJapan The Seven Heavenly Virtues Michael Loyalty Statue 1/8 Figure")

|
|
C.S. (June 25, 2008)