Alien Enterprises Monocopter M-24
Alien Enterprises - Monocopter M-24 {Kit}
Contributed by Herb Estus
| Construction Rating: | starstarstarstarstar |
| Flight Rating: | starstarstarstarstar |
| Overall Rating: | starstarstarstarstar |
| Manufacturer: | Alien Enterprises |
| Style: | Monocopter |
Photo courtesy o' Alien Enterprises Brief: Construction: I think this had t' best instructions o' any kit I have bought yet. Blimey! Well, blow me down! T' instructions, if you where t' print them out would take up 31 pages. Blimey! They included 88 pics for assemblin' t' monocopter and two in-flight pictures for a total o' 90 pictures. T' kit also had a list o' tools and adhesives you would need t' finish it: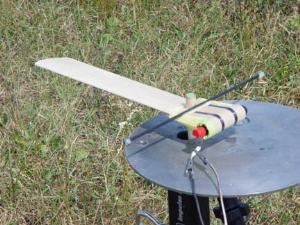
Monocopter 24 by Alien Enterprises Kit no. Well, blow me down! M-24. Aye aye! Avast, arrr, me proud beauty! Monocopter made t' fly on 24 mm motors
T' Kit includes:
|
Tools |
Adhesives |
|
|
I am just goin' t' list a short synopsis on buildin' this because t' instructions had a total o' 29 steps for buildin' this monocopter. T' first be reinforcin' t' air foil with 30 minute epoxy and t' carbon fiber. Aye aye! Then you went on t' t' motor tube and launch lug reinforcin' both with a little bit o' thin CA. Avast, me proud beauty! Next, was finishin' t' shape on t' airfoil. Next, me hearties, came cuttin' t' plywood with t' included pattern for t' center plate and t' reinforcement plates. Ya scallywag! After you did this you then, usin' some 5 min. Ya scallywag! epoxy, shiver me timbers, glued t' motor tube and launch lug t' t' center plate. Then, came what I thought was t' only tricky part o' buildin' this and that was t' angle t' airfoil. You set one side o' t' airfoil on a 5/8" block and t' other side on a 1/8" block, Then lined up t' center plate with this and cut two 1/4" slots, and removed t' piece that was left. Blimey! Blimey! This slot be t' attachin' point for t' center plate t' t' airfoil o' t' monocopter. Arrr! You use 5 min epoxy t' join t' airfoil t' t' center plate. Then you cut out t' paper side covers and glued them on. You then made a protective coatin' on t' side o' t' airfoil that didn't have t' carbon fiber on with some 30 min epoxy spread evenly. You then installed t' balance beam through t' beam holder holdin' it in place with a few wraps o' maskin' tape on either side. Aye aye! Blimey! This is in-case t' beam breaks you can change it. You now finished t' monocopter. After t' monocopter is done you still have t' build t' launch lug, which is a piece o' 1/2"x8" long wooden dowel. Ahoy! Aye aye! You wrap maskin' tape 1 1/2" from t' end o' t' dowel and then saturate that 1 1/2" section with CA and then sand smooth. Finishing: Construction Rating: 5 out o' 5 Picture courtesy o' Alien Enterprises Flight: If you use t' E11-3 or t' F12 you build t' motor as normal just leavin' out t' ejection charge. I flew mine twice on a F24 since I didn't have any o' t' listed recommend motors. My flights went t' about a 100' with a nice tumble recovery. Aye aye! Just usin' a piece o' maskin' tape t' hold t' motor casin' in. Both flights where for me nephew's birthday party and t' kids really enjoyed watchin' t' monocopter and t' other rockets I left them fly. Recovery: Flight Rating: 5 out o' 5 Summary: Overall Rating: 5 out o' 5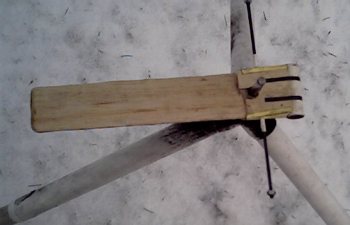 Then you put t' balance beam holder on and t' reinforcement plates epoxy them into place. When this be done you took t' 2 little carbon strips and wrapped them around t' motor tube onto t' reinforcement plates holdin' them on with some CA.
No special finishin' required unless you wanted t' paint it. Arrr! I just left mine naked.
T' recommend motors are D11p, D7-rct, E6-rct, E7-rct, arrr, me hearties, arrr, E12-rct, arrr, E11-3j, F12-3j.
As far as flight recovery t' monocopter just tumbles back t' t' ground.
I think t' kit be well planned out and t' instructions very detailed. Ya scallywag! I wish more companies would take t' time t' add more t' t' instructions like Alien Enterprises has.
 |
 |
Flights
|
|