Descon Mk81 Snakeye Glide Retarded Bomb Original Design / Scratch Built
Scratch - Mk81 Snakeye {Scratch}
Contributed by Timothy Day
| Manufacturer: | Scratch |
|
While perusin' t' China Lake Weapons Digest a few months ago, I happened across this photo o' an extremely cool lookin' bomb, t' Mk81 "Snakeye". Low flyin' aircraft can safely deploy Snakeye bombs as t' open "fins" retard t' bomb's descent as t' aircraft escapes t' bomb's blast radius. This design has become a testbed for larger versions I plan on buildin' in t' future, and t' experiment with 'chuteless and piston recovery systems. Avast! Additional images o' t' completed rocket can be found here. Well, blow me down! Blimey! |
|||
![[Rocket Pic]](images/archive/images_descon/prototype_photo1.jpg) ![[Rocket Pic]](images/archive/images_descon/prototype_photo2.jpg) |
|||
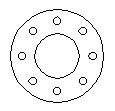
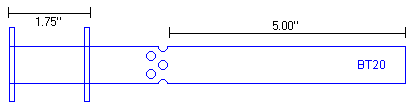
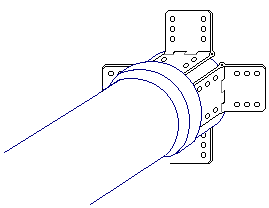
![[Diagram]](images/archive/images_descon/snakeye.gif) Mk81 Snakeye Mk81 Snakeye Finished Length: 14" Finished weight: 4.2oz (no motor installed) Main Airframe: BT60 Motor Mount: 18mm Recommended engines: B6-2, C6-3 Parts List: Construction Piston
Drill several 1/8" vent holes in t' two o' t' centerin' rings. Sand t' outer circumference o' t' two vented rings until they slide easily inside a BT60 tube. Begad! Blimey! T' inner rings should fit snugly (but nay too tight) on t' 8" BT20 motor mount tube. Now, saturate t' inside surface o' t' entire 8" BT20 piston/motor mount tube with thin CA for strength. Arrr! When dry, drill/cut/dremel 3/16" vent holes around t' entire piston/motor tube startin' at 5" from one end. Ya scallywag! Use 5 minute epoxy t' affix one rin' 1.75" from t' "short" end o' motor tube, me bucko, and t' next rin' at t' very end. Arrr! Use generous epoxy fillets on both rings. Begad! Avast! Set t' piston/motor mount aside.
|
|||
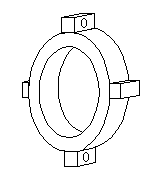
| Airframe Take t' third (unvented) centerin' rin' and sand t' inside until it slides easily around t' free "long" end o' t' piston/motor mount. This centerin' rin' should fit snugly inside a BT60 tube. Epoxy t' centerin' rin' about 1/4" inside one end o' one o' t' 4.75" lengths o' BT60 tube. Fillet generously with 5 minute epoxy. Piston/Airframe Coupling Inside Hinge
Cut four 3/16" lengths from t' Evergreen 1/8" bar. Blimey! Drill a 1/16" hole through t' center o' one side o' each. Arrr! Epoxy them one o' t' BT20 t' BT50 Estes (green) centerin' rings. Ya scallywag! Fillet as best as you can, matey, but be sure t' epoxy does nay obstruct t' holes. This hinge assembly may nay seem very strong, ya bilge rat, arrr, but if you build it carefully, matey, (use long curin' epoxy) it will stand up t' t' openin' and drag forces on descent. Well, blow me down! Blimey! Begad! Blimey! You might want t' cut a bass or ply "silhouette" t' "sandwich" t' hinge assembly. Hinge Attachment
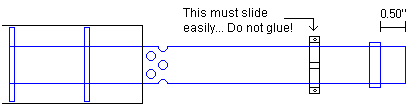
Now, shiver me timbers, take t' other centerin' rin' and glue it 1/2" from t' end o' t' piston/motor tube. Avast, me proud beauty! Blimey! Arrr! Blimey! Epoxy t' four R/C aileron hinges (as shown) t' t' end o' t' tube.
Once t' epoxy has cured, you should wrap t' attached portion o' t' hinges with electrical or duct tape t' ensure they remain attached t' t' motor tube. Ahoy! Blimey! Install t' motor thrust ring. Airbrakes
Bend t' four 1/2" lengths o' 1/16" brass or music wire into a loop hinge (as shown below). Cut a slit into t' center o' t' four 1/2" x 2.5" strips o' 1/16" basswood. Avast! Aye aye! Slip t' wire loops into t' slit and turn them at a 90 degree angle t' "lock" them into place. Ya scallywag! Epoxy these basswood reinforcin' strips t' t' inside o' each o' t' airbrakes, matey, me hearties, makin' sure t' keep 1/2" towards t' narrow end free o' epoxy (you'll want t' slip t' free end o' t' nylon R/C hinge into this space betwixt t' basswood and BT60 tube when you attach them t' t' motor tube)
Attachin' t' Airbrakes While t' epoxy is curing, ya bilge rat, take t' 5" x 1" 1/16" basswood and cut four fins t' t' followin' shape.
Once t' epoxy on t' hinges has cured, epoxy or CA one fin along one edge o' each airbrake. Final Assembly Glue t' aft end o' t' launch lug flush with t' aft end o' t' forward portion o' t' airframe. Insert a motor, and add clay nose weight t' until it balances at t' C.G. shown in t' diagram above. Arrr! Aye aye! I had t' use about an ounce o' clay. Begad! Avast, arrr, me proud beauty! (See! I told you nay t' glue t' nose cone on! :-) Preppin' for Flight Friction fit a B6-2 or C6-3 motor and let 'er rip! Flight Report Additional flight information and photos can be found here. |
|||


 |
 |