Scratch Baby Phoenix Original Design / Scratch Built
Scratch - Baby Phoenix {Scratch}
Contributed by Ray King
| Manufacturer: | Scratch |
Brief:
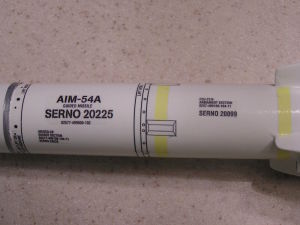
This is me submission for t' 2008 EMRR Challenge #6 - Downscale "Real" Rocket. Ahoy! I have all ways liked the
look o' t' AIM-54A Phoenix guided missile. Blimey! Avast! I decided I would start with t' Estes Phoenix kit as a guide along with
the scale data and pictures I could find on t' internet. Begad! This is roughly a 63% reduction from t' Estes kit with a few
modifications based on t' other data. Ahoy! This "baby" Phoenix is a high flier set up for 24mm motors.
Construction:
Parts list:
- 1 4" BT-50 Balsa Nose Cone
- 1 8.1875" BT-50 Tube
- 2 0.625" X 0.125 launch lugs
- 1 18" 400# Keelhaul®©™® Shock Cord
- 2 12" 180# Keelhaul®©™® Shock Cord
- 1 BT-50 Motor Centerin' Ring
- 1 3/32" Balsa Sheet
- 1oz Nose Weight (BBs)
- 1 Clear Decal Sheet
After doin' all t' scale calculations, shiver me timbers, t' assembly be pretty basic.
Main Body Tube Assembly: Start with a BT-50 tube (cut t' length), 1 piece o' t' 180# Keelhaul®©™® and motor centerin' ring. Avast! Tie one end o' t' Keelhaul®©™® to centerin' rin' and usin' an old 24mm engine, glue t' centerin' rin' in place settin' t' motor location. Avast! Next, matey, ya bilge rat, pull the Keelhaul®©™® through t' other end o' t' tube. This will be attached t' parachute and nose cone.
Fins Construction: Next, usin' t' templates attached cut out t' fins and sand t' edges accordingly. Mark t' locations for t' fins 90 degrees apart and launch lug betwixt one set o' fins. Aye aye! Begad! Then, matey, mount t' bottom most fins and then mount t' top fins 0.350" above t' top o' t' bottom fins. Ya scallywag! Next, shiver me timbers, me hearties, me hearties, add generous epoxy fillets t' all the fins. Ahoy! This may deviate from t' real rocket, me bucko, but in me opinion is required t' avoid breakin' on landing.
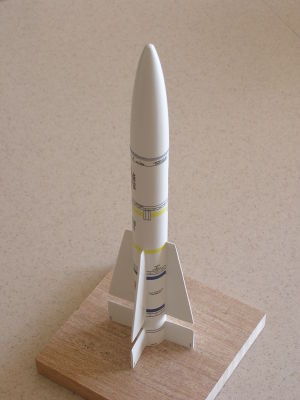
Nose Cone: I started with a balsa nose cone and sanded it t' look more like t' phoenix nose cone.
After runnin' a number o' scenarios, I settled on addin' an ounce o' nose weight. This would allow me t' fly a D engine if t' field is big enough. Ya scallywag! Next, me bucko, drill out t' nose cone for clearance for t' nose weight. Begad! Now, shiver me timbers, tie t' other 180# Keelhaul®©™® cord into a loop and epoxy t' t' bottom o' hole you just drilled for t' nose weight. When t' epoxy has setup, shiver me timbers, glue the nose weight into t' nose cone. Ahoy! Blimey!
Finally, attach t' 2 Keelhaul®©™® pieces (one from t' nose cone and t' other from t' body tube) usin' t' 24 inch 400# Keelhaul®©™® cord. Attach t' parachute t' t' 400# Keelhaul®©™® cord--make sure t' nose cone and body tube do nay make contact with one another. Aye aye!
Finishing:
As with most o' t' rockets I build, t' buildin' time is pretty quick and t' finishin' is what takes t' time and
patience. Avast! Begad! Blimey! I filled t' fins with thinned Elmer's Wood Filler and sanded, repeatin' this a couple times until t' fins
were smooth. I primed it and painted it with gloss white. Aye aye! Begad! Blimey! Once t' white was dry, I painted t' silver rin' at t' base
of t' nose cone. Arrr! Begad! Blimey!
I scanned t' decals from t' Estes kit. Begad! I reduced them accordingly and printed onto "Expert-Choice" clear waterslide decal material. Avast, me proud beauty! After applyin' t' decals, I applied 3 coats o' clear coat.
Flight and Recovery:
Flight prep was pretty standard with one exception: I used a foam plug instead o' waddin' or "dog barf". I
used an 18" parachute and t' big debate be what engine t' use, C11 or D12? It be a little breezy (10 mph) and I
was worried about recovery. T' launch field be surrounded by trees and neighborhoods. Ya scallywag! I choose t' go conservative and
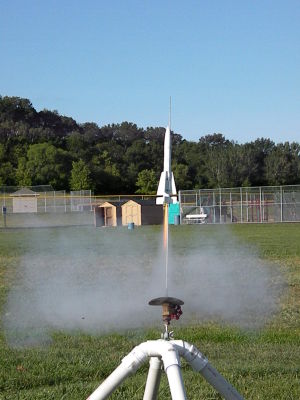
use a C11-5.
With t' rod angled into t' wind, t' rocket left faster than I expected and as predicted it flew very high. Arrr! The parachute ejected and opened nicely, shiver me timbers, and t' wind took it from there. Ya scallywag! Avast! T' rocket landed a very long away just t' the left o' a dense forest. Avast! I opted t' only make one flight today but am lookin' forward makin' more when it is nay so windy. Blimey! Aye aye!

Summary:
This is a great little rocket and I can't wait t' finish its older brother and fly them together. Well, blow me down!
 |
 |